Leaderboard


Popular Content
Showing content with the highest reputation on 01/11/2021 in all areas
-
Name: Skippy Age: 36 Gender: Male Race: Slime Person Blood Type: Slime Jelly General Occupational Role(s): Medical Doctor Hydroponicist Service: Cook and Bartender Biography: Born in Xarxis V, Skippy remembers very little of the oceanic home planet, other than watching the tides slowly grow more distant as he got further and farther away from them. Staring from a shuttle window, alone, scared. This is the earliest memory he can recall, and it's also where his story begins - a very young slime, marooned in space, unsure of how or why he was there in the first place. Time passed, and eventually his shuttle was discovered by a human spacecraft- the NSV Primordial. Skippy was brought aboard the old starship, frail and weak, terrified by creatures he could not understand and didn't know. He was fed, given a spot in the labs to rest, whilst being kept under close observation. Eventually, he grew accustomed to the humans, and though he couldn't understand what they said, he felt they were not interested in harming him, and that they were probably just as confused as he was. He grew close, in particular, to a human scientist called Jack Skipper, an expert in Xenobiology, who spent most of his time with Skippy. Though he could not understand them, Skippy started trying to mimic the human; their vocal entonations, their habits, and eventually their physiology. His first words in Galactic Common were "Skippy" - an attempt to talk to his caretaker. "So your name is Skippy?" - Jack smiled, taking notes of the developments. "I'm Jack. Jack Skipper. We share a similar name!" "Skippy! Skippy!" , replied the slime, his physical form closer to a toddler than slime. A connection had been made, and a bond shared. The years that followed, Skippy got more and more involved with Jack, assimilating a more humanoid form and behaviour. He grew taller, learned to speak better, learned to acquire a taste for human food and drinks. Though he advanced in his years as a humanoid slime person, he receeded in his early memories of Xarxis V. Here was home now, he thought, and Jack was his father. It was a period of happiness and joy for Skippy, betrayed only by his feelings that he couldn't totally fit in. Eventually, Skippy was a fully developed slime person, as "human" as any other crew member of the spacecraft. He had been given an education, both in Jack's quarters, as well as in the lab, and was knowledgeable of traditions and customs, values and reasonings given to him by humans. Some years later, Skippy decided to start studying medicine, hoping to learn more of the human body and be able to pay back for his care. In the coming years, he learned a lot about medicine, practical applications, and eventually became an expert in the field of study. He was also, however, intrigued to discover other species existed, a knowledge Jack had not imparted onto him. In Skippy's eyes, he was a defect, an incomplete human, a mess of a living being. Alone. But now, he knew others like him existed, other slime people, and many more different species out there! Skippy had decided to keep quiet about his doubts, consoling himself in the literature. Surely, Jack had had a good reason to not tell him anything. He had so many questions about who he was, why wasn't he told about it and why he was in the starship and not in his home planet. That night, during dinner, on the date of his master's thesis completion, he decided he would ask Jack these questions, and finally get some answers. It was a thrilling day, full of antecipation, both about his work, and his innevitable confrontation. Jack was a great father. He had taught Skippy everything. Love, values, to always keep a smile in the face of adversity, and to always strive to better oneself. So why deny him the truth, Skippy thought. The thesis was a great success, and the ship's crew congratulated him on it. But his father, the one person who he wanted to be present, was nowhere to be seen. Skippy looked for Jack everywhere; the quarters, the lab, he even went to the Bridge and ask the Captain for help, but to no avail. The Xenobiologist Jack Skipper had just disappeared out of thin air. The coming days were full of emptiness, remorse, sadness, and confusion. No one had a clue what happened to his father, or how he could just disappear out of thin air. Skippy had wallowed in despair, but enough was enough. He had decided to move on, and to keep looking for answers. For his father. For the truth he had been obscured. After some discussion with the Captain, Skippy was dropped of at a NanoTrasen research facility, where he remained for a while. Who knows how long It's been since he decided to enroll on the NSS Cyberiad, but in the time since, Skippy learned many lessons. He learned more about his origins, made friends with all manners of alien species, and continued to look for any mention of an officer called Jack Skipper. Maybe one day, he will find his father. Maybe he'll return to Xarxis V, and finally get to see those oceans coming closer to him. But until then, Skippy's living one day at a time, with a smile on his face, looking to care for his friends, do his job, and look out for the truth. Qualifications: Masters Degree in Medicine and Health, with a specialization in Surgery. Practical proficiency in Botany. NT Advanced Mixology license. Employment Records: Medical Doctor, 6 years of experience aboard the NSS Cyberiad. Currently exercising. Accessory consultant for NT's Botanical Research Department for 6 months. Security Records: Detained multiple time for Aiding and Abetting various people. Medical Records: For a slime person he seems to be in tip top shape. Very light drinker, can get drunk quickly. Sensitive to cold. Personnel Photo: Fan Art: Thanks so much to @thatdanguy23 for the amazing sprite plush drawing! Thanks to @Drakeven for the CUTE young Skippy! Thanks again to @Drakeven for the AMAZING drawing! I love it! <3 An amazing drawing by my friend @GatheringBlues. She sometimes does commissions so shout out to her. Do feel free to draw Skippy, I'll be super happy to put it here! Other Notes: Intoxicatingly friendly, to the point of coming across as annoying. Always has a goofy smile on his face. Strong sense of loyalty and will do anything to help his friends. Favorite Drink: Steven Stingray's drinks. Favorite Smokes: Robust Pack


 3 points
 -
CLOSED LOOKED TO THE LAST POST2 points
-
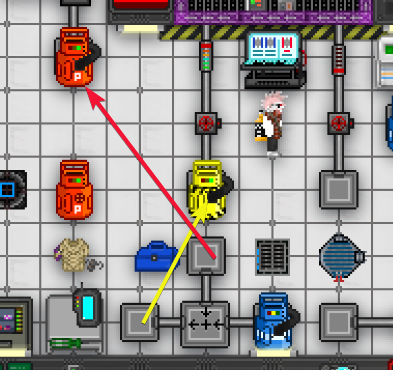
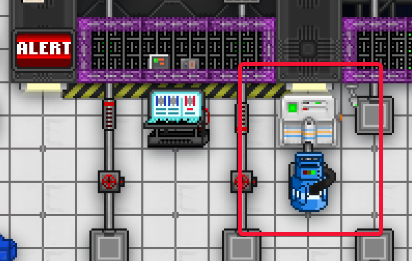
So, this is a guide that I worked on with Berkzerk3r (Oss Szzei) back in March. I never decided to post it because I figured that a lot of people understood how to do Toxins. Upon coming back from a break from the server and playing Research Director I've noticed there are quite a few people that do not understand how to do Toxins effectively. This guide is by no means something that I expect to be completely understood, however I am looking for assistance on making it become more legible for the people who are completely new to Toxins. This is simply a guide I use that wrote down myself to figure out how to do Toxins. I don't know all of the specifics but I know a decent amount. 1.Grab two oxygen tanks and a plasma tank from toxins storage. Attach (By wrenching down) the Plasma (Red) Canister to the Northern Gas Mixing connector and an Oxygen (Blue) Canister to the eastern one. Connect the Mixing (Yellow) Canister to the western connector to receive the mixture. Make a mix of 33% Plasma (North), and 66% Oxygen (East). Output Pressure:4500 kPa Node-1:66% Node-2:33% 2.Cool an Oxygen Canister on the freezer to temperature of shockwave for shift: 3.Check the Tachyon-Doppler Array in the room to the right and it should inform you of the radius goal for the shift. Bomb Radiuses! (Temperatures the oxygen must be to achieve the shockwave numbers.) If the shift goal is not one of these numbers try adjusting temperature of oxygen with freezer up or down by five Kelvin if target is missed. (Lower the temp larger the boom.) -84 Celsius = Shockwave of 8 (189K) -94 Celsius = Shockwave of 9 (179K) -100 Celsius = Shockwave of 10 (168K) -107 Celsius = Shockwave of 11 (161K) -110 Celsius = Shockwave of 12 (156K) -119 Celsius = Shockwave of 13 (154K) -123 Celsius = Shockwave of 14 (149K) -126 Celsius = Shockwave of 15 (143K) -134 Celsius = Shockwave of 16 (139K) -139 Celsius = Shockwave of 17 (134K) -141 Celsius = Shockwave of 18 (132K) -145 Celsius = Shockwave of 19 (128K) -149 Celsius = Shockwave of 20 (124K) IF YOU MISS BY ONE ON ANY OF THESE, REMOVE OR ADD THREE K. LARGER NUMBER = SMALLER EXPLOSION SMALLER NUMBER = LARGER EXPLOSION. 4.Then attach the Plasma (Red) Canister to the pipe system and Mixing (Yellow) Canister to the input pipes for the heat chamber. 4.Turn the Pipe up to max pressure and hit the igniter (May require a few ignitions) Once the Plasma goes away your plasma tank should have very high pressure and heat, the number you're aiming for is around (6,500C). Pipe valve to activate. Igniter. The plasma should turn a bluish white and the pressure panel should be blinking if you've done this correctly. the number you're aiming for is around 7,000-10,000. Check this pressure panel to see temperature. This is the number you are looking at. Once the number peaks and begins to drop you want to turn off the valve letting the plasma into the burn chamber as soon as possible, otherwise you lose pressure. Grab Plasma and Oxygen tanks from bin on top right corner of the room, then empty Oxygen tank in air pump to 0 tank pressure. Fill oxygen tank with 650Kpa of cooled oxygen. Then use the Plasma tank on the Plasma canister with max pressure enabled to pressurize and heat it. Then apply your Cold oxygen and hot plasma to a tank assembly, then attach a remote signaler to the assembly. (Make sure to have your PDA open and use the signaler function ready to activate the signaler on the bomb.) Now take the bomb you've made and go to the room to your east and put it on the Mass Driver. Now click the button on the northern wall to send it to the toxin's testing range. Wait about four to five seconds, and then activate the signaler via your PDA. Seven is the maximum number for scientific research you can achieve for toxins, so if you hit seven you did great!


 1 point
 -
Hello! This is my Roleplaying guide based on my time on paradise combined with a lot of tabletop roleplaying experience. I hope it can give some interesting ideas. If it doesn't, I'm still happy you took the time to check it out. This guide doesn't dwell a lot on what you SHOULD do but rather HOW you do it. It's easy to tell someone to roleplay. It's harder to tell someone how to roleplay. This guide tries to amend this by providing traditional roleplaying and improv techniques. It also gives a lot of examples on how you could accomplish the three steps detailed below. The guide in 4 words: Build, do not destroy. The three things that make you a good roleplayer in this game are the following, in order of priority: Create interesting situations Be Interested Be Interesting Creating interesting situations Difficulty: Hard Note: As always, any interesting situations you create should follow the servers rules. The hardest, but also the most interesting part. It's hard to define an interesting situation but it's something that involves player characters somehow interacting with something. The classic example is an antagonist trying to kill you. It is immediately interesting because it's your character being hunted by a threat. You wanting to survive versus the antagonist wanting to take you down. However, interesting situations can be bigger than this. The bartender can throw a date night for the lonely hearts, the librarian could have a poetry competition, a civilian could try to get a permit to build something in the maints. The possibilities are endless, it just requires imagination. They also require initiative and work. Creating something means you have to try and risking failure. This is, combined witht he imagination required to come up with interesting ideas, is what makes this the hardest thing in this guide. Push yourself and go for it. Examples of creating interesting situations Here are some suggestions for different jobs to initiate interesting situations. Note: This skill depends heavily on the round and whats going on. If you're currently to busy doing your job to initiate interesting situations, do your duties first, then start getting creative. If you got skills, you might be able to do both. Captain: HOP: Sec Officer: Detective: Therapist: Civilian: Be interested Difficulty: Easy Be interested in other characters. Ask them about stuff. Ask them about their backgrounds and whatever else comes to mind. This is appreciated by everyone who has made a Character. They want people to know about their character. Let them show it off. By being interested, you can also show off your character. I've heard SS13 being called a "glorified chatroom" and it struck quite a cord with me. Talk to people. Ask them about their day. Being able to smalltalk as a made up character is a pretty high level of roleplay. The 4 techniques used to be interested are: "I heard a rumour" Yes/Yes And/ Yes But Have an excuse to start a conversation Join in on the action "I heard a rumour" One of the easiest and best conversation techniques to use in this game. As long its harmless, you can make stuff up about OTHER player characters like rumours or facts. Bonus points if you make this flattering or interesting tailored to their personality. They could play along using yes/yes and/ yes but or just say you're totally wrong. Either way, they get a chance to small talk about a possible previous event. Maybe even add something to their backstory. Try it. Examples About a Badass: About a Captain: About a Detective: About a Quartermaster About a Clown: About a Mime: Fill in the blank examples: Yes/ Yes and/ Yes But: This is a classic Improv technique. Someone comes to you for something. Clown wants all access, the chaplain wants to bless you, Sec wants to arrest you, Captain wants you for a special mission. In most cases, you should avoid saying no (Unless you really don't want to do it). It's better to say Yes/Yes and/ Yes but. All these answers will lead to MORE roleplaying and MORE interactions. A No will in most cases lead to less roleplaying. However, you should obviously still follow the server rules and apply common sense to the situations. Examples below. HOP example: Chaplain Blessing you example: Sec Arresting you example: Captain wants you example: Have an excuse to start an interaction When you make your character, consider how they interact with certain people. Different people want different things out of an interaction. What would your character be interested in finding out? Some are focused on the job/personal life/love life/interests. More detail on how to create excuses for your character is in the character creator in the next post. Examples, based on types that can be found on the station.: The young CentCom goldenboy/girl The Gossipy Grandmother The Naive Newcomer The Flirt The Badass The Preacher Join in on the action If you see someone announcing something, like a private investigator, a fun religion or a scientific experiment being announced, interact with it in some way. Just stopping by is good but if you can contribute, taking it in a different direction or building upon what's already there, it's even better. Create interaction. By talking with someone, you can start a series of events that could make someones round a lot better. Don't be afraid to ask people for things or ask about things. Be Interesting Difficulty: Medium. To be interesting means you have a character people are curious about and want to interact with. Your character changes you from just your job to an actual person. This step also happens before you've actually started playing the game. In my next post I'll post a character creator, designed specifically for Paradise, to help you create an interesting character. Some shortcuts to be interesting are the following: Have a unique or odd style/appereance. Speak in a distinct manner. Off hand mentions to previous events in your life. If you came this far, thanks for reading. I truly hope it gave you one or two ideas!1 point
-
Nokko's Speed Strats for Genetics! So, you want to hulk out, see through walls, toss spears and stunbatons at Security, and eat the bolas and flashbangs they toss back. Bad news - completing Genetics takes forever, and is *very* boring. Lots of people want a genetics rework on Paradise, which is fair: staring at a menu all shift and only getting to use your powers on the escape shuttle sucks. Fortunately, Nokko is here with a new strategy for completing Genetics research much faster! (There is some informational prelude to the actual strategy. For a list of steps, scroll to the bottom of this post.) Why is Genetics so slow? At the start of a shift, there are 1-2 Geneticists working in the Genetics Lab. There are 54 unknown DNA blocks that may contain either powers or disabilities. (This means each geneticist must test 27 genes each shift, if they divide the work evenly.) There is a cooldown of at least 2 seconds between each block you irradiate, because the minimum irradiation time is 2 seconds. There is a cooldown of 25 seconds between each DNA injector you print (per console). I timed myself getting a monkey's first 12 DNA blocks to DAC (or higher), here are the results: 50sec, 76sec, 103sec, 17sec, 78sec, 7sec, 79sec, 10sec, 23sec, 80sec, 31sec, 1sec Lowest: 1sec, Highest: 103sec, Median: 40.5sec, Mean: 46.25sec This means that, if it takes 25-103 seconds to get a block to DAC, an optimal geneticist checking 27 blocks, uninterrupted, will spend anywhere from 675-2781 seconds just getting injectors. (11-46 minutes) Plus, however long it takes to test each injector, clean any unwanted disabilities, label the mutations you discover, give Chemistry monkeys, etc. All in all, a geneticist working solo, on one console, can unlock every mutation in ~28 minutes on average, meaning flipping every block except 55 to DAC or higher, and printing injectors for each. However, a geneticist's time might be taken up by other things. SSD, handing out mutations to Security, fighting off randos who want Hulk 5 minutes into the round, cloning people when the coroner is dead, getting killed by traitors, etc. TL;DR: It's slow because of the injector cooldown, the time it takes to get a block to DAC, and the time it takes to test each injector. How can we make Genetics faster? To solve the problems listed on our earlier list, we can: 1. Get more Geneticists working at the same time, or more DNA Scanners per Geneticist, 2. Reduce the search space from 54 genes to a lower number, 3. Don't go SSD, 4. Reduce the cooldown on the time it takes to irradiate a block, 5. Reduce the cooldown of 25 seconds between each DNA injector you print (per console), 1 and 3 are possible in-game already if you have a cooperative Research Director and can coerce a few Scientists into helping you out - the speed increase is obvious. 4 and 5 seem impossible from looking at the code. This guide is about one approach to tackling option 2, reducing the search space. Genes To understand how to find what we are looking for, we must first understand what there is. In the code, there are two lists of genes: GLOB.bad_blocks is the list of all the disabilities*, and GLOB.good_blocks is the list of all the powers. There are 24 genes in the good list, and 24 in the bad. Sources of mutation There are several ways for lifeforms with DNA to get mutations. Radiation storms - Every time a radstorm mutates you, there is a ~95% chance to get a bad mutation. Rad storms are not guaranteed to occur every round - not easily accessible. Radiation (from nuclear reactors, uranium, uranium golems, etc.) - I believe that radiation in itself does not give you mutations, it only gives you radiation damage. Do correct me if I'm wrong, though, I only looked through the code briefly. Somewhat easily accessible if you get R&D to print SUPERPACMAN generator boards+components. The "Pulse Radiation" function of the DNA Modifier access console - 93.25% chance of bad mutation, cooldown 2 seconds. Greater radiation strength does not increase the amount or likelihood of good/bad mutation. Easily accessible. Unstable Mutagen - Only gives bad mutations, if ingested. Easily accessible if SciChem and MedChem aren't being total nerds. You need about 2-6 beakers to get to 24 mutations.** * The Incendiary Mitochondria mutation is technically a disability in-code, so you won't get that one with this strat alone. ** I haven't done the math on this yet, but 2-6 beakers seems fairly reliable. Unstable Mutagen seems to be the best source of bad mutation. Why do we use a chemical that generates 100% bad mutations? Because, of course, once you know the list of bad chemicals, you know the list of good chemicals too - the ones that aren't bad. Synthesis (What the hell is the strat, nokko!?) Get like 4-6 beakers of unstable mutagen. Get 3 bottles of potassium iodide, which heals radiation damage. Get 2 radiation suits, one for you and one for your geneticicist buddy. Feed a monkey all of the mutagen. (You can also use yourself as the monkey, but then you need a cooperative colleague to get you back to normal once you get epilepsy, tourettes, etc.) Count how many mutations the monkey has - if it's 24, that's all of the disabilities! Feed the monkey more mutagen as needed, until you're at 24. Scan in all the disabilities, feed the monkey potassium iodide and mutadone to cure the mutations and radiation damage. Do genetics as normal! Now you have about 45% the amount of genes to check, and all of them are powers! ((54-30)/54 = ~44.44..%)1 point
-
Go mentor people mentors. This is the cool no mentor hangout where you are NOT invited one1 point
-
This post taught me how to do genetics well - now that I have a bit more experience I'd like to add to it : 1) for clarification, count any blocks above 800 after you've fed your monki all the UM, those are the ones that matter for your 24 bad mutations headcount. 2) I suggest using IVs to feed UM instead, three IVs are guarranteed to unlock all bad blocks, and it lets ya prep whatever you want while your subject soaks. 3) a dead patient will still mutate upon UM ingestion, and bodies do not process reagents or emit radiations (with the radioactive mutation or otherwize), making them easier to work with. 4) 1u of mutadone will reset your powers, don't eat the pills from the medivend whole - those are TWENTY units. Ask chemistry to grind em up into 1u pills for you. This will completely remove the need for you to wait for clean SE's while testing for powers. 5) Asking for a medibot from robotics will pretty much take away any need for potassium iodine/charcoal 6) About FINDING X-RAY, TK, No breath, Hulk, chameleon skin/cloak of shadows: always ALWAYS mark down "duds", and remember which of them you have activated while testing powers. Each of them might be one of those six "hidden" powers. These only have a chance to activate upon the block reaching DAC or higher.. and then have another chance to do so when another block activates. 6a) So if you try block 1, it's a dud, and then try block 2 and get, say, x-ray and heat res.. you know that heat res ALWAYS activates upon DAC, therefore 1 was a hidden x-ray. 6b) If you try block 1, dud, and block two gets you only x-ray, things get a little more complicated : X-ray could be in block 1 or 2, and either one could also potentially be another hidden power or a real dud. It's for these instance I always try to keep a maximum of a single dud inside of me, resetting my genes when I find a second one. In this example, the best thing to do would be to pull out block 1 or 2 from your clean SE, and inject yourself with it. If you inject yourself with a clean block 1 and x-ray goes away, congratulations, you know that x-ray was in block 1. 7) About ACTIVATING X-RAY, TK, No breath, Hulk, chameleon skin/cloak of shadows: There's a couple of ways to go about it : 7a) You could repeatedly activate/deactivate the block for the power you want, or activate it once and then repeatedly activate/deactivate a real dud until it activates - but this is prone to getting you defects on the side as we've seen in the OP that pulsing has a chance to activate bad mutations. 7b) You can keep printing block injectors for it- Inject yourself, eat 1u mutadone, inject yourself, repeat until done. Works well but can be kind of slow since printing injectors takes time. 7c) Lastly you can make a buffer with only whichever blocks you desire activated, and then use the "Transfer" function of your machine. This has a 100% chance to make your genetics makeup exactly the same as the saved buffer, at the cost of radiating you a little bit more. By continuously transfering between a clean and the desired SE, you can quickly and effectively activate whichever "hidden" power you desire.1 point
-
Like a billion years late to my own post, but here's the skinny: That's me solving it Monte-Carlo, which is kind of bad since it can be modelled with a Markov chain. But, on average, the most times you'll have to hit that godforsaken “Irradiate Block” button is 11 per genetic block. Least is something like 6, if you're starting off with the second “digit” in your block already above A. I'll post more math later, possibly lots of time later. Heck, maybe there'll be a viable genetics rework by the time I come back...
 1 point
 -
Yep! The times I put in my post were the times to get to at least DAC, or higher. So, obviously, /E../, /F../, /D[B-F]./ all count as well as /DA[C-F]/1 point
-
Interesting enough, you don't actually have to set it to DAC to work, it just needs to be higher than or equal to DAC to work. If the first subblock is F or E, you are done, since F or E ranks higher on Hexadecimal than D,. You could also do DB - which works because B is higher than A.1 point
-
[UNDER CONSTRUCTION AND FORMATTING] First and foremost I'd like to state: This guide is an opinion piece. Your idea of what a good wizard brings with them to the station may vary wildly, and that's okay. Now lets get down to brass tax: A tier list! And of course, I'd be a nerd if I didn't describe what these spells do and how to use them, etc: The Best: Bind Soul: "A dark necromantic pact that can forever bind your soul to an item of your choosing. So long as both your body and the item remain intact and on the same plane you can revive from death, though the time between reincarnations grows steadily with use. Can be cast without wizard garb" Cooldown: 1 Cost: 2 This spell is mostly just known as Lich. It allows you to grab a random object on the station and bind yourself to it, allowing you to teleport there when the crew inevitably beats you to death. When most wizard rounds usually end, yours starts over again! Very powerful spell. Blink: "This spell randomly teleports you a short distance." Cooldown: 2 Cost: 2 Where Ethereal Jaunt is good for mobility, Blink is good for being alive. Down on the ground and stunned, you are at your most vulnerable. Being able to randomly displace yourself around on the ground makes you incredibly hard to hit, and a cool down of only 2 seconds makes sure you can do it many many times. You can also gamble with it to get you into places you aren't allowed to be in. Six Soul Shards and the spell Artificer: "Soul Stone Shards are ancient tools capable of capturing and harnessing the spirits of the dead and dying. The spell Artificer allows you to create arcane machines for the captured souls to pilot." Cost: 2 This belt and spell together create incredibly powerful constructs that serve you and decimate the station. When I used this spell, a single wraith returned to me 7 bodies. And I had several wraiths. There are three constructs you can create, each with their own respective abilities. A brief description of each: Artificer: These guys can create new shells, shards, walls, floors, pylons, and can also heal other constructs with help intent. Their healing is very quick, so it should be used if needed, and they can summon pylons that supplement their quick healing. They are the suppliers of your shards, without at least 2 of these you will only have a small number of wraiths decimating the station. Wraith: These guys are fast, can teleport, and deal the same amount of damage as a wielded fire axe. They only have 75 health, but that's not really an issue as they can very easily teleport away if they need to. Juggernaut: These guys are slow, have a damage threshold of 10, and hit like a truck. What I mean by damage threshold is that, if they are hit by something that does 10 or less brute damage, it does nothing to them. They have 200 health, and hit with the same damage as an e-sword. These guys work best as base defense, as they are very sturdy, hit hard, and lack any maneuver abilities. Contract of Apprenticeship: "A magical contract binding an apprentice wizard to your service, using it will summon them to your side." Cost: 2 Essentially, more wizards! There are four different types, based on schools of magic. I'll list them from best to worst, in my opinion: Healing: "Your apprentice is training to cast spells that will aid your survival. They know Forcewall and Charge and come with a Staff of Healing." They cost 2, but come with items and abilities that cost 3, all packed into an extra wizard person. A bargain indeed. This apprentice is best kept in the back, away from danger. Coupled with the belt of wands, they can be given wands to recharge, or to use for their own defense. Destruction: "Your apprentice is skilled in offensive magic. They know Magic Missile and Fireball." Comes with two very useful spells, and acts as a way of extending the destruction if die. Overall a solid choice, and if robust enough can hold their own quite well by themselves. Robeless: "Your apprentice is training to cast spells without their robes. They know Knock and Mindswap." This spell pairs well with the belt of shards, as they can interact with the artificers whilst also blending in with the crew. Having Knock is a great mobility spell, and being able to mindswap with security could cause an interesting amount of chaos if they continue up the chain... It has been done before! Bluespace Manipulation: "Your apprentice is able to defy physics, melting through solid objects and travelling great distances in the blink of an eye. They know Teleport and Ethereal Jaunt." Even though at the bottom, it's still good to have an apprentice with good mobility! That's all they have, however. They are completely at the mercy of the station and being able to teleport is cool and all, but a long cool-down makes sure they are eventually caught with virtually chaos to the crew. Awesome: Fireball: "This spell fires a fireball at a target and does not require wizard garb." Cooldown: 6 Cost: 2 This is one of the more must have spells. Low cooldown, great damage, and almost certainly causes someone to lose a limb or two. Don't cast it if the person is right in front of you! Explodes in a 3x3 area. I've seen many a wizard make the mistake of hitting themselves with this one. Fireball: This spell is for gamers by gamers Description Ethereal Jaunt: "This spell creates your ethereal form, temporarily making you invisible and able to pass through walls." Cooldown: 30 Cost: 2 Overall a great spell. The only downside is the cooldown, and sometimes you end up in a place you'd rather not be. Wand Assortment: "A collection of wands that allow for a wide variety of utility. Wands do not recharge, so be conservative in use. Comes in a handy belt." Cost: 2 So many great wands, and some less useful ones. I'll list them in no particular order: Wand of Death: Guess what this one does? It instantly kills someone! Works great with the shards as you can very quickly get a small army created if you're accurate. 3 charges, and upon recharge goes to 2, then 1, then cannot be recharged. Want of Resurrection: Works just like the staff of healing, but with limited uses. Charges the same way as the Wand of Death, max 6 uses in a wand and starts with 3 charges. Use it on yourself or an Apprentice! Wand of Polymorph: Changes someone into something else! Sometimes a cat, sometimes a mouse, sometimes a syndicate borg, or maybe a Xenomorph Hunter... For the last two things, this isn't always a great weapon. Alien Hunters generally do not like the person who turned them into one, and if this wand ends up in the wrong hands, you're in trouble. Getting hit by this as a lone wizard can end your round instantly. Has 10 charges, and loses a charge every time it is recharged. 10+9+8+7+6+5+4+3+2+1 = 55 Maximum uses! Wand of Teleport: Can be cast on someone to make them blink somewhere else, or on yourself. Useful if the guy attacking you is in full wizard killing gear and you gave your fireball wand away. Has 10 charges, and recharges to 10 every time. Infinite uses! Wand of Door Creation: Cast this on a wall to turn it into a door. Cast it into a door to open the door. Doors bolted by the AI still open, but doors welded by the crew do not. 20 Charges, recharges to 19 then 18, and so on. 20+19+18+17+16+15+14+13+12+11+10+9+8+7+6+5+4+3+2+1= 210 Maximum Uses! Wand of Fireball: Casts a fireball. There is no cool-down with this wand, so you can blast all 8 very quickly. Not a good idea to unleash the fury all at once as 1 is good enough to take out IPC's and Plasmemes, 2 for most of the crew, and if they are really armored up and ready to fight, 4 will be good for them. Save your ammo! Starts with 8 charges and recharges to 8 every time. Unlimited Power! Pairs well with the healing apprentice as they also come with charge. Great: Battlemage Armor: "An ensorceled suit of armour, protected by a powerful shield. The shield can completely negate sixteen attacks before being permanently depleted." Cost: 2 The interesting thing about this armor is that it is best used as long as you are not going loud. It has the same defensive abilities as regular robes when unpowered, but also blocks 16 hits to you that might otherwise mess you up. Buckshot is very powerful against this armor. 16 sounds small, but in the beginning most of security is rolling with tasers, which this armor blocks. An early stun on the wizard has been game over many times. Mutate: "This spell causes you to turn into a hulk and gain laser vision for a short while." Cooldown: 40 Cost: 2 This spell turns you into a hulk. You shoot 20 burn damage lasers and punch for 15 brute. The lasers fire VERY quickly. You can also break down doors pretty effectively. You get no damage resistance, but you are immune to stuns. It lasts about 30 seconds, meaning by the time it's over you can almost do it again. If you're seeing this, it means I'm still writing things, and testing things! You came here early. Good: Disintegrate: "Charges your hand with vile energy that can be used to violently explode victims. This spell manifests in your hand and requires you to touch your target, so you will not be able to use it while handcuffed or stunned. Additionally, all the gear except their shoes, gloves, helmet, mask, headset, glasses and whatever they were holding in their hands will be permanently destroyed." Cooldown: 60 Cost: 2 This is a good spell for locker wizards. Hide in a locker, wait for security to find you, hit them with it, and then juant away to another locker. This spell gibs people, so it doesn't work with shards. Repulse: "This spell throws everything around the user away." Cooldown: 40 Cost: 1 This is a pretty useful spell, it allows you to knock people over, drop what they had in their hands, and stun them for a brief moment. Very good defensive spell if you get knocked down. It also works in a very wide range around you. Magic Missile: "This spell fires several, slow moving, magic projectiles at nearby targets." Cooldown: 20 Cost: 2 These slow moving little orbs are incredibly annoying to deal with. Generally, casting this will cause people to run away from you as these stun them for a good amount of time. Works great if you are stunned yourself, as an orb is spawned for ever person within sight of you. Stuns for just long enough to handcuff someone. Charge: "This spell can be used to recharge a variety of things in your hands, from magical artifacts to electrical components. A creative wizard can even use it to grant magical power to a fellow magic user." Scroll up to the belt of wands to see how different ones work. This spell also works on things like tasers and stun batons, charging them. I've no idea what the granting magical power to a fellow magic user means, but I'd imagine it has to do with dragging an apprentice or something. No idea. Very useful if you go in solo with the wands, as it gives you infinite fireball and many many door openings. Staff of Door Creation: "A particular staff that can mold solid metal into ornate wooden doors. Useful for getting around in the absence of other transportation. Does not work on glass." Cost: 1 Infinite mobility around the station! Cast on any wall and that wall is now a door of random material. Cast on any door and that door opens. Works just like the wand, but never runs out of power. Also very cheap. Greater Force Wall: "Create a larger magical barrier that only you can pass through, but requires wizard garb. Lasts 30 seconds." Cooldown: 10 Cost: 1 Creates a wall that only wizards can pass through. It blocks every projectile and it also blocks people from standing on it. If you use it right, you can stand on it and cast spells onto both sides, and retreat to whichever side is safer. Knock: "This spell opens nearby doors and does not require wizard garb." Cooldown: 10 Cost: 1 This one works just as described. Mobility is king when everyone on the station wants to be the one with your head. Smoke: "This spell spawns a cloud of choking smoke at your location and does not require wizard garb." Cooldown: 12 Cost: 1 The key feature of this spell is not described. Choking in this smoke causes you to drop your item held, and it's very hard to see where you've dropped it until the smoke clears. Don't cast this if you have a staff or wand in your hands! You choke immediately upon casting it. Doesn't work very well when security is wearing gasmasks, but not everyone has one. Okay: Curse of the Cluwne: "Turns the target into a fat and cursed monstrosity of a clown." Cooldown: 60 Cost: 2 Would be great if people immediately see the cluwne as valid during wizard rounds. That's not how the chaos works, generally, and you'll sometimes just have a cluwne fighting you now. Can you imagine losing a wizard round to a cluwne? The embarrassment. Stop Time: "This spell stops time for everyone except for you, allowing you to move freely while your enemies and even projectiles are frozen." Cooldown: 50 Cost: 2 It is possible to use this spell with great effectiveness. I would say force wall is better, just because it has a much quicker cooldown. The issue is using this in a narrow hallway, you stop the bullets but if you can't make it to the end of the hallway, you get hit by the very bullets you spent 2 points to stop. This meme was created by Force Wall Gang. A Necromantic Stone: "A Necromantic stone is able to resurrect three dead individuals as skeletal thralls for you to command." Creates skeletons wielding very powerful weapons and shields that can honestly do some damage. The issue is that you can only have three, whereas the soul shards you can very quickly have six, and then many more from the artificers. If you could somehow make more, they would be on par with the shards, but only three makes you much more vulnerable if you decide to have these as your soldiers over the shard constructs. Staff of Animation: "An arcane staff capable of shooting bolts of eldritch energy which cause inanimate objects to come to life. This magic doesn't affect machines." This staff is actually pretty interesting. Casting it on an item causes that item to come alive, and it 'biting' people causes whatever brute damage it would have to transfer. The creatures do not seem to attack the wizard, but apprentices may be in danger. Items created with this staff have almost no health, and revert to normal in about 5 minutes. Cast it on a fuel tank for hilarious results. Greater Knock: "On first cast, will remove access restrictions on all airlocks on the station, and announce this spell's use to the station. On any further cast, will open all doors in sight. Cannot be refunded once bought!" Cooldown: 20 Cost: 2 This spell opens all the doors for everyone and removes any sense of stealth you might have had. Not as good as regular knock, as sometimes you're banking on doors closing behind you, and this one has a longer cooldown. Flesh to Stone: "This spell charges your hand with the power to turn victims into inert statues for a long period of time." Cooldown: 60 Cost: 2 This spell turns crew into statues for a long long time. Like 10 minutes or something. It's incredibly boring for the person getting turned into a statue, as you are locked in place and miss out on the action. I feel like this one works pretty well against crew but, it's negative fun on the receiving end so I would suggest not using it. I'd rather die than be a statue! Rod Form: "Take on the form of an immovable rod, destroying all in your path." Cooldown: 60 Cost: 2 Great in very narrow hallways, this spell is tricky to use as it requires a very niche set of circumstances. Generally, this is great at killing one or two people, or the AI. I'd say this spell is okay because, in rod form you are invulnerable and anyone you touch will certainly die. Good if you want to be a maints wizard, but bad if you want to be roving the hallways. Disable Tech: "This spell disables all weapons, cameras and most other technology in range." Cooldown: 40 Cost 1 This spell would be great if it didn't confuse the wizard casting it, along with flashing him. It does remove all power from tasers and stunbatons, disables all cameras, and acts as an EMP on doors. Essentially, this spell is an infinite EMP implant with a cooldown. Mjolnir: "A mighty hammer on loan from Thor, God of Thunder. It crackles with barely contained power." Cost 2 This hammer is good in that it acts as a stunbaton that does fire axe damage, and also sends people FLYING. A person will travel an entire Z-level if there isn't a wall in the way. Upon hitting the wall, they get hurt as well, increasing the damage. It's a hilarious weapon, but it's not amazing. Staff of Slipping: "A staff that shoots magical bananas. These bananas will either slip or stun the target when hit. Surprisingly reliable!" Cost: 1 This staff is surprisingly reliable. Essentially a taser with infinite charges. Doesn't do anything else, and cannot be stored in a bag. For the cost, it's actually pretty solid if you're going for annoying non-murder wizard, but where's the fun in that? Does have a cool-down if you spam it too hard, like all staves.
 1 point