Difference between revisions of "User:Krossarn"

From Paradise Station Wiki
Jump to navigation Jump to search
 
(28 intermediate revisions by the same user not shown)
Line 1: Line 1:
<big><font size="6">Commence Project Construction.</font></big>
{{JobEngineering}}
<br>
[[Guide to Atmospherics]]
<br>
<br>
''This guide is not intended to cover advanced construction. For a list of advanced machinery and their parts, see the [[Guide to Advanced Construction]].''


Welcome to '''Atmospherics'''. Considered by many as one of the most diffcult profession to master on the station, while also being one of the most dangerous.
The learning curve of Atmospherics is rather steep, its important to be patient and not losing focus. An Atmospheric Technician should be able to handle a few situations:
Setting up Atmospherics properly, repressurise a room, remove dangerous gases in unwanted areas, mix and transport gases.


== Introduction to Construction==
The jobs main focus is of course around the various gases found on the station.
In order to fill many roles (such as [[Station Engineer]]), or to just snazz up your sweet maintenance bar, you're going to need to know how to build things!
The Atmospheric Technician should know how the different gases works and how to manipulate them for the saftey of the station and for their own little projects.
Having proper knowledge over the pipes and devices is key for managing the gases.


This guide will cover all the basic tools and their uses (as well as special things they can do) along with a list of basic structures and how to build/deconstruct them.
Working as an Atmospheric Technician can go from having a calm shift while working on a project or the station goal;
into having to fix multiple breaches, repressurise several areas and fight fires all over the station, all at the same time.
Knowledge over how to fix atmospheric issues is a must to ease the working condition for the rest of the crew.  


First and foremost it's important to become familiar with all the tools involved in construction! Please consult the list below.
==The Basics Of Atmospherics==


There are alot of abandoned rooms in maintenance that make good "practice areas" for you to practice construction.
The first thing the technician need to understand is how to use the different available equipment to manipulate the atmospheric gases.


Practice by fixing damaged floors, replacing lights, building doors & windows, etc.
Tools and pipes are ever so important to even begin working with the basics of atmospherics.
<br><br>
<div class="toccolours mw-collapsible mw-collapsed width:80%;" style="background-color:#ffc050; width:80%;">
<span style="font-size:1.5em;" style="font-weight:bold;color:white"> <font size ="4">Construction Tools </font> - '' A quick rundown of basic tools and their more advanced counterparts.''</span>
<div class="mw-collapsible-content">
{|class="wikitable sortable" width:"100%" style="background-color:#fffcec;margin:10pt;"
|- style="background-color:#ffc050;font-weight:bold; color: white;text-align:center;"
! style='background-color:#ffc050' width:150px;                  |Basic Tool
! style='background-color:#ffc050' width:150px;                  |Advanced Tool
! class="unsortable" style='background-color:#ffc050'            |Usage
! class="unsortable" style='background-color:#ffc050'            |Notes
|-
! Crowbar
[[File:Crowbar.png]]
! Jaws of Life
[[File:Jawsoflife.png]]
| Prying things in/out of place
|
* Can pry open unpowered airlocks/lift floor tiles
* Jaws of Life can pry open powered airlocks
* Can be used to remove damaged electronics
* Jaws of Life performs actions faster
|-
! Wirecutters
[[File:Wirecutters.png]]
! Jaws of Life
[[File:Jawsoflife1.png]]
| Snipping wires/grilles
|
* Can snip fingertips off gloves
* Jaws of Life performs actions faster
|-
! Welding Tool
[[File:Welderon.gif]]
! Experimental Welding Tool
[[File:Experiwelder.gif]]
| Welding/slicing metal
|
* Can seal airlocks/vents while on harm intent
* Can repair structures while on help intent
* Can repair robotic limbs (brute)
* Experimental welder regenerates fuel
|-
! Cable Coil
[[File:CableCoils.png]]
! Cable Layer
[[File:Cablelayer.png]]
| Wiring systems together
|
* Can repair robotic limbs (burn)
* Cable Layer rapidly spools and lays cable
|-
! Screwdriver
[[File:Screwdriver_tool.png]]
! Power Drill
[[File:Powerdrill1.png]]
| Securing/opening panels
|
* Can open airlock panels for [[Hacking]]
* Can open vents to slide paper into them
* Power Drill performs actions faster
|-
! Wrench
[[File:Wrench.png]]
! Power Drill
[[File:Powerdrill.png]]
| Ratcheting/unsecuring objects
|
* Used to deconstruct most things
* Can secure/unsecure most machinery
* Power Drill performs actions faster
|-
! Multitool
[[File:Multitool.png]]
! N/A


| Modifying/specifying special parameters
===Atmospherics Tools===  
|
* Used to connect systems together
* Can toggle certain machinery on/off
|-
! Rapid Construction Device
[[File:RCD.png]]
! Combat RCD
[[File:RCD.png]]
| Rapid construction/deconstruction
|
* Combat RCD issued to ERT engineers. Has improved magazine (500 material)
* Can select from a variety of different structures
* Can deconstruct most basic structures (walls, windows, floors)
|-
! Pipe Dispenser
[[File:PipeDispenser.png|64px]]
! Rapid Piping Device
[[File:Rapid_pipe_dispenser.png]]
| Dispensing disposal/air pipes.
|
* Dispenses unfastened pipes
* Dispenser must be anchored to dispense pipes.
* No magazine/material limit on RPD or dispenser.
* Bluespace RPD upgrade can dispense pipes at range.
* Alt-click the RPD to change modes via radial menu. (You can also change modes via its popup window)
|-
|}
</div></div>
<br>
 
=== Wiring ===
 
[[File:Wireexample.png|frame|An engineer doing some wiring. Note the insulated gloves and his position to the tile he's wiring.]]
[[File:WireFull.png|frame|A demonstration of wire placement based on character position.]]
[[File:WireFull1.png|frame|An example of proper or 'smooth' wiring.]]
[[File:WireFull2.png|frame|An example of a node. The round circle is a place to connect machinery like emitters.]]
[[File:WireFull3.png|frame|An example of improper wiring. These wires aren't actually appropriately connected and may not transfer power as a result.]]
[[File:Wirebad.png|frame|An example of 'spaghetti' wiring. This image demonstrates how directional wiring can be manipulated.]]
[[File:Wiregood.png|frame|An example of standard station wiring.]]
Now that we've gone over the list of tools, it's important to understand how wiring in SS13 functions.
 
Outside of its use in repairing robotic limbs, mechs, and other things, cable coil is primarily used to route power to APCs and SMES arrays around the station.
 
* APCs are the power terminals located in each room that provide electricity to the Lighting, Equipment, and Environment systems for a designated area.
* APCs utilize a charging system and contain a single cell (a battery) that charges from the power grid that it's connected to.
* APCs which are not connected to the grid by wiring, or APCs which receive insufficient levels of power, will lose battery life.
* Wiring is used to connect APCs to the SMES arrays which gain charge from power sources (such as the engine) and distribute electricity.
 
As we can see, making sure we're properly wiring things is integral to the function of equipment and the station in general. If things are wired inappropriately, the APC may not receive power and the area you're either creating or repairing will be left in the dark.
 
'''There are a few important caveats before you start any wiring project.'''
 
* Wires connected to an active electrical grid will shock you and cause burn damage.
* Budget insulated gloves will either reduce or multiply damage from shocks.
* Insulated gloves will protect from electrical shocks entirely.


==== Basic Wiring ====
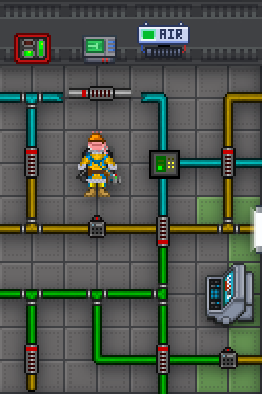
[[File:Atmos_Tech_Working.png|right|frameless|thumb]]
''(Note: Regular tiles on the station will have floor tiles on top of them. You will need to use a crowbar to remove these tiles in order to place any wires down).''
{| class="wikitable sortable mw-collapsible" width="74%" style="text-align: center; background-color: #fffcec;"
 
|- style="font-weight: bold; background-color: #ffc050; color: white;"
Wiring is fairly straightforward, though there's a few things to keep in mind when you're doing it.
| style="width: 20%;"    | Item
 
| class="unsortable" style="width: 80%;"    | Description
* Wires can only ever be placed on plating or catwalk tiles.
* Wire placement is directional and will always orient toward your character.
* If you're placing a wire on a tile you're standing on it orient according to the direction you're facing.
 
In order to place wires you will need to be facing a catwalk or exposed plating with some cable coil in your hand.
 
Once you're ready with cable coil in hand, simply click on an adjacent tile with the wire in your hand to place down the wiring.
 
Here's a quick table explaining the different results you'll get based on your character's position.
 
* Tile Direction refers to which direction the tile is from the player's current position (the wire always points toward the player).
* Tile Directions such as Northeast, Northwest, Southeast, and Southwest indicate the tile is diagonal to the player.
 
{| class="wikitable" style="text-align: center; background-color: #fffcec;"
|- style="font-weight: bold; text-align: center; background-color: #ffc050; color: white;"
| Tile Direction
| Wiring Result
| Tile Direction
| Wiring Result
|-
! West
|[[File:WireW.png]]
! East
|[[File:WireE.png]]
|-
|-
! North
! Rapid Pipe Dispenser{{anchor|Rapid Pipe Dispenser}} <br> [[File:Rapid_pipe_dispenser.png]]
|[[File:WireN.png]]
| A handheld tool that can print, place and recycle pipes. Fits in a backpack or coat and doesn't need ammo.
! South
|[[File:WireS.png]]
|-
|-
! Northeast
! ATMOS Holofan{{anchor|ATMOS Holofan Projector}} <br> [[File:Engineering_Holofan_Projector.gif]]
|[[File:WireNE.png]]
| Can project up to 3 holographic barriers which block gas movement. These holofans can be used to isolate breaches or prevent a spill from getting worse. Does not hold in high temperatures or in fires.
! Northwest
|[[File:WireNW.png]]
|-
|-
! Southeast
! Analyzer{{anchor|Analyzer}} <br> [[File:Analyzer.png]]
|[[File:WireSE.png]]
| Mostly used for scanning the surrounding air and measuring the gas content and composition of pipes and canisters. A [[PDA]] with the breathe deep cartridge can also scan pipes and canisters.
! Southwest
|[[File:WireSW.png]]
|}
 
Now that we understand how directional placement of wires functions, we can start wiring things together.
 
Before we do however there's two important features of wiring that need to be discussed!
 
In any wiring project there are "nodes" and "wires" which both serve special functions.
 
Wires are what actually transfer power while nodes allow special machinery (like SMES arrays, emitters, and shield generators) to hook up to the power grid.
 
{| class="wikitable" style="background-color: #fffcec;"
|- style="font-weight: bold; text-align: center; background-color: #ffc050; color: white;"
| Wiring Type
| Explanation
|-
|-
! colspan=2 | Smooth Wiring
! Multitool{{anchor|Multitool}} <br> [[File:Multitool.png]]
| The multitool is used for many things. But for the atmospheric technician it's mostly used to link devices to monitors or an [[Air Alarm|air alarm]].
|-
|-
| [[File:Wiresmooth.png]]
| Smooth wiring allows power to flow from point A to point B.
This is the basic, efficient, and accepted wiring configuration.
|}
|}


In order to produce smooth wiring, move to the opposite side of the tile and click on the little circle (or wiring node) on the ground.
----


IE: If the tile was to the West of you initially, move two tiles West so that it's now facing East from you (the wire should be pointing away from your character).
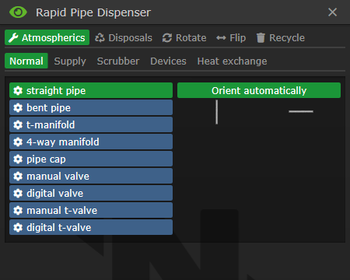
====Rapid Pipe Dispenser====
[[File:Rapid_Part_Dispenser_Menu.png|frameless|right|thumb|350px]] 
The Rapid Pipe Dispenser, aka RPD for short, will be one of the main tools for the technician to use.
This device can rapidly dispense atmospherics and disposals piping, manipulate loose piping, and recycle any detached pipes it is applied to.


If you don't smoothly wire your cables (and leave those little ball-shaped nodes everywhere), you're unlikely to create connections between pieces of wiring.
There are five main tabs and five sub tabs in the RPDs menu where pipe types and pipe shapes can be selected as well as different pipe manipulations actions.  


'''Make sure there's no unwanted nodes and all your cables are smooth, otherwise your wiring system likely won't transfer any electricity.'''
[[File:Rapid_Part_Dispenser_Hud.png|right|frameless|thumb]]
*'''Atmospherics''' - Have five sub tabs:
**'''Normal''' - Consists of the type of pipe found in Atmospherics.
**'''Supply''' - <span style="color:#0000B2">The dark blue pipes</span> used for the air distribution system.
**'''Scrubber''' - <span style="color:#B70000">The red pipes</span> used for the scrubber system.
**'''Devices''' - Holds all the usable devices.
**'''Heat exchange''' - Have the type of pipes that will exchange heat with the atmosphere.
*'''Disposals''' - Contains all the disposal type pipes and devices.
*'''Rotate''' - Rotate the pipes and devices.
*'''Flip''' - Invert the pipes and devices.
*'''Recycle''' - Remove unwrenched pipes and devices.


{| class="wikitable" style="background-color: #fffcec;"
It can also select which direction the pipe will be facing or have it orient automatically.
|- style="font-weight: bold; text-align: center; background-color: #ffc050; color: white;"
| Wiring Type
| Explanation
|-
! colspan=2 | Node Wiring
|-
| [[File:Wirenode.png]]
| Node wiring is used for special equipment and electrifying grilles.
Exposed nodes can cause electric shocks when touched.
|}


In order to produce a wire node, click on a tile already occupied by a smooth cable.
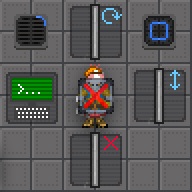
''Alt + left'' clicking the RPD will bring up a small hud which can be used to switch rapidly between UI, rotate, flip and delete.


You should always do your standard smooth wiring before creating any nodes to make sure your cables are properly connected.
----


'''If you're trying to make a node in the middle of a section of wire, it must be smoothly wired first.'''
===Atmospherics Pipes===


There are a few different types of pipes on the station that the atmospheric technician will work with during their shift. They all can take every available type of gas. They are more used to better organize the pipe system overall.


=== Station Piping ===
====Standard Pipes====
For station piping, see: [[Guide to Atmospherics#The Pipe System|Guide to Atmospherics]]


===Base Materials===
{| class="wikitable sortable mw-collapsible" width="90%" style="text-align: center; background-color: #fffcec;"
<div class="toccolours mw-collapsible mw-collapsed" style="background-color:#ffc050; width:80%;">
|- style="font-weight: bold; background-color: #ffc050; color: white;"
<span style="font-size:1.5em;" style="font-weight:bold;color:white">- ''A list of base materials used in construction.''</span>
| style="width: 10%;"    | Item
<div class="mw-collapsible-content">
| class="unsortable" style="width: 35%;"    | Description
{|class="wikitable sortable" style="width:80%" style="background-color:#fffcec;margin:10pt;"
| style="width: 10%;"     | Item
|- style="background-color:#ffc050;font-weight:bold; color: white;text-align:center;"
| class="unsortable" style="width: 35%;"     | Description
! style='background-color:#ffc050' width:150px;                     |Object
! class="unsortable" style='background-color:#ffc050' width:200px; |Materials
! class="unsortable" style='background-color:#ffc050'              |Construction
! class="unsortable" style='background-color:#ffc050'              |Deconstruction
|-
! Metal Sheet
[[File:Metal.png]]
|
* N/A
|
* Ore Redemption Machine (Iron)
|
* N/A
|-
! Glass Sheet
[[File:Glass.png]]
|
* N/A
|
* Ore Redemption Machine (Sand)
|
* N/A
|-
! Wood Plank
[[File:Planks.png]]
|
* N/A
|
* Apply hatchet to tower-cap logs
|
* N/A
|-
! Metal Rods (2)
[[File:Rods.png]]
|
* 1 Metal
|
* Use metal in-hand
* Select "metal rods"
|
* Apply active welding tool
** 1 metal returned per 2 rods
|-
! Reinforced Glass
[[File:Reinforced Glass.png]]
|
* 1 Glass
* 1 Rod
|
* Hold rod(s) in hand
* Apply rods to glass sheet(s)
|
* N/A
|-
! Plasma Glass
[[File:Plasma Glass.png]]
|
* N/A
|
* Ore Redemption Machine (Plasma + Sand)
|
* N/A
|-
! Reinforced Plasma Glass
[[File:Reinforced Plasma Glass.png]]
|
* 1 Plasma Glass
* 1 Rod
|
* Hold rod(s) in hand
* Apply rods to plasma glass sheet(s)
|
* N/A
|-
|-
! Plasteel
!Normal Pipes <br> [[File:Atmospheric_Pipe.png]]
[[File:Plasteel.png]]
|Generic pipes that can be used for most tasks. These are airtight pipes that can carry any gas you pump into them.
|  
!Air Supply Pipe <br> [[File:supply_pipe.png|64px]]
* N/A
|Special pipes that are mostly used for the air distribution network. Can be laid in parallel to normal pipes and scrubber pipes. Used to distribute air all across the station.
|
* Ore Redemption Machine (Plasma + Iron)
|
* N/A
|-
|-
! Plastitanium
!Scrubber Pipes <br> [[File:scrubber_pipe.png]]
[[File:Plastitanium.png]]
|Special pipes that are mostly used for the waste network. Can be laid in parallel to normal pipes and air supply pipes. Used to move waste or harmful gases.
|  
!Heat Exchange Pipes <br> [[File:heat_exchanger_pipe.png|64px]]
* N/A
|Exchanges heat between any gas in the pipe and any gas in the tile. Think space loop(for cooling) or the [[Toxins]] burn chamber(for heating). Connects to normal pipes via junctions.
|
* Ore Redemption Machine (Plasma + Titanium)
|
* N/A
|-
|-
! Plastitanium Glass
!Universal Pipes <br> [[File:universal_pipe.png]]
[[File:Plastitanium Glass.png]]
|Used to interface between normal, air supply, and scrubbers pipes. They cannot connect to each other without this.  
|  
| colspan="2" |
* N/A
|
* Ore Redemption Machine (Sand + Plasma + Titanium)
|
* N/A
|-
! Titanium
[[File:Titanium.png]]
|
* N/A
|
* Ore Redemption Machine (Titanium)
|
* N/A
|-
! Titanium Glass
[[File:Titanium Glass.png]]
|
* N/A
|
* Ore Redemption Machine (Sand + Titanium)
|
* N/A
|-
! Plastic
[[File:Plastic.png]]
|
* N/A
|
* [[Guide to Chemistry#Plastic Polymers|Plastic Polymer Reaction]]
|
* N/A
|-
! Brass
[[File:Brass.png]]
|
* N/A
|
* [[Guide to Chemistry#Brassification|Brassification]]
|
* N/A
|}
|}
</div></div>
<br>


== Constructions ==
====Devices====
These lists contains all buildable constructions of all the base materials.
{| class="wikitable sortable mw-collapsible" width="90%" style="text-align: center; background-color: #fffcec;"
<br>
|- style="font-weight: bold; background-color: #ffc050; color: white;"
=== Metal Constructions ===
| style="width: 10%;"    | Item
<div class="toccolours mw-collapsible mw-collapsed width:20%;" style="background-color:#ffc050; width:80%;">
| class="unsortable" style="width: 35%;"    | Description
<span style="font-size:1.5em;" style="font-weight:bold; color:white">- ''A list of constructions that only involve the use of metal sheets.''</span>
| style="width: 10%;"     | Item
<div class="mw-collapsible-content">
| class="unsortable" style="width: 35%;"     | Description
{|class="wikitable sortable mw-collapsible" width:"80%" style="background-color:#fffcec;margin:10pt;"
|- style="background-color:#ffc050;font-weight:bold; color: white;text-align:center;"
! style='background-color:#ffc050' width:150px;                     |Object
! class="unsortable" style='background-color:#ffc050' width:200px; |Materials
! class="unsortable" style='background-color:#ffc050'              |Construction
! class="unsortable" style='background-color:#ffc050'              |Deconstruction
|-
! Plating
[[File:Plating.png]]
|
* 1 Floor Tile
|
* Hold floor tile in-hand
* Apply floor tile to lattice
|
* Apply screwdriver
* Apply welder (1 floor tile returned)
|-
! Floor Tiles (4)
[[File:Floor_Tiles.png]]
|
* 1 Metal
|
* Use metal in-hand
* Select "floor tiles"
* Apply floor tiles to plating
|
* Apply crowbar to lift floor tiles
|-
! Wall
[[File:Wall.png]]
|
* 4 Metal
|
* Use metal in-hand
* Select "wall girders"
* Apply metal to girder
|
* Apply welder on harm intent (1 metal returned)
* Apply wrench (1 metal returned)
|-
! False Wall
[[File:False_Wall.gif]]
|
* 4 Metal
|
* Use metal in-hand
* Select "wall girders"
* Apply crowbar to girder
* Apply metal to girder
|
* Apply welder (1 metal returned)
* Apply wrench
* Apply wrench (1 metal returned)
: Alternative Method:
* Apply welder
* Apply welder
|-
! Chair
[[File:Chair.png]]
|
* 1 Metal
|
* Use metal in-hand
* Select "stool" or "chair"
|
* Apply wrench (1 metal returned)
|-
! Stool
[[File:Stool.png]]
|
* 1 Metal
|
* Use metal in-hand
* Select "stool"
|
* Apply wrench (1 metal returned)
|-
! Stool
[[File:Bar Stool.png]]
|
* 1 Metal
|
* Use metal in-hand
* Select "Bar Stool"
|
* Apply wrench (1 metal returned)
|-
! Sofa
[[File:Chairsofa.png]]
|
* 1 Metal
|
* Use metal in-hand
* Select "sofa (direction)"
|
* Apply wrench (1 metal returned)
|-
! Wheelchair
[[File:Chairwheel.png]]
|
* 15 Metal
|
* Use metal in-hand
* Select "Wheelchair"
|
* Apply wrench (1 metal returned)
|-
! Bed
[[File:Bed.png]]
|
* 2 Metal
|
* Use metal in-hand
* Select "bed"
|
* Apply wrench (2 metal returned)
|-
! Psychiatrist's Bed
[[File:Bedpsych.png]]
|
* 5 Metal
|
* Use metal in-hand
* Select "chair"
|
* Apply wrench (5 metal returned)
|-
|-
! Office Chair
!Unary Vent <br> [[File:Vent_Port.png]]
[[File:Chairoffice.png]]
|The standard vent used to distribute air. Needs to be inside a blueprinted room with a functional air alarm to operate. Typically used to pump breathable air into a room.
|  
!Air Scrubber <br> [[File:Scrubber_Port.png]]
* 5 Metal
|Scrubs the air clean. Needs to be inside a blueprinted room with a functional air alarm to operate. Can remove specific gases from the room it is in, or rapidly siphon out all gas. Typically used to remove harmful gases like CO2 from the station's air.
|
* Use metal in-hand
* Select "office chairs"
* Select desired sub-type
|
* Apply wrench (5 metal returned)
|-
|-
! Comfy Chair
!Passive Vent <br> [[File:Vent_Port.png]]
[[File:Chaircomfy.png]]
|An unpowered vent that relies on pipe pressure to operate. Freely exchanges gas and heat between the tile and the connected pipe network, based on pressure and temperature gradients. Does not require power, or even a blueprinted room.
|  
!Dual-Port Air Vent <br> [[File:dual_vent.png]]
* 2 Metal
|Has a valve and pump attached to it. There are two ports.
|
* Use metal in-hand
* Select "comfy chairs"
* Select desired sub-type
|
* Apply wrench (2 metal returned)
|-
|-
! Barber's Chair
!Connector Port <br> [[File:Connector_Port.png]]
[[File:Chairbarber.png]]
|A connector port for canisters of gas. Connects canisters to pipe networks. When used in conjunction with pumps, allows you to fill canisters or to empty them into a pipe network.
|  
!Gas Pump <br> [[File:Pump.png]]
* 3 Metal
|A generic pressure pump. This pump is configured to measure how much gas it pumps by pressure. Can be set to only pump a certain amount of pressure through. The maximum pressure this pump can be set to move is 4500 kPa
|
* Use metal in-hand
* Select "barber chair"
|
* Apply wrench (3 metal returned)
|-
|-
! Rack
! Volume Pump <br> [[File:Volumetric_Pump.png]]
[[File:Rack.png]]
|This pump is configured to measure how much gas it pumps by volume instead of pressure. Can be set to pump only a specific volume of gas through. The maximum volume this pump can be set to move is 200L/s.
|  
!Passive Gate <br> [[File:Passive_Gate.png]]
* 1 Metal
|A valve that only lets gas through if it the input pressure and the output setting are both higher than the output pressure. Can be set to limit its output between 0 and 4500 kPa.
|
* Use metal in-hand
* Select "rack parts"
* Use "rack parts" object in-hand
|
* Apply wrench (returns rack parts)
* Apply wrench again (1 metal returned)
|-
|-
! Closet
!Gas Filter <br> [[File:Gas_Filter.png]]
[[File:Closet.png]]
|A scrubber in pipe form. Checks for whatever gas you set it to, then filters it out into another pipe.
|  
!Gas Mixer <br> [[File:Gas_Mixer.png]]
* 2 Metal
|The opposite of a filter. Takes the contents of its two inputs and combines them together at whatever ratio you tell it to, then pumps them through the output. Importantly, ratios are measured by pressure, not volume. Maximum output pressure is 4500 kPa
|
* Use metal in-hand
* Select "closet"
|
* Toggle locker to open state
* Apply active welding tool (2 metal returned)
|-
|-
! Canister
!Heat Exchanger <br> [[File:Heat_exchanger.png]]
[[File:Canister.png]]
|When two heat exchangers are placed next to each other, facing each other, they will try to equalize the heat between the two pipe networks they are connected to. They connect to normal pipes and thus are not part of the heat exchanger pipe system.
|  
!Air Injector <br> [[File:Air_Injector.png]]
* 10 Metal
|A gas injector that will continue to pump its contents out regardless of how high the pressure around it is. Measures how much it pumps by volume. Will not operate without being linked to a console. Will display a green light when on.
|
* Use metal in-hand
* Select "canister"
|
* Break canister with a welding tool
* Apply active welding tool (3 metal returned)
|-
|-
! Light Switch
!Manual Valve <br> [[File:Manual_Valve.png]]
[[File:Lightswitch.png]]
|A manually-controlled valve, it requires no power and also no ID authorization to use. Doesn't require power(or a blueprinted room), doesn't require ID access, and cannot be operated by the AI, borgs, or drones. Displays a small green light when open.
|  
!Digital Valvle <br> [[File:Digital_Valve.png]]
* 1 Metal
|An electronically-controlled gas valve. Requires power, requires ID access, and can be operated by the AI, borgs, and drones. Displays a small green light when open.
|
* Use metal in-hand
* Select "light switch frame"
* Apply light switch to adjacent wall
|
* Apply wrench
* Apply wrench (1 metal returned)
|-
|-
! Window Tint Control Button
!Meter <br> [[File:meter.gif]]
[[File:Lightswitch.png]]
|Simply place over any flat stretch of pipe and wrench it on. Upon examination, it should now be yielding measurements on what is going on inside the pipe. Does not provide as much information as an analyser/gas scanner, but good for being able to tell what is going on at a glance.
|  
!Gas Sensor <br> [[File:Gas_Sensor.png|64px]]
* 1 Metal
|Used to sense the pressure and temperature of the gas surrounding the sensor itself, rather than a pipe. Must be connected to one of several kinds of computer to be used.
|
* Use metal in-hand
* Select "window tint control button frame"
* Apply window tint control button to adjacent wall
|
* Apply wrench
* Apply wrench (1 metal returned)
|-
|-
! Mass Driver Button
[[File:Massdriverbutton.png]]
|
* 1 Metal
|
* Use metal in-hand
* Select "mass driver button frame"
* Apply mass driver button to adjacent wall
* Use multitool to link button to driver
|
* Apply wrench
* Apply wrench (1 metal returned)
|}
|}
</div></div>
====Disposal Pipes====
<br>
 
=== Metal Rod Constructions ===
{| class="wikitable sortable mw-collapsible" width="90%" style="text-align: center; background-color: #fffcec;"
<div class="toccolours mw-collapsible mw-collapsed width:20%;" style="background-color:#ffc050; width:80%;">
|- style="font-weight: bold; background-color: #ffc050; color: white;"
<span style="font-size:1.5em;" style="font-weight:bold;color:white">- ''A list of constructions that only involve the use of metal rods.''</span>
| style="width: 10%;"    | Item
<div class="mw-collapsible-content">
| class="unsortable" style="width: 35%;"    | Description
{|class="wikitable sortable" width:"80%" style="background-color:#fffcec;margin:10pt;"
| style="width: 10%;"     | Item
|- style="background-color:#ffc050;font-weight:bold; color: white;text-align:center;"
| class="unsortable" style="width: 35%;"     | Description
! style='background-color:#ffc050' width:150px;                     |Object
! class="unsortable" style='background-color:#ffc050' width:200px; |Materials
! class="unsortable" style='background-color:#ffc050'              |Construction
! class="unsortable" style='background-color:#ffc050'              |Deconstruction
|-
! Lattice
[[File:Lattice.png]]
|
* 2 Metal Rods
|
* Hold rods in-hand
* Apply to space tile
|
* Apply wirecutters (1 rod returned)
|-
! Catwalk
[[File:Catwalk.png]]
|
* 2 Metal Rods
|
* Hold rods in-hand
* Apply metal rods to lattice
|
* Apply wirecutters (1 rod returned)
* Note: applying wirecutters simultaneously deconstructs catwalk & underlying lattice
|-
! Reinforced Floor
[[File:Reinforced_floor.png]]
|
* 2 Metal Rods
|
* Hold rods in-hand
* Apply to plating tile
|
* Apply wrench (2 rods returned)
|-
! Grille
[[File:Grille.png]]
|
* 2 Metal Rods
|
* Use rods in-hand
* Select "grille"
|
* Apply wirecutters (2 rods returned)
|-
! Railing
[[File:Railing.png]]
|
* 3 Metal Rods
|
* Use rods in-hand
* Select "railing"
|
* Apply wrench
* Apply wirecutters (3 rods returned)
|-
! Railing Corner
[[File:Railing Corner.png]]
|
* 3 Metal Rods
|
* Use rods in-hand
* Select "railing corner"
|
* Apply wrench
* Apply wirecutters (3 rods returned)
|-
! Chainlink Fences
[[File:Chainlink Fences.gif]]
|
* 5 Metal Rods
|
* Use rods in-hand
* Select "chainlink Fence" subgroup
* Select "chainlink fence", "chainlink post", or "chainlink corner"
|
* Apply wirecutters 3 times (no rods returned)
|-
|-
! Chainlink Fence Door
! Disposal Pipe <br> [[File:Disposal_pipe.png]]
[[File:Chainlink Fence Door.png]]
| Large pneumatic pipes that are used to carry trash, mail, and occasionally people around the station.
|  
! Disposal Bin <br> [[File:Disposal_bin.png]]
* 10 Metal Rods
| The preferred method for delivering garbage into disposal pipes. Holds onto contents until they are flushed, whether manually or automatically.
|
* Use rods in-hand
* Select "chainlink fence" subgroup
* Select "chainlink fence door"
|
* Apply wirecutters (no rods returned)
|-
|-
! Chainlink Fence End
! Disposal Outlet <br> [[File:Disposal_outlet.png]]
[[File:Chainlink Fence End.png]]
| Whenever something or someone has reached this from a disposal pipe, they are ejected after a buzzer sounds.
|  
! Disposal Intake <br> [[File:Disposal_intake.png]]
* 3 Metal Rods
| An open chute into disposal pipes. Objects or people that enter will be sent into connected disposal pipes. Objects or people who reach one of these at the end of a disposal pipe are ejected at high speed in a random direction.
|
* Use rods in-hand
* Select "chainlink fence" subgroup
* Select "chainlink fence end"
|
* Apply wirecutters (no rods returned)
|}
|}
</div></div>
 
<br>
===Gases===
=== Mixed Constructions ===
 
<div class="toccolours mw-collapsible mw-collapsed width:20%;" style="background-color:#ffc050; width:80%;">
The main goal of atmospherics is to manipulate these in a way that benefits the station. Each type of gas has different properties that can help or hinder. Your skill in manipulating these will determine the success of your atmospheric machinations.
<span style="font-size:1.5em;" style="font-weight:bold;color:white">- ''A list of constructions that involve the use of metal sheets as a starting component.''</span>
 
<div class="mw-collapsible-content">
{| class="wikitable sortable mw-collapsible" width="90%" style="text-align: center; background-color: #fffcec;"
{|class="wikitable sortable" style="background-color:#fffcec;margin:10pt; width:80%;"
|- style="font-weight: bold; background-color: #ffc050; color: white;"
|- style="background-color:#ffc050;font-weight:bold; color: white;text-align:center;"
| style="width: 15%;"    | Item
! style='background-color:#ffc050' width:150px;                     |Object
| class="unsortable" style="width: 75%;"     | Description
! class="unsortable" style='background-color:#ffc050' width:200px; |Materials
 
! class="unsortable" style='background-color:#ffc050'              |Construction
! class="unsortable" style='background-color:#ffc050'              |Deconstruction
|-
! {{anchor|Reinforced Wall}} Reinforced Wall
[[File:R_wall.png]]
|
* 2 Metal
* 2 Plasteel
|
* Use metal in-hand
* Select "wall girders"
* Apply plasteel to girder
* Apply plasteel again
|
* Apply wirecutters, screwdriver (1 rod returned)
* Apply active welder, crowbar
* Apply wrench, active welder (1 plasteel returned)
* Apply crowbar, screwdriver
* Apply wirecutters, wrench (1 rod, 2 metal returned)
|-
! Reinforced False Wall
[[File:False_Wall_r.gif]]
|
* 2 Metal
* 2 Plasteel
|
* Use metal in-hand
* Select "wall girders"
* Apply crowbar
* Apply plasteel to girder
|
* Apply screwdriver
* Apply wirecutters, screwdriver (1 rod returned)
* Apply active welder, crowbar
* Apply wrench, active welder (1 plasteel returned)
* Apply crowbar, screwdriver
* Apply wirecutters, wrench (1 rod, 2 metal returned)
|-
! Light-Tile
[[File:LightFloor.gif]]
|
* 1 Metal
* 1 Glass
* 5 Cable Coil
|
* Apply cable coil to glass sheet
* Apply metal to wired glass
* Apply light-tile to plating (use 'magnetic gripper' if you're synthetic)
* Apply multitool to change colour
|
* Apply crowbar to lift light-tiles
|-
! Table
[[File:Table.png]]
|
* 1 Metal
* 2 Rods
|
* Use rods in-hand
* Select "table frame"
* Apply metal to frame
|
* Apply wrench (1 metal, 2 rods returned)
|-
! Reinforced Table
[[File:R-table.png]]
|
* 1 Plasteel
* 2 Rods
|
* Use rods in-hand
* Select "table frame"
* Apply plasteel to frame
|
* Apply welder
* Apply wrench (1 plasteel, 2 rods returned)
|-
! Fancy Table
[[File:Fancytable.png]]
|
* 2 Rods
* 1 Carpet
|
* Use rods in-hand
* Select "table frame"
* Apply carpet to frame
|
* Apply wrench (1 material, 2 rods returned)
|-
! Glass Table
[[File:Glasstable.png]]
|
* 2 Rods
* 1 Glass
|
* Use rods in-hand
* Select "table frame"
* Apply glass to frame
|
* Apply wrench (1 material, 2 rods returned)
|-
! Computer Console
[[File:Teleporterconsole.png]]
|
* 5 Metal
* 2 Glass
* 5 Cable Coil
* 1 Circuitboard
|
* Use metal in-hand
* Select "computer frame"
* Apply wrench, circuitboard
* Apply screwdriver, cablecoil
* Apply glass, screwdriver
|
* Apply screwdriver, crowbar (2 glass returned)
* Apply wirecutters, screwdriver (5 cable returned)
* Apply crowbar, wrench
* Apply active welder (5 metal returned)
|-
! Machine
[[File:Machine_Frame.png]]
|
* 5 Metal
* 10 Cable Coil
* Circuitboard
* Select Components
|
* Use metal in-hand
* Select "machine frame"
* Apply cable coil, circuitboard
* Apply required components
* Apply screwdriver
|
* Apply screwdriver, crowbar (components/board returned)
* Apply wirecutters (cable returned)
* Apply wrench (5 metal returned)
|-
! Display Case
[[File:Display_Case.png]]
|
* 5 Wood
* 10 Glass
* Airlock Electronics
|
* Use Wood in-hand
* Select "display case chassis"
* Use airlock electronics in-hand to set access
* Apply airlock electronics
* Apply glass
* Apply screwdriver
|
* Unlock with ID
* Apply crowbar, crowbar, crowbar (5 glass returned)
* Apply wrench (5 metal returned)
|-
! Automated Turret
[[File:Turret.PNG]]
|
* 5 Metal
* Proximity Sensor
* Energy Gun
|
* Use metal in-hand
* Select "turret frame"
* Apply wrench, metal, wrench
* Apply energy gun, proximity sensor
* Apply screwdriver, metal
* Apply active welder
|
* Hit with object on harm intent while turret is active
* Apply crowbar (energy gun returned)
* Apply active welder (5 metal returned)
|-
! Firelock
[[File:Firelock.png]]
|
* 3 Metal
* 5 Cable Coil
* Firelock Electronics
|
* Use metal in-hand
* Select "firelock frame"
* Apply firelock electronics
* Apply cable coil, crowbar
* Apply plasteel (optional)
* Apply wrench
|
* Apply crowbar, weld shut with active welder
* Apply screwdriver, wrench, crowbar
* Apply wirecutters, crowbar (cable, firelock electronics returned)
* Apply active welder (3 metal returned)
|-  
|-  
! Airlock
! Nitrogen (N2) <br> [[File:N2_canister.png]]
[[File:Airlock.gif]]
| Nitrogen is an inert gas that makes up 80% of the air on the station. Vox breathe this. But in the station atmosphere, it mostly just takes up space.
|
* 4 Metal
* 1 Glass (optional)
* 1 Mineral Sheet (optional)
* 5 Cable Coil
* Airlock Electronics
|
* Use metal in-hand  {{anchor|Airlock}}
* Select "airlock assemblies"
* Select desired sub-type
* Apply wrench, cable coil
* Apply glass and/or minerals (optional)
* Use airlock electronics in-hand to set access
* Apply airlock electronics
* Apply pen to optionally rename
* Apply screwdriver
|
* Make sure Wire Panel is screwed closed
* Weld airlock closed with active welding tool on harm intent
* Apply screwdriver
* Bolts up
* Apply wirecutters, cut the test wire
* Apply crowbar (airlock electronics returned)
* Apply wirecutters (cable returned)
* Apply wrench, active welder (4 metal returned)
|-
! Windoor
[[File:Windoor.png]]
|
* 5 Reinforced Glass
* 2 Plasteel (optional)
* 1 Cable Coil
* Airlock Electronics
|
* Use reinforced glass in-hand
* Select "windoor"
* Apply wrench, plasteel (optional)
* Use airlock electronics in-hand to set access
* Apply cable, airlock electronics
* Apply crowbar
|
* Apply crowbar to open windoor
* Apply screwdriver, crowbar (airlock electronics returned)
* Apply wirecutters, wrench (cable returned)
* Apply active welder (5 reinforced glass returned)
|-
! Meatspike
[[File:Meatspike.png]]
|
* 5 Metal
* 4 Rods
|
* Use metal in-hand
* Select "meatspike frame"
* Apply rods
|
* Apply crowbar (rods returned)
* Apply wrench to move (non-destructible frame)
|-
! Light Fixture
[[File:Lightfixture.png]]
|
* 1-2 Metal
* 1 Cable Coil
|
* Use metal in-hand
* Select "(small) light fixture frame"
* Apply frame to adjacent wall
* Apply cable coil
* Apply screwdriver
|
* Remove lightbulb
* Apply screwdriver, wirecutters (cable returned)
* Apply wrench, wrench (1-2 metal returned)
|-
! APC
[[File:APC.png]]
|
* 2 Metal
* 10 Cable Coil
* Power Control Board
* Power Cell
|
* Use metal in-hand
* Select "apc frame"
* Apply apc frame to wall
* Apply power control board, cable coil
* Apply screwdriver, power cell
* Apply crowbar
|
* Unlock with ID, disengage lock cover
* Apply crowbar, empty hand (power cell returned)
* Apply screwdriver
* Apply crowbar to floor tile adjacent to APC
* Apply wirecutters, crowbar (cable, power control module returned)
* Apply active welder, wrench (2 metal returned)
|-
! Air Alarm
[[File:AirAlarm.png]]
|
* 2 Metal
* 5 Cable Coil
* Air Alarm Electronics
|
* Use metal in-hand
* Select "air alarm frame"
* Apply air alarm frame to wall
* Apply air alarm electronics
* Apply cable coil, screwdriver
|
* Apply screwdriver
* Apply wirecutters, cut all wires
* Apply wirecutters (cable returned)
* Apply crowbar (air alarm electronics returned)
* Apply wrench (2 metal returned)
|-
! Fire Alarm
[[File:FireAlarm.png]]
|
* 2 Metal
* 5 Cable Coil
* Fire Alarm Electronics
|
* Use metal in-hand
* Select "fire alarm frame"
* Apply fire alarm frame to wall
* Apply fire alarm electronics
* Apply cable coil, screwdriver
|
* Apply screwdriver
* Apply wirecutters (cable returned)
* Apply crowbar (fire alarm electronics returned)
* Apply wrench (2 metal returned)
|-
! Intercom
[[File:Wallradio.png]]
|
* 2 Metal
* 5 Cable Coil
* Intercom Electronics
|
* Use metal in-hand
* Select "intercom frame"
* Apply intercom frame to wall
* Apply intercom electronics
* Apply cable coil, screwdriver
|
* Apply screwdriver
* Apply wirecutters (cable returned)
* Apply crowbar (intercom electronics returned)
* Apply welder (2 metal returned)
|-
|-
! Security Camera
! Oxygen (O2) <br> [[File:O2_canister.png]]
[[File:Security_Camera.gif]]
| The other 20% of the air. Filling the entire station with O2 would work but is worthless and makes it a even bigger firehazard. Most of the crew will be needing at least 16kPa of this stuff in the atmosphere in order to live. So filling the entire station with O2 would work but is worthless and makes it an even bigger firehazard. Poisonous to Vox and Plasmamen. Necessary for burning plasma.
|
* 1 Camera assembly
* 2 Cable Coil
|
* Put the camera assembly on the floor
* Apply wrench on the camera assembly
* Apply welder, cable coil
* Optional, add proximity sensor for motion detection
* Optional, add plasma sheet for EMP protection
* Apply screwdriver to finish
|
* Apply screwdriver
* Cut all wires
* Apply welder
* Optional, apply crowbar to remove upgrades
* Apply wrench (camera assembly returned, upgrades still inside)
|-
|-
! Extinguisher Cabinet
! Air <br> [[File:Air_Canister.png]]
[[File:Extinguishercabinet.png]]
| You know what this is. The gas mix that is distributed around the station. It is composed of 80% N2 and 20% O2.
|
* 2 Metal
|
* Use metal in-hand
* Select "extinguisher cabinet frame"
* Apply extinguisher cabinet frame to wall
|
* Remove fire extinguisher
* Apply active welder (1 metal returned)
|-
|-
! Grenade
! Carbon Dioxide (CO2) <br> [[File:CO2_canister.png]]
[[File:Grenade.png]]
| An invisible gas that is slightly heavier than air. This is what crewmembers who breathe will be exhaling. Also produced by plasma fires. In high concentrations, will make you pass out, which can quickly lead to suffocation.  
|
* 1 Metal
* 1 Cable Coil
* 1-2 Beakers
|
* Use metal in-hand
* Select "grenade casing"
* Apply cable coil, beaker
* Apply screwdriver
|
* Apply wirecutters
* Apply wrench (grenade casing returned, beaker returned)
|}
</div></div>
<br>
=== Glass Constructions ===
<div class="toccolours mw-collapsible mw-collapsed width:20%;" style="background-color:#ffc050; width:80%;">
<span style="font-size:1.5em;" style="font-weight:bold;color:white">- ''A list of constructions that only involve the use of glass or reinforced glass sheets.''</span>
<div class="mw-collapsible-content">
{|class="wikitable sortable" width:"80%" style="background-color:#fffcec;margin:10pt;"
|- style="background-color:#ffc050;font-weight:bold; color: white;text-align:center;"
! style='background-color:#ffc050' width:150px;                    |Object
! class="unsortable" style='background-color:#ffc050' width:200px;  |Materials
! class="unsortable" style='background-color:#ffc050'              |Construction
! class="unsortable" style='background-color:#ffc050'              |Deconstruction
|-
|-
! Fishbowl
! Nitrous Oxide (N2O) <br> [[File:N2O_canister.png]]
[[File:Fishbowl.png]]
| Also known as Sleeping Agent. A white-flecked gas that is slightly heavier than CO2. At low concentrations, will cause sporadic laughing. At high concentrations, will put you to sleep.
|
* 1 Glass
|
* Use glass in-hand
* Select "fishbowl"
|
* Apply wrench (1 glass returned)
|-
! Fish Tank
[[File:Fishtank.png]]
|
* 3 Glass
|
* Use glass in-hand
* Select "fish tank"
|
* Apply wrench (3 glass returned)
|-
! Wall Aquarium
[[File:Aquarium.png]]
|
* 4 Glass
|
* Use glass in-hand
* Select "wall aquarium"
|
* Apply wrench (4 glass returned)
|-
! Directional Window
[[File:Glass_panel.png]]
|
* 1 Glass
OR
* 1 Plasma Glass
|
* Use glass in-hand
* Select "directional window"
* Fasten with screwdriver
OR
* Hold glass in-hand
* Click on constructed grille
* Fasten with screwdriver
|
* Unsecure with screwdriver
* Apply wrench (1 material returned)
|-
! Fulltile Window
[[File:Glass_wall.png]]
|  
* 2 Glass
OR
* 2 Plasma Glass
|
* Use glass in-hand
* Select "fulltile window"
* Fasten with screwdriver
|
* Unsecure with screwdriver
* Apply wrench (2 material returned)
|-
! Directional Window (Reinforced)
[[File:Glass_panel_r.png]]
|
* 1 Reinforced Glass
OR
* 1 Reinforced Plasma Glass
|
* Use reinforced glass in-hand
* Select "directional window"
* Apply screwdriver, crowbar, then screwdriver
OR
* Hold reinforced glass in-hand
* Click on constructed grille
* Apply screwdriver, crowbar, then screwdriver
|
* Unsecure with screwdriver, crowbar, then screwdriver
* Apply wrench (1 material returned)
|-
! Fulltile Window (Reinforced)
[[File:Glass_wall_r.png]]
|
* 2 Reinforced Glass
OR
* 2 Reinforced Plasma Glass
|
* Use reinforced glass in-hand
* Select "fulltile window"
* Apply screwdriver, crowbar, then screwdriver
|
* Unsecure with screwdriver, crowbar, then screwdriver
* Apply wrench (2 material returned)
|-
! Directional Electrochromic Window (Reinforced)
[[File:Electrochromic Window Directional.gif]]
|
* 2 Reinforced Glass
|
* Use reinforced glass in-hand
* Select "directional window"
* Apply screwdriver, crowbar, then screwdriver
OR
* Hold reinforced glass in-hand
* Click on constructed grille
* Apply screwdriver, crowbar, then screwdriver
|
* Unsecure with screwdriver, crowbar, then screwdriver
* Apply wrench (2 material returned)
|-
! Fulltile Electrochromic Window (Reinforced)
[[File:Electrochromic Window Fulltile.gif]]
|
* 4 Reinforced Glass
|
* Use reinforced glass in-hand
* Select "fulltile electrochromic window"
* Apply screwdriver, crowbar, then screwdriver
|
* Unsecure with screwdriver, crowbar, then screwdriver
* Apply wrench (4 material returned)
|-
! Glass Floor
[[File:Glass floor.gif]]
|
* 2 Glass
OR
* 2 Plasma Glass
|
* Hold glass in hand
* Use glass on plating (two metal returned)
|
* Hold two metal in hand
* Use crowbar on the floor (two glass returned)
|-
! Glass Floor (Reinforced)
[[File:Reinforced glass floor.gif]]
|
* 2 Reinforced Glass
OR
* 2 Reinforced Plasma Glass
|
* Hold glass in hand
* Use glass on plating (two metal returned)
|
* Hold two metal in hand
* Use crowbar on the floor (two glass returned)
|-
|-
! Toxins (Plasma) <br> [[File:Plasma_canister.png]]
| The oil of the new world. Purple, highly flammable, and highly toxic(unless you are a Plasmaman). Burns with oxygen and will spontaneously ignite with it at a high enough temperature. Much heavier than all the previous gases.
|}
|}
</div></div>
 
<br>
=== Plasteel Constructions ===
 
<div class="toccolours mw-collapsible mw-collapsed width:20%;" style="background-color:#ffc050; width:80%;">
<span style="font-size:1.5em;" style="font-weight:bold;color:white">- ''A list of constructions that only involve the use of special materials such as plasteel.''</span>
==Atmospherics==
<div class="mw-collapsible-content">
 
{|class="wikitable sortable" width:"80%" style="background-color:#fffcec;margin:10pt;"
The main room for this sub-department. Not everyone will use this room to it's fullest extent. But as one of the biggest areas on the station the possibilities are endless. The room might look scary at first sight, but it's rather straightforward. Everything will function without properly setting up atmospherics at the start of the shift; the station will be supplied with air and filter out waste without crew interference. But it's higly recommended to do so.
|- style="background-color:#ffc050;font-weight:bold; color: white;text-align:center;"
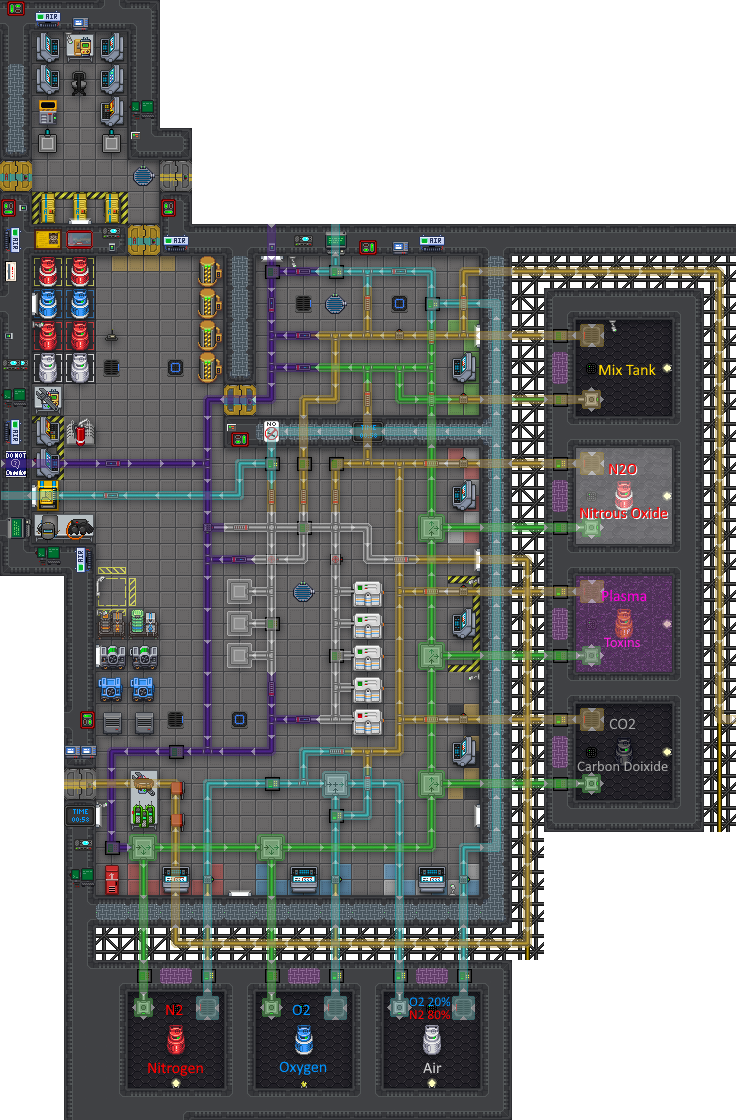
Atmospherics is built in such a way so that new technicians will quickly learn how the room works. And to easier see what pipes and devices do what; the room uses colour coded pipes.
! style='background-color:#ffc050' width:150px;                     |Object
 
! class="unsortable" style='background-color:#ffc050' width:200px; |Materials
===Colour Coded Pipes===
! class="unsortable" style='background-color:#ffc050'              |Construction
 
! class="unsortable" style='background-color:#ffc050'              |Deconstruction
At first glance it might look silly having pipes in different colours. But by doing so it's easier to distinguish what section of the pipenet does what. As one wise Atmospherics Technician once said "Stare at it until it make sense."; follow this advice and it will all become clear in due time.
|-
 
! Surgery Table
{| class="wikitable sortable mw-collapsible" width="90%" style="text-align: center; background-color: #fffcec;"
[[File:Surgery.png]]
|- style="font-weight: bold; background-color: #ffc050; color: white;"
|
| style="width: 10%;"    | Item
* 5 Plasteel
| class="unsortable" style="width: 35%;"    | Description
|
| style="width: 10%;"     | Item
* Hold plasteel in-hand
| class="unsortable" style="width: 35%;"     | Description
* Select "surgery table"
|
* Apply wrench (5 plasteel returned)
|-
! Metal Crate
[[File:GrayCrate.png]]
|
* 10 Plasteel
|
* Hold plasteel in-hand
* Select "metal crate"
|
* N/A
|-
|-
! Titanium Window
!Air Supply <br> [[File:supply_pipe.png]]
[[File:Glass_tita.png]]
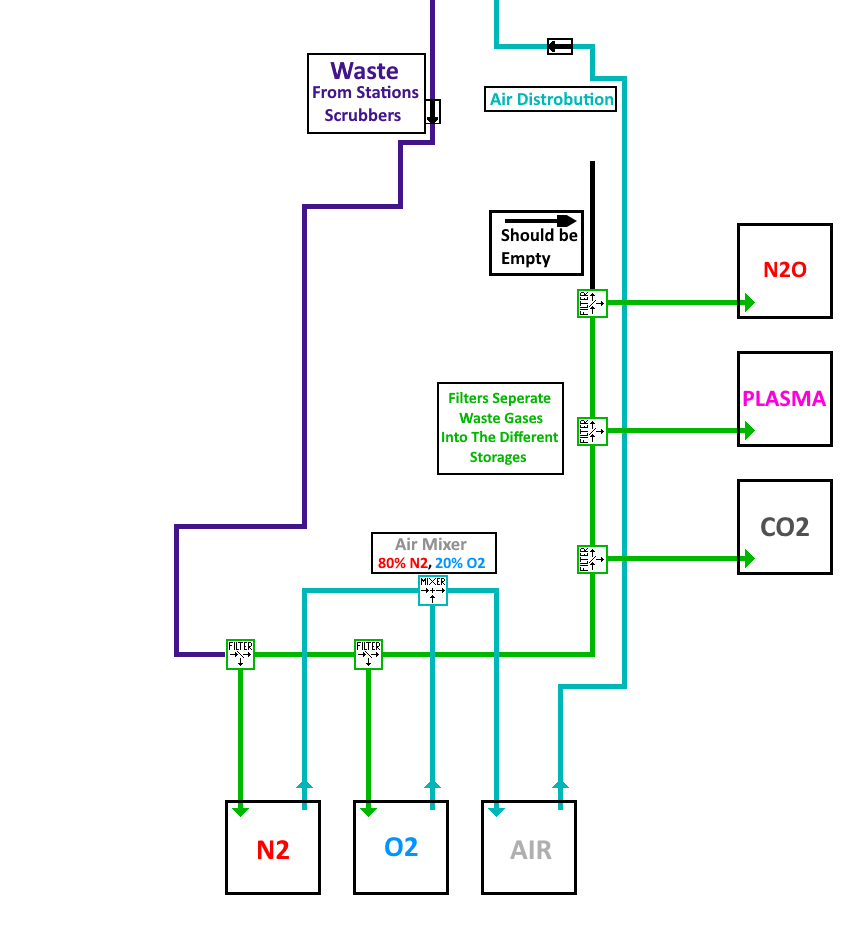
|The '''<span style="color:#0000B2">dark blue pipe</span>''' is the '''<span style="color:black">Main Air Supply</span>'''. It sends breathable air (roughly 80% nitrogen and 20% oxygen) to all the vents on the station, and is fed by the cyan pipe in Atmospherics.
|
!Scrubber <br> [[File:Scrubber_pipe.png]]
* 2 Titanium Glass
|The '''<span style="color:#B70000">red pipe</span>''' is the '''<span style="color:black">Scrubber Pipe</span>'''. This is where all the toxic waste normally ends up by the scrubber system found all around the station. It may contain breathable air, however it is unfiltered and possibly contaminated.
|
* Use titanium glass in-hand
* Select "shuttle window"
* Apply screwdriver, crowbar, then screwdriver
|
* Unsecure with screwdriver, crowbar, then screwdriver
* Apply wrench (2 titanium glass returned)
|-
|-
! Plastitanium Window
!Air Mix <br> [[File:cyan_pipe.png]]
[[File:Glass_plasti.png]]
|The '''<span style="color:#00B2B2">cyan pipe</span>''' is the breathable air or the '''<span style="color:black">Air Mix</span>'''. This pipe feeds into the main air supply.
|
!Waste <br> [[File:purple_pipe.png]]
* 2 Plastitanium Glass
|The '''<span style="color:#42168B">purple pipe</span>''' is the '''<span style="color:black">Waste Pipe</span>''', which retrieves waste air from the scrubber pipe which then leads to the filter.
|
* Use plastitanium glass in-hand
* Select "plastitanium window"
* Apply screwdriver, crowbar, then screwdriver
|
* Unsecure with screwdriver, crowbar, then screwdriver
* Apply wrench (2 plastitanium glass returned)
|-
|-
! Plastitanium Wall
!Filter <br> [[File:green_pipe.png]]
[[File:Wall_plasti.png]]
|The '''<span style="color:#00B800">green pipe</span>''' is the '''<span style="color:black">Filter Pipe</span>''', which filters out the various gases in the waste air provided by the water at various filters placed along it. Each filter puts the respect gases back into the gas containers.
|
!Pure <br> [[File:yellow_pipe.png]]
* 2 Metal
|The '''<span style="color:#B79200">yellow pipe</span>''' is the '''<span style="color:black">Mix Pipe</span>''', which is internal to Atmospherics and is used for custom air mixes.
* 2 Plastitanium
|
* Use metal in-hand
* Select "wall girders"
* Apply plastitanium to girder
|
* Apply welder (1 plastitanium returned)
* Apply wrench (1 metal returned)
|-
! Plastitanium Tiles (4)
[[File:Plastitaniumtile.png]]
|
* 1 Plastitanium
|
* Use metal in-hand
* Select "plastitanium tiles"
* Apply floor tiles to plating
|
* Apply crowbar to lift floor tiles
|}
|}
</div></div>
 
<br>
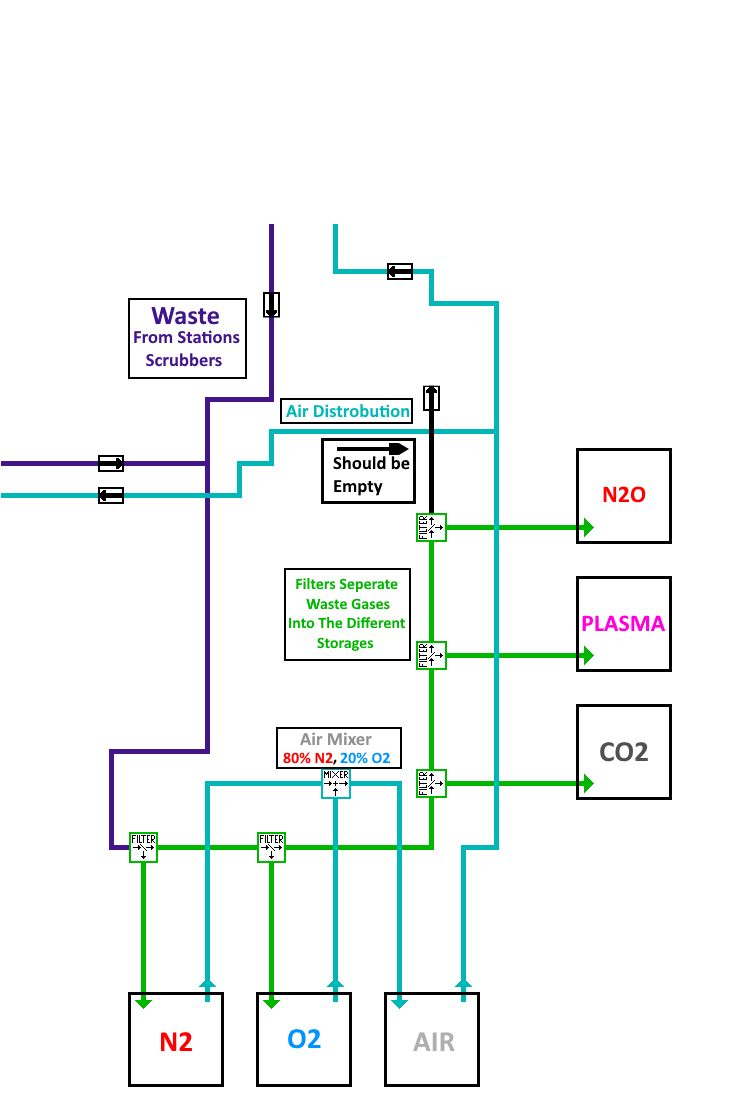
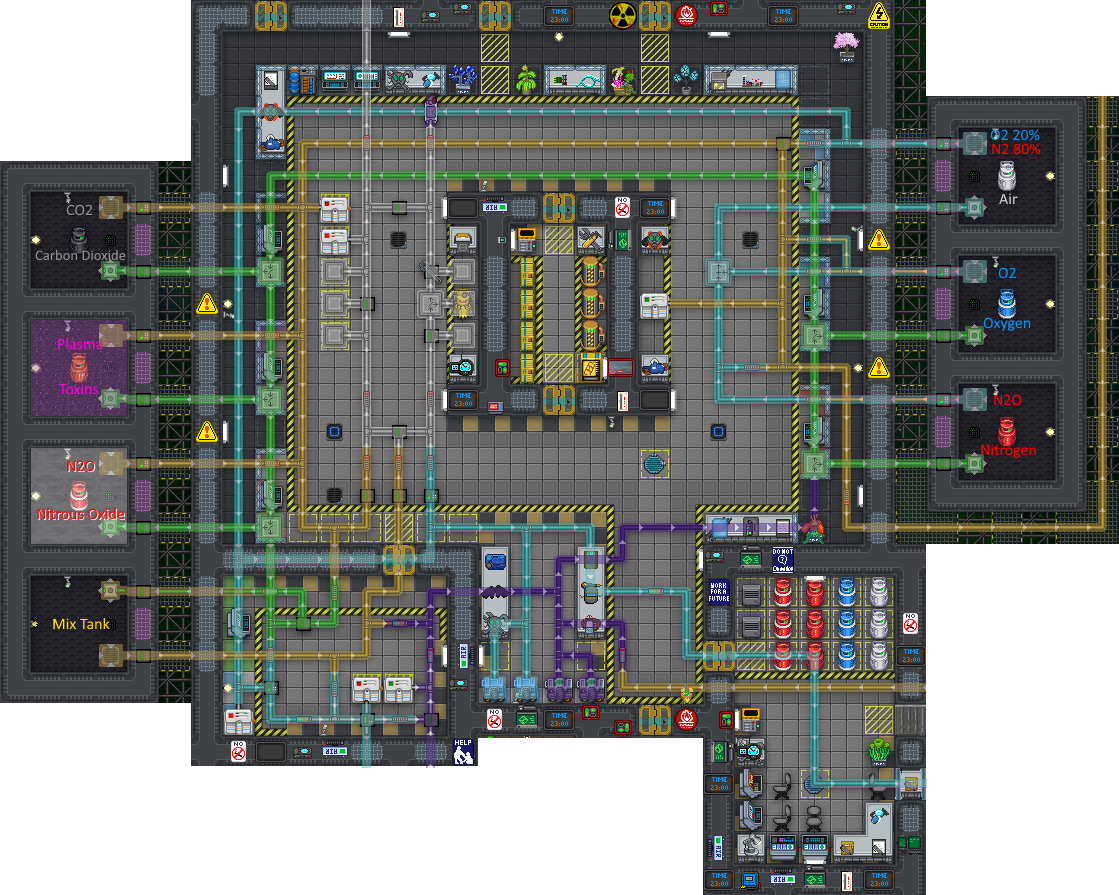
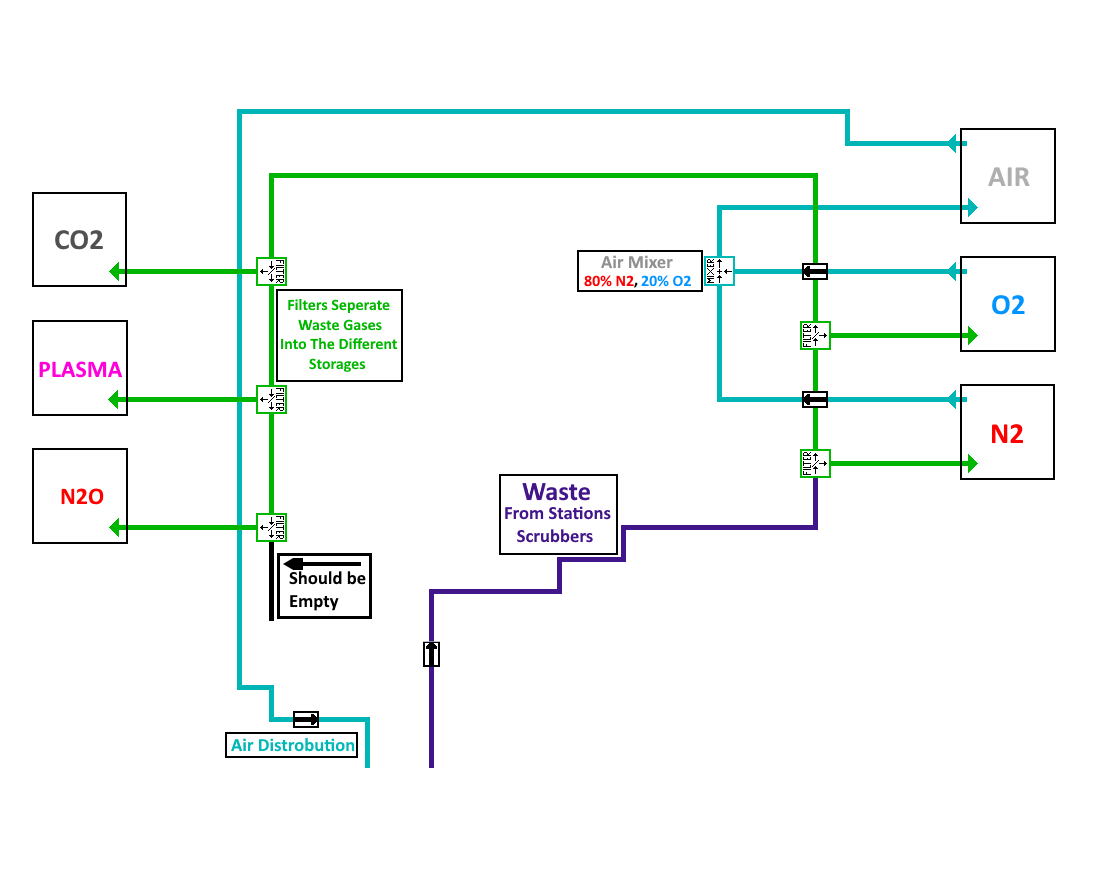
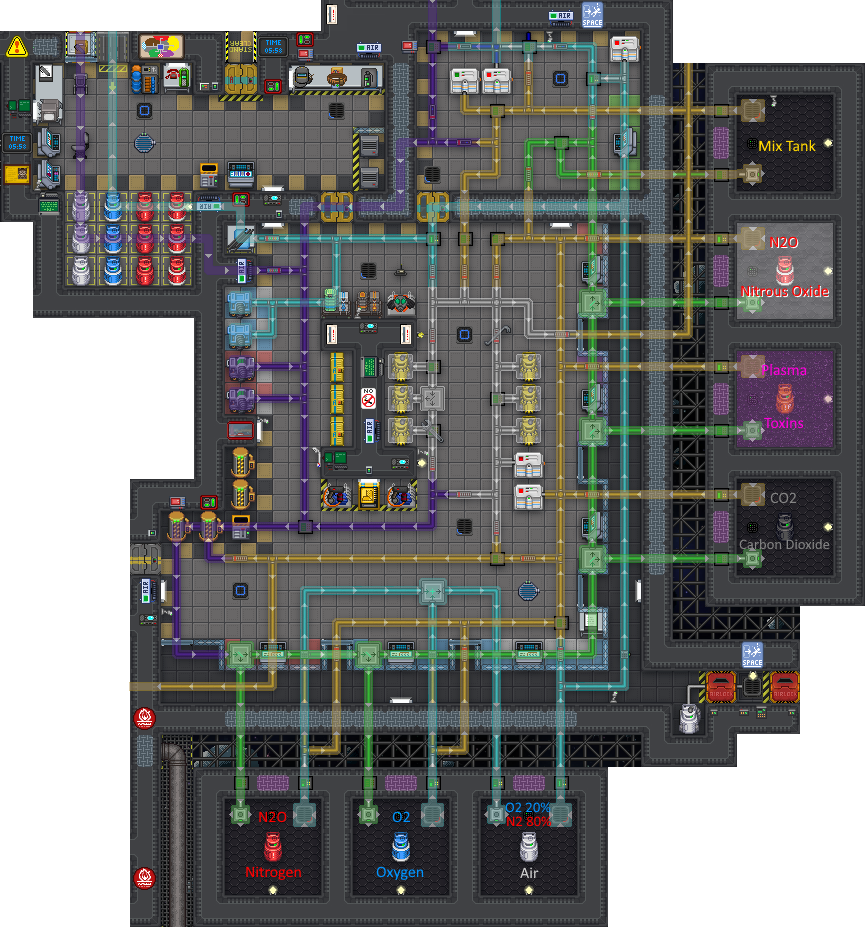
===Atmospherics Layout===
=== Mixed Plasteel Constructions ===
 
<div class="toccolours mw-collapsible mw-collapsed width:20%;" style="background-color:#ffc050; width:80%;">
<tabs>
<span style="font-size:1.5em;" style="font-weight:bold;color:white">- ''A list of constructions that involve the use of special materials as a starting component.''</span>
<tab name="NSS Cyberiad">
<div class="mw-collapsible-content">
The layout of NSS Cyberiad, aka Boxstation. <br>
{|class="wikitable sortable" width:"80%" style="background-color:#fffcec;margin:10pt;"
[[File:Atmos_Box_Highlighted.png]]
|- style="background-color:#ffc050;font-weight:bold; color: white;text-align:center;"
</tab>
! style='background-color:#ffc050' width:150px;                     |Object
<tab name="NSS Cyberiad Simplified">
! class="unsortable" style='background-color:#ffc050' width:200px; |Materials
A Simplified version of NSS Cyberiads Air distrobution system. <br>
! class="unsortable" style='background-color:#ffc050'              |Construction
[[File:Atmos_Box_Simplified.png]]
! class="unsortable" style='background-color:#ffc050'              |Deconstruction
</tab>
|-
<tab name="NSS Kerberos">
! AI Core
The layout of NSS Kereberos, aka Deltastation. <br>
[[File:AI.gif]]
[[File:Atmos_Delta_Highlighted.png]]
|
</tab>
* 4 Plasteel
<tab name="NSS Kerberos Simplified">
* 2 Reinforced Glass
A Simplified version of NSS Kereberos Air distrobution system. <br>
* 5 Cable Coil
[[File:Atmos_Delta_Simplified.png]]
* AI Circuitboard
</tab>
* Brain
<tab name="NSS Cereberon">
|
The layout of NSS Cereberon, aka Metastation. <br>
* Use plasteel in hand
[[File:Atmos_Meta_Highlighted.png]]
* Select "AI core"
</tab>
* Apply wrench, circuitboard to core
<tab name="NSS Cereberon Simplified">
* Apply screwdriver, cable coil to core
A Simplified version of NSS Cereberon Air distrobution system. <br>
* Apply brain, reinforced glass to core
[[File:Atmos_Meta_Simplified.png]]
* Apply screwdriver to core
</tab>
|
</tabs>
* Apply screwdriver
===Mixing Gases===
* Apply crowbar (2 reinforced glass returned)
====Gas For Canisters====
* If the core contains a brain/mmi, apply crowbar
====Gas For The Turbine====
* Apply wirecutters (5 cable returned)
====Gas For The Supermatter====
* Apply screwdriver
==Station Systems==
* Apply crowbar (returns circuit board)
 
* Apply active welder (5 plasteel returned)
There are some systems on the station that the atmospheric technician will be working with during their shift.
 
===[[Air Alarm|Air Alarms]]===
 
[[File:AirAlarm.png]]
 
Mandatory for the use of non-passive vents and scrubbers. Allows a wide range of control over a blueprinted rooms current gas contents. Where exactly the Air Alarm is in the room does not matter. As long as the room is blueprinted and powered it will function. Cannot be placed in areas that are not blueprinted.
 
'''To learn more about Air Alarms and how to use them, click here: [[Air Alarm]]'''  
 
----
 
===Fire Alarms===  
 
[[File:FireAlarm.png]]
 
Most areas have firelock doors which close if a fire is detected. This will stop the fire from spreading to other areas and is therefore very useful. Some crewmembers can be tempted to force them open (by resetting the fire alarm for the area) without one thought that doing so provides the fire with more oxygen, which will keep it burning longer.
 
----
<br><br>
===Computer Consoles And Monitors===
 
{| class="wikitable sortable mw-collapsiblewidth="90%" style="text-align: center; background-color: #fffcec;"
|- style="font-weight: bold; background-color: #ffc050; color: white;"
| style="width: 15%;"    | Computer
| style="width: 75%;"     | Description
|-  
!Central Atmospherics <br> Computer <br>
[[File:atmos_tank_monitor.png|center]]
|The most important computer for the Atmospherics department to have. It can remotley access all air alarms on the station. Can also show a map with locations of all the air alarms.
|-
|-
! Bomb Assembly
!Atmospheric Alert <br> Computer <br>
[[File:Secbomb.png]]
[[file:atmos_alert_console.gif|center]]
|
|This computer will tell you where your attention is needed. Green means everything is alright, yellow signals something is wrong, and red means things have gone wrong enough for an alarm to be triggered (Usually caused when a room's air stops being breathable).
* 3 Plasteel
|
* Use plasteel in hand
* Select "bomb assembly"
* Apply bomb to assembly (optional)
|
* N/A
|-
|-
! Mass Driver
!Large Tank <br> Control <br>
[[File:Massdriver.png]]
[[File:atmos_tank_monitor.png|center]]
|
|Can be used to monitor the pressure and control the inlet and outlet of larger tanks in Atmospherics. This computer is needed to be able to use the Injector.
* 3 Plasteel
* 2 Rods
* 5 Cable Coil
|
* Use plasteel in hand
* Select "mass driver frame"
* Apply wrench to frame
* Apply active welder to frame
* Apply Cable Coil
* Apply rods to frame
* Apply Screw driver
|
* Apply screwdriver, crowbar, wirecutters (2 rods, 5 cable returned)
* Apply active welder
* Apply wrench
* Apply active welder (3 plasteel returned)
|-
|-
! Reinforced Airlock
!Tank Monitor <br>
[[File:Airlock.gif]]
[[File:atmos_tank_monitor.png|center]]
|
|Just like the Large Tank Control but will only connect to sensors, making it rather obsolete.
* 6-8 Plasteel
|
* See [[Guide to Construction#Airlock|airlock]]
|
* See [[Guide to Construction#Airlock|airlock]]
|}
|}
</div></div>
<br>
<br>
=== Wood Constructions ===
 
<div class="toccolours mw-collapsible mw-collapsed width:20%;" style="background-color:#ffc050; width:80%;">
====Link Devices To Monitors====
<span style="font-size:1.5em;" style="font-weight:bold;color:white">- ''A list of constructions that involve the use of wood planks as a starting component.''</span>
 
<div class="mw-collapsible-content">
[[File:Link_Device.png|right|thumb]]
{|class="wikitable sortable" width:"80%" style="background-color:#fffcec;margin:10pt;"
To link different atmospheric devices, such as the air injector, a multitool is required. By using the multitool on the device a window will appear that will show what '''Frequency''' it's using, what it's named with an '''ID tag''' and the '''Multitool Buffer''' that links the device to the multitool. Not every device will have the option to add it to a multitool and some don't need to be added to a multitool at all.
|- style="background-color:#ffc050;font-weight:bold; color: white;text-align:center;"
<br><br>
! style='background-color:#ffc050' width:150px;                    |Object
The gas sensor have a few option on what information to show by enabling the different internal sensors with the multitool.
! class="unsortable" style='background-color:#ffc050' width:200px;  |Materials
<br><br>
! class="unsortable" style='background-color:#ffc050'               |Construction
With the device added to the multitool it is now possible to link it to preferably a Large Tank Control. Use the multitool on the computer and a new window will appear. <br><br>
! class="unsortable" style='background-color:#ffc050'               |Deconstruction
'''Frequency''' needs to be the same as the device for it to be able to link at all.
|-
 
! Wood Floor Tiles (4)
'''Input''' is where an air injector or unary vent can be linked with.
[[File:Woodtile.png]]
 
|
'''Output''' is for the unary vent with the siphon mode enabled.
* 1 Wood Plank
 
|
'''Sensors''' only require to be on the same frequency to be linked to the gas sensor.
* Use wooden plank in-hand
 
* Select "wood floor tiles"
----
* Apply floor tiles to plating
 
|
===Atmospherics Machinery===
* Apply screwdriver to lift floor tiles
 
|-
Some machinery are of use when working with atmospherics. Luckily enough theres not as many as devices.
! Wood/Poker Table
 
[[File:Woodtable.png]]
====Thermomachines====
|
 
* 3 Wood Planks
[[File:Freezer.gif|left]] Also known as "Heaters" or "Freezers". They can be use to either heat och cool gas in the pipe it's directly connected to. Upgrading it with lasers will increase maximum and minimum temperature available; upgrading with matter bins will decrease the time needed to reach the desired vaule.
|
 
* Use wooden plank in-hand
Useful in many senarios: such as help a basic [[Thermoelectric Generator|TEG]] to produce power so the completion of the station goal [[Station Goals#Bluespace Harvester|BSH]] can be made possible, or cooling down a gas to easier transport a large ammount of [[#Moles|moles]].
* Select "wood table frame"
These are just some of many uses made possible by te thermomachine.
* Apply wood plank to frame
 
OR
----
* Apply carpet tile to frame
 
|
===Atmospheric Portable Equipment===
* Apply wrench (3 wood returned)
 
OR
{| class="wikitable sortable mw-collapsible" width="90%" style="text-align: center; background-color: #fffcec;"
* Apply wrench (2 wood, 1 carpet returned)
|- style="font-weight: bold; background-color: #ffc050; color: white;"
|-
| style="width: 15%;"    | Item
! Wooden Chair
| style="width: 75%;"     | Description
[[File:Chairwood.png]]
|
* 3 Wood Planks
|
* Use wooden plank in-hand
* Select "wooden chair"
|
* Apply wrench (3 wood returned)
|-
! Pew
[[File:Chairpew.png]]
|
* 1 Wood
|
* Use Wood in-hand
* Select "Pew (direction)"
|
* Apply wrench (1 wood returned)
|-
! Wooden Barricade
[[File:Woodbarricade.png]]
|
* 5 Wood Planks
|
* Use wooden plank in-hand
* Select "wooden barricade"
|
* Apply crowbar (5 wood returned)
|-
! Bookcase
[[File:Bookcase.png]]
|
* 5 Wood Planks
|
* Use wooden plank in-hand
* Select "bookcase"
|
* Apply wrench (5 wood returned)
|-
! Dresser
[[File:Dresser.png]]
|
* 30 Wood Planks
|
* Use wooden plank in-hand
* Select "dresser"
|
* Apply wrench
* Apply crowbar (30 wood returned)
|-
! Drying Rack
[[File:Dryingrack.png]]
|
* 10 Wood Planks
|
* Use wooden plank in-hand
* Select "drying rack"
|
* Apply wrench
* Apply crowbar (10 wood returned)
|-
! Dog Bed
[[File:Dogbed.png]]
|
* 10 Wood Planks
|
* Use wooden plank in-hand
* Select "dog bed"
|
* Apply wrench (10 wood returned)
|-
! Wooden Door
[[File:Doorwood.png]]
|
* 10 Wood Planks
|
* Use wooden plank in-hand
* Select "wooden door"
|
* Hit with object on harm intent (5 wood returned)
|-
! Coffin
[[File:Woodcoffin.png]]
|
* 5 Wood Planks
|
* Use wooden plank in-hand
* Select "coffin"
|
* N/A
|-
|-
! Apiary
!Space Heater <br> [[file:Space Heater.gif]]
[[File:Apiary.png]]
|Heating up a cold area. Find a nearby breach and turn it on once it's been repaired. Made by the Space Amish, it can reliably heat up a room to a habitable temperature. Can be adjusted.
|
* 40 Wood Planks
|
* Use wooden plank in-hand
* Select "apiary"
|
* Apply crowbar (40 wood returned)
|-
|-
! Honey Frame
!Portable Pump <br> [[file:Portable Air Pump.gif]]
[[File:Honeyframe.png]]
|Filling a room with air or sucking the air out of a room. Set the pump direction to out, set the release pressure to maximum. Be sure to connect it to the blue-designated ports outside [[Engineering]] to fill it up with some delicious air-mix beforehand. Turn it on, and use it to carve the room's atmosphere to your desire.
|
* 5 Wood Planks
|
* Use wooden plank in-hand
* Select "honey frame"
|
* N/A
|-
|-
! Fermenting Barrel
!Portable Scrubber <br> [[file:Portable Air Scrubber.gif]]
[[File:Barrel.png]]
|Cleaning the air from Plasma and other unwanted gasses. Can also used for emptying Plasma Tanks and Oxygen tanks.
|
* 30 Wood Planks
|
* Use wooden plank in-hand
* Select "fermenting barrel"
|
* Apply crowbar (30 wood returned)
|}
|}
</div></div>
<br>
==Basic Atmospherics Mathematical Details==
=== Plastic/Misc. Constructions ===
===Ideal Gas Law===
<div class="toccolours mw-collapsible mw-collapsed width:20%;" style="background-color:#ffc050; width:80%;">
====Pressure====
<span style="font-size:1.5em;" style="font-weight:bold;color:white">- ''A list of constructions that involve the use of plastic and other materials as a starting component.''</span>
====Volume====
<div class="mw-collapsible-content">
====Moles====
{|class="wikitable sortable" width:"80%" style="background-color:#fffcec;margin:10pt;"
====Temperature====
|- style="background-color:#ffc050;font-weight:bold; color: white;text-align:center;"
===Heat Capacity===
! style='background-color:#ffc050' width:150px;                    |Object
====Fire====
! class="unsortable" style='background-color:#ffc050' width:200px;  |Materials
===Convertion To And From Kelvin===
! class="unsortable" style='background-color:#ffc050'              |Construction
 
! class="unsortable" style='background-color:#ffc050'              |Deconstruction
==Disposals==
|-
===Understanding Disposals===
! Plastic Flaps
===Sort Junction And Destination Tagger===
[[File:Flaps.png]]
 
|
==Additional Guides And Related Links==
* 5 Plastic
===Guides===
|
===Links===
* Use plastic in-hand
* Select "plastic flaps"
|
* (Optional) Apply Screwdriver to detach.
* Apply Welding Tool (5 Plastic returned)
|-
! Wet Floor Sign
[[File:WetFloorSign.png]]
|
* 2 Plastic
|
* Use plastic in-hand
* Select "wet floor sign"
|
* N/A
|-
! Plastic Crate
[[File:Plasticcrate.png]]
|
* 10 Plastic
|
* Use plastic in-hand
* Select "plastic crate"
|
* N/A
|-
! Plastic Ashtray
[[File:Ashtray.png]]
|
* 2 Plastic
|
* Use plastic in-hand
* Select "plastic ashtray"
|
* N/A
|-
! Plastic Utensils
[[File:Plasticspoon.png]]
|
* 1 Plastic
|
* Use plastic in-hand
* Select utensil of choice
|
* N/A
|-
! Water Bottle
[[File:Waterbottle.png]]
|
* 1-2 Plastic
|
* Use plastic in-hand
* Select "water bottle" or "large water bottle"
|
* N/A
|-
! Cardboard Cutout
[[File:Cardboard_Cutout.png]]
|
* 5 Cardboard
|
* Use cardboard in-hand
* Select "cardboard cutout"
* Apply crayon to cutout
* Select preferred design
|
* Apply active welding tool (no cardboard returned)
|-
! Warning Cone
[[File:Cone.png]]
|
* 5 Plastic
|
* Use plastic in hand
* Select "warning cone"
|
* N/A
|-
! Cardboard Box
[[File:Cardboardbox.png]]
|
* 4 Cardboard
|
* Use cardboard in-hand
* Select "cardboard box"
|
* N/A
|}
</div></div>
<br>
=== Brass Constructions ===
<div class="toccolours mw-collapsible mw-collapsed width:20%;" style="background-color:#ffc050; width:80%;">
<span style="font-size:1.5em;" style="font-weight:bold;color:white">- ''A list of constructions that involve the use of brass''</span>
<div class="mw-collapsible-content">
{|class="wikitable sortable" width:"80%" style="background-color:#fffcec;margin:10pt;"
|- style="background-color:#ffc050;font-weight:bold; color: white;text-align:center;"
! style='background-color:#ffc050' width:150px;                    |Object
! class="unsortable" style='background-color:#ffc050' width:200px;  |Materials
! class="unsortable" style='background-color:#ffc050'              |Construction
! class="unsortable" style='background-color:#ffc050'              |Deconstruction
|-
! Wall Gear
[[File:Brass Wall Gear.png]]
|
* 3 Brass
|
* Use brass in-hand
* Select "Wall Gear"
|
* ??? (probably the same way you deconstruct a standard metal wall)
|-
! Brass Windoor
[[File:Brass Windoor.png]]
|
* 2 Brass
* 1 Cable Coil
* Airlock Electronics
|
* Use brass in-hand
* Select "windoor"
* Apply wrench
* Use airlock electronics in-hand to set access
* Apply cable, airlock electronics
* Apply crowbar
|
* Apply crowbar to open windoor
* Apply screwdriver, crowbar (airlock electronics returned)
* Apply wirecutters, wrench (cable returned)
* Apply active welder (2 reinforced glass returned)
|-
! Directional Brass Window
[[File:Directional Brass Window.png]]
|
* 1 Brass
|
* Use brass in-hand
* Select "directional window"
* Apply screwdriver, crowbar, then screwdriver
|
* Unsecure with screwdriver
* Apply wrench (1 material returned)
|-
! Fulltile Brass Window
[[File:Fulltile Brass Window.png]]
|
* 2 Brass
|
* Use brass in-hand
* Select "fulltile window"
* Fasten with screwdriver
|
* Unsecure with screwdriver
* Apply wrench (2 material returned)
|-
! Brass Chair
[[File:Brass Chair.png]]
|
* 1 Brass
|
Use brass in-hand
Select "chair"
|
* Apply wrench (2 material returned)
|-
! Brass Table Frame
[[File:Brass Table Frame.png]]
|
* 1 Brass
|
* Use brass in-hand
* Select "table frame"
|
* Apply wrench (1 material returned)
|}
</div></div>
<br>
=== Special Constructions ===
<div class="toccolours mw-collapsible mw-collapsed width:20%;" style="background-color:#ffc050; width:80%;">
<span style="font-size:1.5em;" style="font-weight:bold;color:white">- ''A list of constructions that use special components.''</span>
<div class="mw-collapsible-content">
{|class="wikitable sortable" width:"80%" style="background-color:#fffcec;margin:10pt;"
|- style="background-color:#ffc050;font-weight:bold; color: white;text-align:center;"
! style='background-color:#ffc050' width:150px;                    |Object
! class="unsortable" style='background-color:#ffc050' width:200px;  |Materials
! class="unsortable" style='background-color:#ffc050'              |Construction
! class="unsortable" style='background-color:#ffc050'              |Deconstruction
|-
! Solar Tracker
[[File:Solar_tracker.png]]
|
* 1 Solar Panel Assembly
* 1 Tracker Electronics
* 2 Glass
|
* Wrench the Solar Assembly to anchor
* Insert the Tracker Electronics
* Insert the Glass
|
* Apply crowbar
|-
! Solar Panel
[[File:Solar_panel.png]]
|
* 1 Solar Panel Assembly
* 2 Glass
|
* Wrench the Solar Assembly to anchor
* Insert the Glass
|
* Apply crowbar
|-
! Conveyor Belt
[[File:Conveyor_belt.gif|64px]]
|
* 1 Conveyor Belt Assembly
|
* (Use a Conveyor Belt Switch Assembly on the Conveyor Belt Assembly to link it)
* Place the Conveyor Belt Assembly on the floor
* (Use a Conveyor Belt Switch on the Conveyor Belt to link it)
* (Use a wrench on the Conveyor Belt to rotate)
|
* Apply crowbar
|-
! Conveyor switch
[[File:Conveyor_switch.png|64px]]
|
* 1 Conveyor switch assembly
|
* (Use the Conveyor Belt Switch Assembly on a Conveyor Belt to link it)
* Place the Conveyor Belt Switch assembly on the floor
* (Use a multitool to make the Conveyor Belts go the other way)
|
* Apply crowbar
|}
</div></div>
[[Category:Guides]]

Latest revision as of 08:24, 8 January 2023

Engineering Department


Guide to Atmospherics

Welcome to Atmospherics. Considered by many as one of the most diffcult profession to master on the station, while also being one of the most dangerous. The learning curve of Atmospherics is rather steep, its important to be patient and not losing focus. An Atmospheric Technician should be able to handle a few situations: Setting up Atmospherics properly, repressurise a room, remove dangerous gases in unwanted areas, mix and transport gases.

The jobs main focus is of course around the various gases found on the station. The Atmospheric Technician should know how the different gases works and how to manipulate them for the saftey of the station and for their own little projects. Having proper knowledge over the pipes and devices is key for managing the gases.

Working as an Atmospheric Technician can go from having a calm shift while working on a project or the station goal; into having to fix multiple breaches, repressurise several areas and fight fires all over the station, all at the same time. Knowledge over how to fix atmospheric issues is a must to ease the working condition for the rest of the crew.

The Basics Of Atmospherics

The first thing the technician need to understand is how to use the different available equipment to manipulate the atmospheric gases.

Tools and pipes are ever so important to even begin working with the basics of atmospherics.

Atmospherics Tools

thumb
Item Description
Rapid Pipe Dispenser
Rapid pipe dispenser.png
A handheld tool that can print, place and recycle pipes. Fits in a backpack or coat and doesn't need ammo.
ATMOS Holofan
Engineering Holofan Projector.gif
Can project up to 3 holographic barriers which block gas movement. These holofans can be used to isolate breaches or prevent a spill from getting worse. Does not hold in high temperatures or in fires.
Analyzer
Analyzer.png
Mostly used for scanning the surrounding air and measuring the gas content and composition of pipes and canisters. A PDA with the breathe deep cartridge can also scan pipes and canisters.
Multitool
Multitool.png
The multitool is used for many things. But for the atmospheric technician it's mostly used to link devices to monitors or an air alarm.

Rapid Pipe Dispenser

thumb

The Rapid Pipe Dispenser, aka RPD for short, will be one of the main tools for the technician to use. This device can rapidly dispense atmospherics and disposals piping, manipulate loose piping, and recycle any detached pipes it is applied to.

There are five main tabs and five sub tabs in the RPDs menu where pipe types and pipe shapes can be selected as well as different pipe manipulations actions.

thumb
  • Atmospherics - Have five sub tabs:
    • Normal - Consists of the type of pipe found in Atmospherics.
    • Supply - The dark blue pipes used for the air distribution system.
    • Scrubber - The red pipes used for the scrubber system.
    • Devices - Holds all the usable devices.
    • Heat exchange - Have the type of pipes that will exchange heat with the atmosphere.
  • Disposals - Contains all the disposal type pipes and devices.
  • Rotate - Rotate the pipes and devices.
  • Flip - Invert the pipes and devices.
  • Recycle - Remove unwrenched pipes and devices.

It can also select which direction the pipe will be facing or have it orient automatically.

Alt + left clicking the RPD will bring up a small hud which can be used to switch rapidly between UI, rotate, flip and delete.


Atmospherics Pipes

There are a few different types of pipes on the station that the atmospheric technician will work with during their shift. They all can take every available type of gas. They are more used to better organize the pipe system overall.

Standard Pipes

Item Description Item Description
Normal Pipes
Atmospheric Pipe.png
Generic pipes that can be used for most tasks. These are airtight pipes that can carry any gas you pump into them. Air Supply Pipe
Supply pipe.png
Special pipes that are mostly used for the air distribution network. Can be laid in parallel to normal pipes and scrubber pipes. Used to distribute air all across the station.
Scrubber Pipes
Scrubber pipe.png
Special pipes that are mostly used for the waste network. Can be laid in parallel to normal pipes and air supply pipes. Used to move waste or harmful gases. Heat Exchange Pipes
Heat exchanger pipe.png
Exchanges heat between any gas in the pipe and any gas in the tile. Think space loop(for cooling) or the Toxins burn chamber(for heating). Connects to normal pipes via junctions.
Universal Pipes
Universal pipe.png
Used to interface between normal, air supply, and scrubbers pipes. They cannot connect to each other without this.

Devices

Item Description Item Description
Unary Vent
Vent Port.png
The standard vent used to distribute air. Needs to be inside a blueprinted room with a functional air alarm to operate. Typically used to pump breathable air into a room. Air Scrubber
Scrubber Port.png
Scrubs the air clean. Needs to be inside a blueprinted room with a functional air alarm to operate. Can remove specific gases from the room it is in, or rapidly siphon out all gas. Typically used to remove harmful gases like CO2 from the station's air.
Passive Vent
Vent Port.png
An unpowered vent that relies on pipe pressure to operate. Freely exchanges gas and heat between the tile and the connected pipe network, based on pressure and temperature gradients. Does not require power, or even a blueprinted room. Dual-Port Air Vent
Dual vent.png
Has a valve and pump attached to it. There are two ports.
Connector Port
Connector Port.png
A connector port for canisters of gas. Connects canisters to pipe networks. When used in conjunction with pumps, allows you to fill canisters or to empty them into a pipe network. Gas Pump
Pump.png
A generic pressure pump. This pump is configured to measure how much gas it pumps by pressure. Can be set to only pump a certain amount of pressure through. The maximum pressure this pump can be set to move is 4500 kPa
Volume Pump
Volumetric Pump.png
This pump is configured to measure how much gas it pumps by volume instead of pressure. Can be set to pump only a specific volume of gas through. The maximum volume this pump can be set to move is 200L/s. Passive Gate
Passive Gate.png
A valve that only lets gas through if it the input pressure and the output setting are both higher than the output pressure. Can be set to limit its output between 0 and 4500 kPa.
Gas Filter
Gas Filter.png
A scrubber in pipe form. Checks for whatever gas you set it to, then filters it out into another pipe. Gas Mixer
Gas Mixer.png
The opposite of a filter. Takes the contents of its two inputs and combines them together at whatever ratio you tell it to, then pumps them through the output. Importantly, ratios are measured by pressure, not volume. Maximum output pressure is 4500 kPa
Heat Exchanger
Heat exchanger.png
When two heat exchangers are placed next to each other, facing each other, they will try to equalize the heat between the two pipe networks they are connected to. They connect to normal pipes and thus are not part of the heat exchanger pipe system. Air Injector
Air Injector.png
A gas injector that will continue to pump its contents out regardless of how high the pressure around it is. Measures how much it pumps by volume. Will not operate without being linked to a console. Will display a green light when on.
Manual Valve
Manual Valve.png
A manually-controlled valve, it requires no power and also no ID authorization to use. Doesn't require power(or a blueprinted room), doesn't require ID access, and cannot be operated by the AI, borgs, or drones. Displays a small green light when open. Digital Valvle
Digital Valve.png
An electronically-controlled gas valve. Requires power, requires ID access, and can be operated by the AI, borgs, and drones. Displays a small green light when open.
Meter
Meter.gif
Simply place over any flat stretch of pipe and wrench it on. Upon examination, it should now be yielding measurements on what is going on inside the pipe. Does not provide as much information as an analyser/gas scanner, but good for being able to tell what is going on at a glance. Gas Sensor
Gas Sensor.png
Used to sense the pressure and temperature of the gas surrounding the sensor itself, rather than a pipe. Must be connected to one of several kinds of computer to be used.

Disposal Pipes

Item Description Item Description
Disposal Pipe
Disposal pipe.png
Large pneumatic pipes that are used to carry trash, mail, and occasionally people around the station. Disposal Bin
Disposal bin.png
The preferred method for delivering garbage into disposal pipes. Holds onto contents until they are flushed, whether manually or automatically.
Disposal Outlet
Disposal outlet.png
Whenever something or someone has reached this from a disposal pipe, they are ejected after a buzzer sounds. Disposal Intake
Disposal intake.png
An open chute into disposal pipes. Objects or people that enter will be sent into connected disposal pipes. Objects or people who reach one of these at the end of a disposal pipe are ejected at high speed in a random direction.

Gases

The main goal of atmospherics is to manipulate these in a way that benefits the station. Each type of gas has different properties that can help or hinder. Your skill in manipulating these will determine the success of your atmospheric machinations.

Item Description
Nitrogen (N2)
N2 canister.png
Nitrogen is an inert gas that makes up 80% of the air on the station. Vox breathe this. But in the station atmosphere, it mostly just takes up space.
Oxygen (O2)
O2 canister.png
The other 20% of the air. Filling the entire station with O2 would work but is worthless and makes it a even bigger firehazard. Most of the crew will be needing at least 16kPa of this stuff in the atmosphere in order to live. So filling the entire station with O2 would work but is worthless and makes it an even bigger firehazard. Poisonous to Vox and Plasmamen. Necessary for burning plasma.
Air
Air Canister.png
You know what this is. The gas mix that is distributed around the station. It is composed of 80% N2 and 20% O2.
Carbon Dioxide (CO2)
CO2 canister.png
An invisible gas that is slightly heavier than air. This is what crewmembers who breathe will be exhaling. Also produced by plasma fires. In high concentrations, will make you pass out, which can quickly lead to suffocation.
Nitrous Oxide (N2O)
N2O canister.png
Also known as Sleeping Agent. A white-flecked gas that is slightly heavier than CO2. At low concentrations, will cause sporadic laughing. At high concentrations, will put you to sleep.
Toxins (Plasma)
Plasma canister.png
The oil of the new world. Purple, highly flammable, and highly toxic(unless you are a Plasmaman). Burns with oxygen and will spontaneously ignite with it at a high enough temperature. Much heavier than all the previous gases.


Atmospherics

The main room for this sub-department. Not everyone will use this room to it's fullest extent. But as one of the biggest areas on the station the possibilities are endless. The room might look scary at first sight, but it's rather straightforward. Everything will function without properly setting up atmospherics at the start of the shift; the station will be supplied with air and filter out waste without crew interference. But it's higly recommended to do so. Atmospherics is built in such a way so that new technicians will quickly learn how the room works. And to easier see what pipes and devices do what; the room uses colour coded pipes.

Colour Coded Pipes

At first glance it might look silly having pipes in different colours. But by doing so it's easier to distinguish what section of the pipenet does what. As one wise Atmospherics Technician once said "Stare at it until it make sense."; follow this advice and it will all become clear in due time.

Item Description Item Description
Air Supply
Supply pipe.png
The dark blue pipe is the Main Air Supply. It sends breathable air (roughly 80% nitrogen and 20% oxygen) to all the vents on the station, and is fed by the cyan pipe in Atmospherics. Scrubber
Scrubber pipe.png
The red pipe is the Scrubber Pipe. This is where all the toxic waste normally ends up by the scrubber system found all around the station. It may contain breathable air, however it is unfiltered and possibly contaminated.
Air Mix
Cyan pipe.png
The cyan pipe is the breathable air or the Air Mix. This pipe feeds into the main air supply. Waste
Purple pipe.png
The purple pipe is the Waste Pipe, which retrieves waste air from the scrubber pipe which then leads to the filter.
Filter
Green pipe.png
The green pipe is the Filter Pipe, which filters out the various gases in the waste air provided by the water at various filters placed along it. Each filter puts the respect gases back into the gas containers. Pure
Yellow pipe.png
The yellow pipe is the Mix Pipe, which is internal to Atmospherics and is used for custom air mixes.

Atmospherics Layout

The layout of NSS Cyberiad, aka Boxstation.
Atmos Box Highlighted.png

A Simplified version of NSS Cyberiads Air distrobution system.
Atmos Box Simplified.png

The layout of NSS Kereberos, aka Deltastation.
Atmos Delta Highlighted.png

A Simplified version of NSS Kereberos Air distrobution system.
Atmos Delta Simplified.png

The layout of NSS Cereberon, aka Metastation.
Atmos Meta Highlighted.png

A Simplified version of NSS Cereberon Air distrobution system.
Atmos Meta Simplified.png

Mixing Gases

Gas For Canisters

Gas For The Turbine

Gas For The Supermatter

Station Systems

There are some systems on the station that the atmospheric technician will be working with during their shift.

Air Alarms

AirAlarm.png

Mandatory for the use of non-passive vents and scrubbers. Allows a wide range of control over a blueprinted rooms current gas contents. Where exactly the Air Alarm is in the room does not matter. As long as the room is blueprinted and powered it will function. Cannot be placed in areas that are not blueprinted.

To learn more about Air Alarms and how to use them, click here: Air Alarm


Fire Alarms

FireAlarm.png

Most areas have firelock doors which close if a fire is detected. This will stop the fire from spreading to other areas and is therefore very useful. Some crewmembers can be tempted to force them open (by resetting the fire alarm for the area) without one thought that doing so provides the fire with more oxygen, which will keep it burning longer.


Computer Consoles And Monitors

Computer Description
Central Atmospherics
Computer
Atmos tank monitor.png
The most important computer for the Atmospherics department to have. It can remotley access all air alarms on the station. Can also show a map with locations of all the air alarms.
Atmospheric Alert
Computer
Atmos alert console.gif
This computer will tell you where your attention is needed. Green means everything is alright, yellow signals something is wrong, and red means things have gone wrong enough for an alarm to be triggered (Usually caused when a room's air stops being breathable).
Large Tank
Control
Atmos tank monitor.png
Can be used to monitor the pressure and control the inlet and outlet of larger tanks in Atmospherics. This computer is needed to be able to use the Injector.
Tank Monitor
Atmos tank monitor.png
Just like the Large Tank Control but will only connect to sensors, making it rather obsolete.


Link Devices To Monitors

To link different atmospheric devices, such as the air injector, a multitool is required. By using the multitool on the device a window will appear that will show what Frequency it's using, what it's named with an ID tag and the Multitool Buffer that links the device to the multitool. Not every device will have the option to add it to a multitool and some don't need to be added to a multitool at all.

The gas sensor have a few option on what information to show by enabling the different internal sensors with the multitool.

With the device added to the multitool it is now possible to link it to preferably a Large Tank Control. Use the multitool on the computer and a new window will appear.

Frequency needs to be the same as the device for it to be able to link at all.

Input is where an air injector or unary vent can be linked with.

Output is for the unary vent with the siphon mode enabled.

Sensors only require to be on the same frequency to be linked to the gas sensor.


Atmospherics Machinery

Some machinery are of use when working with atmospherics. Luckily enough theres not as many as devices.

Thermomachines

Freezer.gif

Also known as "Heaters" or "Freezers". They can be use to either heat och cool gas in the pipe it's directly connected to. Upgrading it with lasers will increase maximum and minimum temperature available; upgrading with matter bins will decrease the time needed to reach the desired vaule.

Useful in many senarios: such as help a basic TEG to produce power so the completion of the station goal BSH can be made possible, or cooling down a gas to easier transport a large ammount of moles. These are just some of many uses made possible by te thermomachine.


Atmospheric Portable Equipment

Item Description
Space Heater
Space Heater.gif
Heating up a cold area. Find a nearby breach and turn it on once it's been repaired. Made by the Space Amish, it can reliably heat up a room to a habitable temperature. Can be adjusted.
Portable Pump
Portable Air Pump.gif
Filling a room with air or sucking the air out of a room. Set the pump direction to out, set the release pressure to maximum. Be sure to connect it to the blue-designated ports outside Engineering to fill it up with some delicious air-mix beforehand. Turn it on, and use it to carve the room's atmosphere to your desire.
Portable Scrubber
Portable Air Scrubber.gif
Cleaning the air from Plasma and other unwanted gasses. Can also used for emptying Plasma Tanks and Oxygen tanks.

Basic Atmospherics Mathematical Details

Ideal Gas Law

Pressure

Volume

Moles

Temperature

Heat Capacity

Fire

Convertion To And From Kelvin

Disposals

Understanding Disposals

Sort Junction And Destination Tagger

Additional Guides And Related Links

Guides

Links