Guide to Toxins
The Toxins & Outs
Toxins are the division of Science devoted to creating and testing plasma-based bombs, also known as toxin bombs. Toxin bombs consist of two tanks (a hot plasma tank and a cold oxygen tank), a tank transfer valve, and a trigger device. Do be warned things can go wrong unintentionally if you are not careful and this guide will, hopefully, help prevent you from blowing the station to smithereens, in your quest for research.
The goal of toxins is to hit a defined target in order to get levels for Research and Development, the closer you are to your target, the higher you will drive the toxin research levels, to a max of 7.
To start off you need to retrieve 3 canisters from the toxin storage room, 1 plasma and 2 oxygen.
In this guide, I will attempt to cover the steps required to performing toxins research without blowing yourself up.
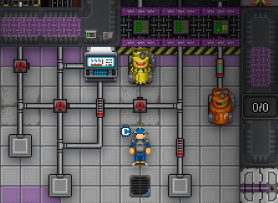
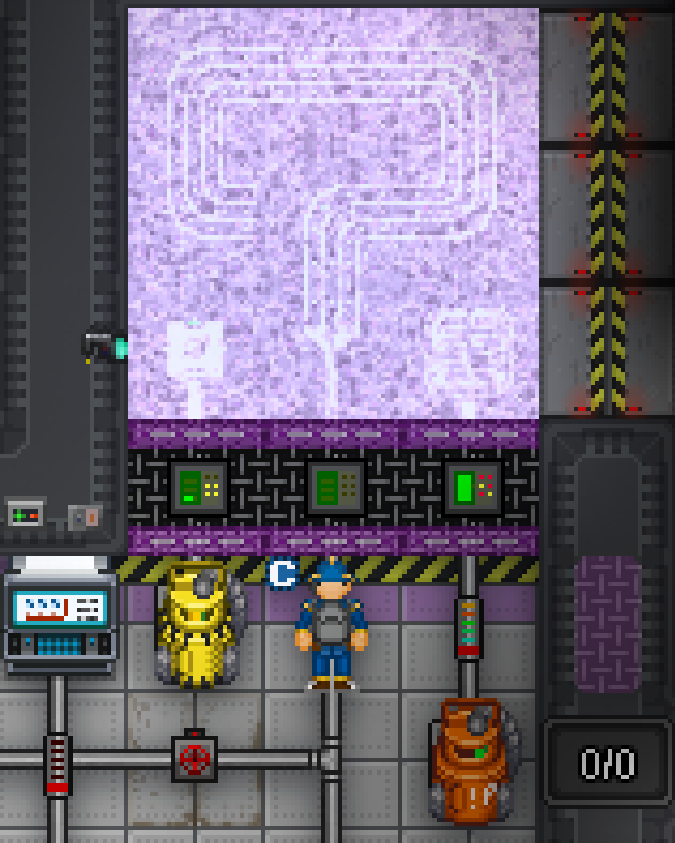
1) The Burn Chamber: This space is for your plasma and oxygen mix. It has two buttons, the one on the right ignites the mix in the chamber, the one on the left vents the mixing chamber to space. This allows you to heat the chamber and by extension a plasma tank linked to it.
2) Heat Port: This port is for your pure plasma, to transfer heat from the burn chamber, into the pure plasma canister. It has two manual valves and a gas monitor. The valve on the right is linked to the burn chamber and toggles heat transfer, the one on the left vents the contents of any connected canister to space.
3) Burn Chamber Feed: This is the input port for your plasma oxygen mix. You must activate both the valve and the pump.
4) Freezer: This is used for cooling an oxygen canister, it allows you to accurately control the temperature of the oxygen.
5) Precision mixer: You will use this for making your plasma oxygen mix.
6) Bomb making equipment: This space should contain everything you need to construct your bomb once you have your hot plasma and cold oxygen mix. The toolbox had a full set of basic tools in, you should immediately retrieve the wrench and screwdriver, as they are essential to your work. It also has tank transfer valves, remote signalling devices and miscellaneous other trigger items which you should ignore.
7) Bulk mixer: Do not use this for mixing, it is wasteful and causes you to require 2 more tanks than you would otherwise need.
The Burn and Hot Mixes
One of the first essential things you will need to construct your toxins bomb, is hot plasma. You need to use the burn chamber and a burn mix to heat your pure plasma, to a sufficiently high temperature for a potent reaction. To do this, you will use a wrench to attach one oxygen canister and one plasma canister to the precision mixer, while standing on the mixing pipe, as that is the only way to access it while the tanks are connected.
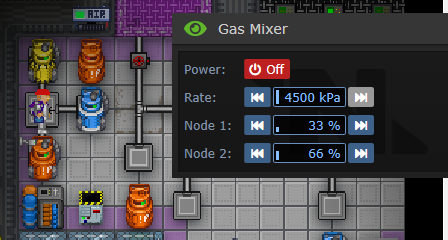
As seen in the image, you want to set Node 1, the connector on the right|with a plasma canister attached, to 33%. Set Node 2, the connector above|with an oxygen canister attached, to 67%. This is generally speaking the best ratio for a plasma mix. Once you have set the percentages, using the arrows on the mixer, set the output pressure to Max and turn on the mixer.
The mixing process will take a few seconds, during which time you will notice a change in the lights on the related canisters, as their internal gas levels alter. Once the oxygen canister is registering red(i.e. close to empty), turn off the mixer, use the wrench to disconnect the plasma canister and the yellow canister that now contains your burn mix.
Move the plasma canister (that holds your remaining pure plasma) to the Heat Port, connect it and open the valve on the right hand side.
Notice: This canister MUST contain only plasma.
Now that you have your pure plasma connected to the heat port, go back to the precision mixer and grab the yellow canister containing your burn mix. Take the burn mix canister to the Burn Chamber feed connector and attach it with your wrench, once attached, open the valve and turn on the pump connected to that valve.
The burn chamber will now be filling with the heat mix. You now wait until your burn mix canister is empty (red indicator) and then hit the ignition button (the one on the right) to start the heating process. Notice: That is a plasma fire, it is safe and contained in the burn chamber only.
After you have ignited the burn mix, move back to the heat port and examine the gas monitor for an accurate result of the current temperature and pressure of the contained plasma. When the temperature of the plasma has exceeded 4500 degrees, close the valve (ideally you want to do this before the temperature goes above 6000 degrees).
Congratulations, you have your hot plasma. You now ignore the burn chamber for a while and allow it to consume the rest of its burn mix.
The Cold Mix
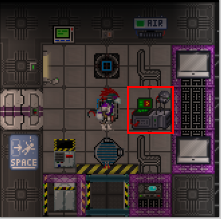
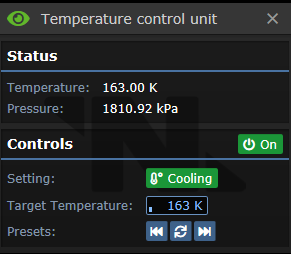
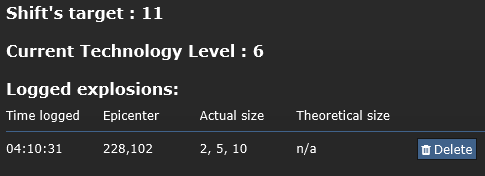
Making the cold mix, is by far the most simple aspect of toxins, but is also exceedingly important. Take your unused oxygen tank and connect it to the freezer's connector port. Now head into the next room on your right and use the tachyon-doppler array to find your target radius for your explosion.
For an example, lets say the target radius is 11.
Once you have your target radius, head back into the other room, back to the freezer. You want to set the temperature of the freezer to a setting that reflects your target, so in this example, the freezer will be set to a temperature of -110 degrees, using the arrows on the freezer interface.
Once you have set the target temperature, turn the freezer on, which will cool the oxygen in the tank to the desired level, after some time.
Making the Bomb
Go back to the bomb mixing equipment, grab one tank transfer valve and a remote signalling device. Use the remote signalling device, turn the receiver on and setting the frequency and/or code to another setting, so as not to have your bomb randomly activated by other people on the station.
Now use your screwdriver on the remote signalling device and then attach it to the tank transfer valve.
You now need to grab an oxygen tank from the tank storage on the right hand side of toxins. Put the oxygen tank into the portable air pump, set the portable air pump to max and switch it on. This will pull all of the oxygen out of the tank, when this is done, turn the portable air pump off and eject the tank.
Check the freezer, to see if the oxygen canister is at the level you desired, in this example -110 degrees. If the oxygen is at the right temperature, put the oxygen tank into the oxygen canister, set the oxygen canisters pressure to around 800kPa and open the canister to fill the tank. When it is full to the desired level, close the canister, eject the tank and then connect it to your tank transfer valve.
Now, go back to the tank storage and grab a plasma tank. Due to the high temperatures involved with the plasma, you DO NOT want to empty the tank, so just place it into the hot plasma canister. Set the plasma canister's internals to max and then hit open to fill the tank. When the tank is full, close the internals, eject the tank and attach it to the tank transfer valve.
Congratulations you have your completed bomb.
Warning: If you use the tank transfer valves GUI, do NOT click open for the Release Valve Status. Doing this will instantly detonate the bomb, killing you and dealing massive damage to the station.
Testing the Explosive
Now that your bomb is ready, it's time to head back into the room containing the tachyon-doppler array.There is a disposal chute in there, which you put your bomb into and then activate, this will put place the bomb onto the mass driver present in that room. Once the bomb is on the mass drive, hit the launch button on the wall above you and the bomb will then be launched to the testing chamber.
Before detonating a bomb, alert the station crew to a bomb test. This way, people don't freak out when they hear the bomb explode.
Now either use your PDA signaler ace, or another remote signalling device, set to the settings you chose, to activate your bomb. The results of your bomb and its relation to your target will be printed into chat.
The information will also be available on the tachyon-doppler array.
If the bomb meets your requirements, you will need to head to Research and Development, and grab a technology disk, which you must then bring back to and use on the Tachyon-doppler array, in order to store those research levels. Take the technology disk withe the toxins research back to RnD and upload it to the console there.
If the bomb did not meet your requirements, then you will need to make a new bomb, following all the steps of Making a bomb again, only with changes to the temperature of your oxygen canister. If you were under your target, you need to decrease the oxygen temperature. If you were over your target, you need to increase the oxygen temperature. As a general rule of thumb, 5 degrees is equal to 1 size difference in radius (this however is not always the case, sometimes requiring 2-3 degree changes instead). Experiment with the oxygen temperature, repeating the steps as needed, until you hit your target.
Congratulations! You now know how to make your own toxin bombs.
Notice: If you ever feel you need to use a bomb on anything on the station itself (outside of the Toxins Testing Chamber) as a non-antag, such as a blob, xenomorph infestation, etc., then adminhelp first. You MUST get approval from an admin.
The Anarchist Cookbook
You're a Scientist tasked with making bombs, and the Syndicate has asked of some work of you. When it comes to destructive objectives, this is perhaps one of the best positions to be in. Not only can you make a distraction with a bomb on a solar array or Asteroid, small bombs (which you can test before using) can be used to make small breaches into areas without causing too much station damage. Of course, server rules still apply, so don't just bomb something you can't justify, and if you don't know if you should, ask an admin for guidance and explain your plan so they can give you pointers and possible approval.
This also applies to anyone caught in the explosion. You must be ready to justify unintended, or perhaps intended, casualties outside of your target. Explosions in the primary hallways without the Hijack objective is not allowed. Just being an antagonist does not mean you can use bombs.
For destroying evidence, or making sure someone isn't going to be coming back, a bomb is a powerful choice. Just ensure the bomb has very little gas to it so the explosion is rather minimal, just enough to complete the objective.
Just because you can doesn't mean you MAY.
