Difference between revisions of "Guide for Beginners"
m (Spelling, Punctuation and Grammar and clarity changed) |
LordisMangis (talk | contribs) (→Joining the Server: Split the Game Preferences section into Game Preferences and Antagonists to match the game.) |
||
| (66 intermediate revisions by 18 users not shown) | |||
| Line 1: | Line 1: | ||
{{Glossarytable}} | {{Glossarytable}} | ||
Welcome to Nanotrasen and congratulations on your new career! | |||
''' | '''Space Station 13''' (often abbreviated as '''SS13''') is an engaging multiplayer roleplaying game.<br> As a participant, you'll assume the persona of a space station worker. Among the myriad of ''SS13'' servers, Paradise Station stands out with its unique roles and diverse gameplay opportunities. | ||
'''As a medium role-playing (MRP) server, Paradise Station encourages a balanced blend of in-character gameplay and narrative exploration.''' | |||
As a newcomer, you might want to familiarize yourself with the '''[[Keyboard Shortcuts|Controls]]''' we use. Additionally, if roleplay is a new territory for you, we highly recommend browsing our '''[[A Crash Course In Roleplaying|roleplay guide]]'''. If any queries arise, feel free to ask them either on our '''[http://www.paradisestation.org/forum/ forums]''' or in our '''[http://discord.gg/paradisestation Discord]''' channel. | |||
== The Server Rules == | == The Server Rules == | ||
= | <span style="font-size:180%;font-weight:bold;">Please read the [https://www.paradisestation.org/rules server rules].</span> | ||
The server rules help create an enjoyable atmosphere for all and punish users who interfere with the enjoyment of other players or adversely affect the community and server. [[Space Law]] largely dictates what you are and aren't allowed to do while playing. | |||
We recommend that you read [[Space Law]] and [[Standard Operating Procedure]], especially if you wish to play essential roles such as Security or Command. | |||
== Joining the Server == | |||
[[File:byond_client_paradise_server_listing.png|thumb|A screenshot of the BYOND client with the Paradise SS13 server highlighted in yellow.]] | |||
'''To get started with SS13, follow these steps:''' | |||
# | #Download and install the [https://www.byond.com/? BYOND] client. | ||
# | #Register for a [https://secure.byond.com/?page=Join BYOND account]. | ||
'''Afterwards, join Paradise via one of the following methods:<br>''' | |||
*Select the server from within the BYOND client.<br> | |||
*Click "Open..." located beneath the "Games" tab on the client's left panel, and manually input the Paradise server address: <code>byond.paradisestation.org:6666</code>.<br> | |||
*Press "Server" on the official website: https://paradisestation.org/ | |||
'''Tip:''' You can bookmark the server for easy access in future sessions. | |||
<br><br> | |||
If you've successfully connected to the server, congratulations! | |||
Prior to embarking on your game journey, we suggest setting up your character next. | |||
[[File:MidgameWindow.png|100px|thumb|right|The joining and setup panel.]] | |||
=== | === Character Setup === | ||
= | [[File:CharacterSetupMenu.png|350px|thumb|right|The character setup screen.]] | ||
[[File:Game Preferences.png|350px|thumb|right|Game settings located in Game Preferences.]] | |||
[[File:Loadout.png|350px|thumb|right|Loadout screen.]] | |||
The <span style="font-family: 'Courier New', monospace; padding: 0px 4px; display: inline-block; background-color: #383838; color: #98B0C3;">Character Setup</span> screen lets you personalize your character, encompassing name, species, and appearance.<br>This is also where you set your preferred roles for gameplay. More on this in the '''[[#Occupation Preferences|Occupation Preferences]]''' section. | |||
=== Identity === | |||
'''Name:''' Choose a realistic name per the [https://www.paradisestation.org/rules rules]. Vary your name choice depending on your character's gender and species. As a Human, use a first and last name. Avoid comical or famous names. For random, lore-appropriate names, use the randomize option. | |||
'''Gender:''' This alters your character's body type and scream voice. Options are male, female, or gender-neutral. | |||
'''Age:''' This is only displayed on in-game security and medical records, and doesn't change your character's looks. | |||
The | '''Species:''' The default is [[Humans|Human]]. Options like [[Tajaran]], [[Vulpkanin]], and [[Unathi]] exist.<br>Refer to the [[Lore#Species|lore page]] for all playable species. | ||
'''Secondary Language:''' ''Galactic Common'' is the primary language on SS13 and all crew members understand it.<br>Choose a secondary language like ''Tradeband,'' ''Clownish,'' or ''Gutter''. Check [[Languages]] for language options and switching instructions. | |||
'''Blood type:''' This determines the type of blood transfusion you would need. | |||
'''Disabilities:''' Choose different disabilities here. | |||
'''Nanotrasen Relation:''' Define your character's relationship with Nanotrasen. This is only for roleplay purposes. | |||
'''Appearance Options:''' Alter your character's physical traits. Options vary based on species. | |||
'''Flavor Text:''' This is your physical description and will show when players examine you in-game and should only contain information that other characters could see from a glance. Keep it brief. | |||
=== | === Character Records === | ||
The Character Records screen lets you set your character's medical and security records, accessible in-game by [[Medical Doctor]]s and [[Security Officer]]s. | |||
Use this as an RP tool to develop your character. Remember, these are official records, so keep the tone formal. | |||
Your records do not belong in your flavor text. | |||
Check the "Employment Records" to display your character's previous jobs. | |||
=== Game Preferences === | |||
This section lets you tweak your games settings in order to get the most enjoyable experience. Some recommended settings to tweak: | |||
* ''' | *'''Window Flashing:''' Disables your game window flashing to white when flashed. Useful if you have epilepsy! | ||
*'''Colourblind Mode:''' Lets you choose between deuteranopic, protanopic, and tritanopic colourblindness, adjusting the games colours to your needs. | |||
*'''Parallax:''' Decreases or increases the level of detail and animation space has. Recommended to disable it completely on weaker machines. | |||
*'''Ambient Occlusion:''' A shading method to make the game look fancier. Recommended to disable it completely on weaker machines. | |||
=== [[Roles#Antagonists|Antagonists]] === | |||
This section lets you choose if you'd prefer to play as an antagonist in a round. Being an antagonist isn't guaranteed.<br>As a new player, you can't be an antagonist until you've played for a few days. | |||
'''The non-antagonist roles include:''' | |||
*'''pAI:''' You can rejoin the game as a [[Personal AI]] during observation or post-death. Won't happen without confirmation from you, so keep it enabled. | |||
*'''Sentient Animal:''' If [[Xenobiology]] creates them, you can become a sentient animal when dead or observing. | |||
*'''Positronic Brain:''' This lets you become a positronic brain when dead or observing, from which Roboticists can create a [[Cyborg]] or [[AI|Artificial Intelligence]]. | |||
=== Loadout === | |||
The Loadout screen lets you equip several items for your character. You get five loadout points to spend on various items like suits, coats, rocks, and much more! The possibilities are endless! Some items are restricted to occupation, however. | |||
=== | === Saving your character === | ||
Use the "Save Setup" button to store your character, occupation preferences, and antagonist choices in the database. | |||
=== Global Antag Candidacy === | |||
If you have any antagonist preference set to yes, the Setup Panel will have an option for [[File:Global Antag Candidacy Cropped.png|100px]]. This option will allow you to be eligible for some antagonist roles you ''' accepted''', this includes round-start antagonists and auto traitors. Otherwise, the setting makes sure you aren't eligible for any antagonist roles while spawning in. | |||
== Occupation Preferences == | |||
[[File:JobPanel.png|400px|thumb|right|The job preferences panel.]] | |||
Your occupation is your most important choice on the server. It affects your station access, rank, authority, equipment, and purpose in life. The roles available to you are listed in the <span style="font-family: 'Courier New', monospace; padding: 0px 4px; display: inline-block; background-color: #383838; color: #98B0C3;">Occupation Preferences</span>. | |||
=== Job Assignment === | |||
Except for Assistant, all job preferences have four levels: | |||
<code style="color:red;">NEVER</code>, | |||
<code style="color:orange;">Low</code>, | |||
<code style="color:green;">Medium</code>, and | |||
<code style="color:slateblue;">High</code>. | |||
These change how likely the server will assign you that job when it compares your preferences to other players. You may only mark one job <code style="color:slateblue;">High</code>, but there are no limits otherwise. | |||
Because of the diversity and range of jobs available, there are many ways to play the game. However, many jobs require a good knowledge of the game mechanics, the layout of the station, and how to use in-game tools and machinery. Because of this, the following jobs are recommended for new players: | |||
* '''[[Assistant]]:''' The most basic of all occupations, the assistant has no authority and, generally speaking, no responsibilities. It's an excellent opportunity to learn the game mechanics, but your access is limited. Ask others if you can help; they'll usually be happy to show you around their department and help you learn the ropes. It also lets you practice roleplaying if you're still unsure about it. Unlike other roles, Assistant can only be set to <code style="color:red;">No</code> or <code style="color:green">Yes</code>. If Assistant is set to <code style="color:green">Yes</code>, all other roles are disabled. | |||
*''' | * '''[[Cargo Technician]]:''' A basic yet practical job that is easy to pick up and will help you learn most of the game's controls. Working under the [[Quartermaster]], you're tasked with ordering supplies and delivering them to the relevant department to ensure the station is well-equipped. | ||
*''' | |||
*''' | * '''[[Janitor]]:''' A simple but menial job that involves replacing lightbulbs, cleaning up messes, putting out wet floor signs, and then pointing them out to people who've slipped on the floor you just finished mopping. Your only responsibilities are to keep the station clean and well-lit, and it'll help you learn your way around the station and its various departments. | ||
* '''[[Librarian]]:''' A very simple job that involves making sure the library is stocked, writing and running DnD campaigns in the back of your workplace. | |||
*''' | |||
* '''[[Bartender]]:''' A relatively simple job that gives you an excellent introduction to combining substances. The Bartender's job is primarily mixing and serving drinks to a thirsty crew. Drink recipes are available in [[Guide_to_Drinks|Guide to Drinks]]. You'd be surprised at some of the stuff you can make, so try it out! | |||
[[ | |||
If you're interested in other jobs, browse the [[Guides#Job guides|Job guides]]. Avoid any security, engineering, and command positions until you get the hang of the game. This is '''especially''' true of the [[Head of Security]], [[Head of Personnel]], [[Captain]] and [[Security Officer]] positions. (Jumping into a position you're not prepared to do is a guaranteed way of making people angry at you and possibly earning a job ban.) | |||
== | == Playing the Game == | ||
Great job! You've crafted a character and chosen a job. Before you jump into your new role, let's cover a few more aspects of the game. | |||
=== Starting the round === | |||
A round begins with a brief period for players to chat and ready themselves. This is where your job preferences apply. | |||
However, you may frequently join in the middle of a round. Clicking on <span style="padding: 0px 4px; font-family: Verdana; color: #fff; display: inline-block; border: 1px solid #000; background-color: #40628a">Join Game!</span> shows available jobs. | |||
Once you spawn on the map, you'll start at the Arrivals Shuttle, announced by the Arrivals Announcement Computer or the AI. You can either proceed to your workplace or explore.<br> Click the for '''Map''' button in the top right corner of your game window for a station layout. | |||
Also, click <span style="padding: 0px 4px; font-family: Verdana; color: #fff; display: inline-block; border: 1px solid #000; background-color: #40628a">View the Crew Manifest</span> to see who else is on the station. | |||
=== | === The User Interface === | ||
The user interface might appear daunting initially, but understanding its elements will make navigation easier. The table below presents the elements in the example image. | |||
[[File:HUD_Clean.png|848px|right|thumb]] | |||
{| class="wikitable" style="text-align:center;" | |||
|- | |||
! style=background-color:#ffce93; | Icon | |||
! style="background-color:#9aff99;" | Explanation | |||
! style=background-color:#ffce93; | Icon | |||
! style="background-color:#9aff99;" | Explanation | |||
|- | |||
| Your Hands<br />[[File:Right hand midnight.png|64px]][[File:Left hand midnight.png|64px]] | |||
| Your hands are used Individually.<br />(See [[Keyboard Shortcuts#Your_Hands_&_You|Your Hands & You]]) | |||
| Mask Slot<br />[[File:Mask Slot.png|64px]] | |||
| Vital Slot to remember when air is sparse!<br />This is for various mask types. | |||
|- | |||
| Your Inventory<br />[[File:UI Inventory.png|64px]] | |||
| Left-Clicking this will open to show more icons<br />let's go over them below | |||
| Ear Slots<br />[[File:Earwear Slot.png|64px]] | |||
| Mainly used for radio headsets, make sure you have yours equipped! | |||
|- | |||
| Shoes Slot<br />[[File:Shoes Slot.png|64px]] | |||
| This is where you wear any shoes<br />(like Magboots) | |||
| Head Slot<br />[[File:Headgear Slot.png|64px]] | |||
| This is where you'll equip various helmets and hats | |||
|- | |||
| Suit Storage<br />[[File:Suit Storage Slot.png|64px]] | |||
| When you are wearing a "suit" you will be able to use this storage | |||
| ID Slot<br />[[File:ID Slot.png|64px]] | |||
| When your ID is equipped here, you'll show off who you are to others<br />because your character will pin your ID to your uniform | |||
|- | |||
| Uniform Slot<br />[[File:Jumpsuit Slot.png|64px]] | |||
| Your main clothing slot, removing this will drop<br />ID, PDA, and pocket contents! | |||
| Belt Slot<br />[[File:Belt Slot.png|64px]] | |||
| Equipping a belt here can act as a smaller backpack like<br /> container for items, useful for Engineers | |||
|- | |||
| Suit Slot<br />[[File:External Wear Slot.png|64px]] | |||
| This slot is for exosuits, jackets, and other garments<br /> that go over your uniform. | |||
| Back Slot<br />[[File:Backpack Slot.png|64px]] | |||
| Your backpack will go here; you'll be able to store lots of things here | |||
|- | |||
| Gloves Slot<br />[[File:Gloves Slot.png|64px]] | |||
| An important slot for various needed gloves<br />(Insulated Gloves, Medical Gloves, etc.) | |||
| Pocket Slots<br />[[File:Pocket slot.png|64px]] | |||
| Two pockets for whatever you want easy access to | |||
|- | |||
| Glasses Slot<br />[[File:Eyewear Slot.png|64px]] | |||
| The slot to equip your shades! | |||
| PDA Slot<br />[[File:PDA slot.png|64px]] | |||
| Your PDA will go here, be sure to<br />(see [[PDA]] for more info) | |||
|} | |||
{| class="wikitable" style="text-align:center;" | |||
|- | |||
! style=background-color:#ffce93; | Icon | |||
! style="background-color:#9aff99;" | Explanation | |||
! style=background-color:#ffce93; | Icon | |||
! style="background-color:#9aff99;" | Explanation | |||
! style=background-color:#ffce93; | Icon | |||
! style="background-color:#9aff99;" | Explanation | |||
|- | |||
| Intent<br />[[File:Intent cycle.gif|64px]] | |||
| Intents define what some controls do<br />(See [[Keyboard Shortcuts#Intents_&_Position|Intent & Position)]] | |||
| Status<br />[[File:Status effects.gif|64px]] | |||
| There are various status effects in-game<br />Mouse over them to see what they are | |||
| Low "Air"<br />[[File:Low air.gif|64px]] | |||
| Depending on Racial traits, you'll see<br />this warning when the air you breathe is low! | |||
|- | |||
| Health<br />[[File:Health cycle.gif|64px]] | |||
| This indicator shows your current well-being | |||
| Pull<br />[[File:Pull icon.png|64px]] | |||
| You'll see this appear when pulling something,<br />(Left-Click this to stop pulling) | |||
| Low Toxins<br />[[File:Low tox.gif|64px]] | |||
| Toxin levels are too low in this area! | |||
|- | |||
| Hunger<br />[[File:Hunger yoyo.gif|64px]] | |||
| You'll eventually get hungry while on shift,<br />Make sure not to eat too much or too little! | |||
| Resist<br />[[File:Resist icon.png|64px]] | |||
| Click this to resist being grabbed/cuffed,<br />(if on fire, you'll stop, drop, and roll!) | |||
| High Air<br />[[File:High air.gif|64px]] | |||
| The Gas shown is too high in volume for you!<br />(Toggle Mask & Internals!) | |||
|- | |||
| Too Hot<br />[[File:Warn hot.gif|64px]] | |||
| The temperature is too hot for you! Scram! | |||
| Drop<br />[[File:Drop icon.png|64px]] | |||
| This will make you drop your currently held item | |||
| High Toxins<br />[[File:High tox.gif|64px]] | |||
| Toxins levels in this area are too high! | |||
|- | |||
| Too Cold<br />[[File:Warn cold.gif|64px]] | |||
| The temperature is too cold for you! Scram! | |||
| Throwing On/Off<br />[[File:Throw on icon.png|64px]] | |||
| Toggle throwing objects On/Off | |||
| Low Pressure<br />[[File:Low pressure warning.gif|64px]] | |||
| Outside Pressure is too low, you'll want<br /> a space suit, or you'll die! | |||
|} | |||
=== Action Buttons === | |||
Certain actions in the game can be quickly done using one of the buttons in the top right corner of your screen. When clicked and held, they may be moved around the screen or put into the Action Palette. Shift clicking a button will reset it to it's original position. Hovering over them will tell you what they will do once you press them. | |||
[[File:Action_Buttons.png|598px|right|thumb|Action buttons and palette shown in-game]] | |||
==== Action Palette ==== | |||
[[File:Action_Palette.png]] | |||
The action palette lets you store your action buttons and gives information about action buttons when hovering over it with your mouse. It will hide itself once you click on something other than an action inside of it, and changes color depending on if an action was added or removed from it. Alt-Clicking it will reset all action buttons to their original positions. Control-Clicking will give you a basic overview of the function of action buttons. | |||
=== Controls === | |||
'''We suggest checking out the [[Keyboard Shortcuts|Controls]] page for essential information on controlling your character.''' | |||
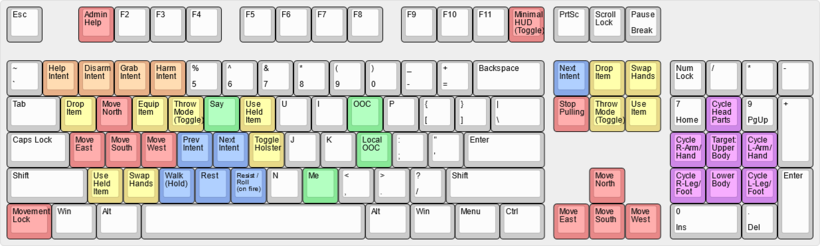
[[File:Keyboard-layout-complete.png|820px|right|thumb|link=Keyboard Shortcuts|Default Keybindings]] | |||
SS13's controls vary across servers. At Paradise Station, controls are keybindings that can be adjusted in the [[Guide_for_Beginners#Character_Setup|Character Setup]] before a round. Although the game can be complex, don't get discouraged! | |||
Below are some basic mouse-related controls and an image of the default keybindings: | |||
{| class="wikitable" style="margin-left: 0px;" | |||
|- | |||
! style=background-color:#ffce93; | Shortcut/Key Combo | |||
! style="background-color:#9aff99;" | Action | |||
|- | |||
| Pick up Items | |||
| Left-Click on target item<br />(must be within reach) | |||
|- | |||
| Open Containers | |||
| Left-Click on the target Container or Backpack | |||
|- | |||
| Attack | |||
| Left-Click(with object in hand)<br />Left-Click w/ [[Keyboard_Shortcuts#Intent_&_Position|Harm Intent]] | |||
|- | |||
| Using Consoles/Object | |||
| Left-Click the Console or Object | |||
|- | |||
| Perform CPR | |||
| Left-Click with w/ [[Keyboard_Shortcuts#Intent_&_Position|Help Intent]] <br /> on a "medically challenged" individual | |||
|- | |||
| Examine Object | |||
| Shift + Left-Click | |||
|- | |||
| Pull Object | |||
| Ctrl + Left-Click | |||
|- | |||
| Crawl into Vents | |||
| Alt + Left-Click <br /> See [[Item Interactions]] for more uncommon actions using Alt+LC | |||
|- | |||
| Point finger/Aim weapon | |||
| Press Middle Mouse Wheel + Left-Click | |||
|- | |||
| Access Someone's Inventory | |||
| Left-Click(Hold) on the target, drag the mouse to yourself,<br /> then release Left-Click | |||
|- | |||
| Buckle into Seat | |||
| Left-Click(Hold) on yourself, drag the mouse to a chair,<br /> then release Left-Click | |||
|- | |||
| Unbuckle (self/other) | |||
| Left-Click the chair you/someone is buckled into | |||
|- | |||
| Empty Backpack/Containers | |||
| While it's in your hand, Left-Click(hold) on the backpack,<br /> drag to a table or other surface, then release Left-Click | |||
|- | |||
| Climb over/ on top | |||
| Left-Click(hold) on yourself, drag the mouse to the obstacle,<br /> then release Left-Click | |||
|- | |||
|} | |||
=== In-game Communication === | |||
To interact verbally within the game, use the "say" and "me" command keys.<br> Open the '''say''' dialog with '''T''' to chat with others as your character.<br> The '''me''' command, activated with '''M''', lets you perform specific actions for added depth. | |||
Here's a brief overview: | |||
{| class="wikitable" style=" | {| class="wikitable" style="margin-left: 0px;" | ||
|- style="font-weight: bold; | |- style="font-weight: bold;" | ||
| style=" | ! Key/Type | ||
| style=" | ! style=background-color:#ffce93; | What you type in | ||
| style=" | ! style="background-color:#9aff99;" | What others see | ||
| style=" | ! Relative Notes | ||
|- | |||
| <code>T</code> / Say | |||
| style="font-family: monospace;" | <code>hello world</code> | |||
| style="background-color: #151515; color: #fff; font-family: Verdana" | <b>ExampleMan</b> says, "Hello world" | |||
| rowspan="3" | You'll notice the chat system will automatically change your result based on certain factors (i.e., Punctuation, Drunkenness, Injuries, and Shock.) While other factors will only be seen by other players, like speaking different languages. Additionally, the game will capitalize the first letter in your input. | |||
|- | |||
| <code>T</code> / Shout | |||
| style="font-family: monospace;" | <code>hello world!</code> | |||
| style="background-color: #151515; color: #fff; font-family: Verdana" | <b>ExampleMan</b> shouts, "Hello world!" | |||
|- | |||
| <code>T</code> / Ask | |||
| style="font-family: monospace;" | <code>hello world?</code> | |||
| style="background-color: #151515; color: #fff; font-family: Verdana" | <b>ExampleMan</b> asks, "Hello world?" | |||
|- | |- | ||
| <code>T</code> / Whisper | |||
| | | style="font-family: monospace;" | <code>:w hello world</code> | ||
| | | style="background-color: #151515; color: #fff; font-family: Verdana" | <b>ExampleMan</b> whispers quietly, "Hello world"<br /><b>ExampleMan</b> whispers quietly, "****o *****"<br /><b>ExampleMan</b> whispers something. | ||
| | | A) When adjacent, others see this<br />B) When two tiles away, others see this<br />C) three or more tiles away, others will see this | ||
|- | |- | ||
| <code>T</code> / Alt Language | |||
| | | style="font-family: monospace;" | <code>:? hello world</code> | ||
| | | style="background-color: #151515; color: #fff; font-family: Verdana" | <b>ExampleMan</b> articulates, "<span style="color: #6c322d;">Hello world</span>""<br /><b>ExampleMan</b> articulates, "<span style="color: #6c322d;">Linkabota vech</span>"" | ||
| | | A) When others know your language<br />B) When others don't know your language | ||
|- | |- | ||
| <code>T</code> / Specific Words in Language | |||
| | | style="font-family: monospace;" | <code>well :? hello :9 world</code> | ||
| | | style="background-color: #151515; color: #fff; font-family: Verdana" | <b>ExampleMan</b> says, "Well <span style="color: #6c322d;">Idivyek</span> world" | ||
| | | :9 is Galactic Common, so we're just swapping back to common after one word in another language | ||
|- | |- | ||
| <code>T</code> / Mixed Languages | |||
| | | style="font-family: monospace;" | <code>:1 hello :? world</code> | ||
| | | style="background-color: #151515; color: #fff; font-family: Verdana" | <b>ExampleMan</b> says, "<span style="color: #3076c9;">Hello</span> <span style="color: #6c322d;">Bulobs</span>"<br /> | ||
| | | The outcomes could be: 1) Understand both languages / 2 or 3 ) Others could understand one word or the other<br />4) Both are in different languages. (This example is 2/3) | ||
|- | |- | ||
| <code>T</code> / Emote | |||
| | | style="font-family: monospace;" | <code>*nod</code> | ||
| | | style="background-color: #151515; color: #fff; font-family: Verdana" | <b>ExampleMan</b> nods his head. | ||
| | | Type <code>*help</code> in-game for available emotes. | ||
|- | |- | ||
| <code>M</code> / Me | |||
| | | style="font-family: monospace;" | <code>scratches his head and raises one brow.</code> | ||
| | | style="background-color: #151515; color: #fff; font-family: Verdana" | <b>ExampleMan</b> scratches his head and raises one brow. | ||
| | | Notice I had to type the period for it to be there, and there wasn't auto-capitalization either | ||
|- | |- | ||
| [[File:Megaphone.png|32px]] / Using Megaphone | |||
| | | style="font-family: monospace;" | <code>hello world</code> | ||
| | | style="background-color: #151515; color: #fff; font-family: Verdana" | <b>ExampleMan</b> broadcasts, <span style="font-size: 175%;">"Hello world"</span> | ||
| | | You can still use <code>!/?</code> to change up the method of saying it | ||
|- | |- | ||
! | ! colspan="4" style="text-align:left;" |<code>Alternatives</code> | ||
| | |||
|- | |- | ||
! | | <code>T</code> / Me (Prefix) | ||
| | | style="font-family: monospace;" | <code>! scratches his head and raises one brow.</code> | ||
| | | style="background-color: #151515; color: #fff; font-family: Verdana" | <b>ExampleMan</b> scratches his head and raises one brow. | ||
| | | Notice when you use the prefix, you are using <code>T</code> instead of <code>M</code> | ||
|} | |||
=== Runechat === | |||
[[File:Runechat.png|frame|right|An example Runechat speech.]] | |||
Runechat means the text you see over characters when they talk and is good for in-person conversations, don't forget to still look at the chat box however! To turn it on/off, use the "Enable/Disable Runechat" option under your "Preferences" tab in-game. | |||
'''Why don't I see it even though I have it on?''' | |||
There are some situations in which you won't see runechat text. Examples: | |||
* If the speaker is using a radio channel and you are not in range of hearing the headset whisper. | |||
* If they are whispering and you can't hear them clearly. | |||
* If they are out of your normal vision range. | |||
* If they were invisible to you (Out of sight or round a corner) when they said their message, you will not see it above their head even if they walk inside your vision range | |||
'''What determines my text color for runechat?''' | |||
* Typically, your hair color. | |||
* For races without hair, blood color. | |||
* For races without variations of hair OR blood color, its determined by eye color. | |||
=== Headsets and Comms === | |||
Every crew member receives a headset on arrival, facilitating communication on specific frequencies. Wall-mounted intercoms are also accessible. See [[Headset#Special_Channels|here]] for non-departmental channels.<br>To communicate on these devices, prefix your message with the right channel code. Each device can operate in "Hot-Mic" mode, transmitting any nearby chatter with prefixes. | |||
{| class="wikitable" style="margin-right: 64px;" | |||
|- style="font-weight: bold;" | |||
! Headset | |||
! Intercom | |||
! Station Bounced Radio | |||
|- | |||
| [[File:Headset.png|64px]]Uses Prefixes Below | |||
| [[File:Wallradio.png|64px]]To use a wall-mounted intercom, stand near it and use the <code>:i</code> prefix | |||
| [[File:Station Bounced Radio.png|64px]]These prefixes can be used for any headset/radio in your <code>:r</code>ight or <code>:l</code>eft hand | |||
|} | |||
{| class="wikitable" style="margin-left: 0px;" | |||
|- style="font-weight: bold;" | |||
! Prefix | |||
! style=background-color:#ffce93; | What you type in | |||
! style="background-color:#9aff99;" | What others see | |||
|- | |- | ||
| <code>;</code> | |||
| | | style="font-family: monospace;" | <code>; hello world</code> | ||
| | | style="background-color: #151515; color: #fff; font-family: Verdana" | <span style="color: #20b142"><b>[Common] <b>ExampleMan</b> says, "Hello world"</span> | ||
| | |||
|- | |- | ||
| <code>:s</code> | |||
| | | style="font-family: monospace;" | <code>:s hello world</code> | ||
| | | style="background-color: #151515; color: #fff; font-family: Verdana" | <span style="color: #dd3535"><b>[Security] <b>ExampleMan</b> says, "Hello world"</span> | ||
| | |||
|- | |- | ||
| <code>:c</code> | |||
| | | style="font-family: monospace;" | <code>:c hello world</code> | ||
| | | style="background-color: #151515; color: #fff; font-family: Verdana" | <span style="color: #475cff"><b>[Command] <b>ExampleMan</b> says, "Hello world"</span> | ||
| | |||
|- | |- | ||
| <code>:e</code> | |||
| | | style="font-family: monospace;" | <code>:e hello world</code> | ||
| | | style="background-color: #151515; color: #fff; font-family: Verdana" | <span style="color: #feac20"><b>[Engineering] <b>ExampleMan</b> says, "Hello world"</span> | ||
| | |||
|- | |- | ||
| <code>:u</code> | |||
| | | style="font-family: monospace;" | <code>:u hello world</code> | ||
| | | style="background-color: #151515; color: #fff; font-family: Verdana" | <span style="color: #b8863c"><b>[Supply] <b>ExampleMan</b> says, "Hello world"</span> | ||
| | |- | ||
| <code>:m</code> | |||
| style="font-family: monospace;" | <code>:m hello world</code> | |||
| style="background-color: #151515; color: #fff; font-family: Verdana" | <span style="color: #05b5ad"><b>[Medical] <b>ExampleMan</b> says, "Hello world"</span> | |||
|- | |||
| <code>:n</code> | |||
| style="font-family: monospace;" | <code>:n hello world</code> | |||
| style="background-color: #151515; color: #fff; font-family: Verdana" | <span style="color: #c68cfa"><b>[Science] <b>ExampleMan</b> says, "Hello world"</span> | |||
|- | |||
| <code>:z</code> | |||
| style="font-family: monospace;" | <code>:z hello world</code> | |||
| style="background-color: #151515; color: #fff; font-family: Verdana" | <span style="color: #bbd164"><b>[Service] <b>ExampleMan</b> says, "Hello world"</span> | |||
|- | |||
| <code>:x</code> | |||
| style="font-family: monospace;" | <code>:x hello world</code> | |||
| style="background-color: #151515; color: #fff; font-family: Verdana" | <span style="color: #b84f92"><b>[Procedure] <b>ExampleMan</b> says, "Hello world"</span> | |||
|} | |} | ||
=== Metacommunication === | |||
'''OOC''' (Out Of Character) and '''LOOC''' (Local Out Of Character) are methods to '''communicate''' with players directly, '''not as your character'''.<br> '''OOC''' is for '''pre/post-round chats''' and requires the '''O''' key. During the round, OOC is inactive.<br> '''LOOC''' is used during the game for '''local-area''' broadcasting and requires the '''L''' key. | |||
{| class="wikitable" style="margin-left: 0px;" | |||
|- style="font-weight: bold;" | |||
! Examples | |||
|- | |||
| style="background-color: #151515; color: #fff; font-family: Verdana" | <span style="color: #095fdc"><b>OOC: ExampleMan: Hello World</b></span> | |||
|- | |||
| style="background-color: #151515; color: #fff; font-family: Verdana" | <span style="color: #6699cc"><b>LOOC: ExampleMan: Hello World</b></span> | |||
|} | |||
=== Extra Help === | |||
Server-based abbreviations are often utilized. For a complete list of acronyms, see the [[Glossary]]. | |||
{| class="wikitable" style="text-align: center;" | {| class="wikitable" style="text-align:center;" | ||
|- style="font-weight: bold; text-align: center; background-color: chocolate; color: white;" | |- style="font-weight: bold; text-align: center; background-color: chocolate; color: white;" | ||
| style="width: 150pt; center;" | Abbreviation | | style="width: 150pt; center;" | Abbreviation | ||
| style="width: 319pt; center;" | Meaning | | style="width: 319pt; center;" | Meaning | ||
|- | |||
! AI | |||
| [[AI|Artificial Intelligence]] | |||
|- | |- | ||
! HOP | ! HOP | ||
| Line 319: | Line 487: | ||
| [[Chief Medical Officer]] | | [[Chief Medical Officer]] | ||
|- | |- | ||
! NTRep | ! NTRep/NTR | ||
| [[Nanotrasen Representative]] | | [[Nanotrasen Representative]] | ||
|- | |- | ||
| Line 329: | Line 497: | ||
|- | |- | ||
! Blueshield | ! Blueshield | ||
| [[Blueshield]] | | [[Blueshield|Blueshield officer]] | ||
|- | |- | ||
! Lethals | ! Lethals | ||
| Line 336: | Line 504: | ||
! Lings/Clings | ! Lings/Clings | ||
| [[Changeling]]s | | [[Changeling]]s | ||
|} | |} | ||
Further guidance is available from the [[guides]], from admins or mentors on our Discord channel. | |||
== What To Do Now== | |||
=== Things not to do === | |||
While this should already be pretty obvious, do not do the following: | |||
*'''Randomly kill people:''' While this is stated in the rules as not allowed, anyone who wishes to do this probably hasn't and won't read this guide. New players might think that the game objective is to kill everyone, but I cannot stress enough that it is not. | |||
*'''Get a job change:''' This is fine for experienced players, but if you have just joined the server, you should not go and get a job change to a role you have not unlocked and don't know how to play. | |||
*'''Report false antagonists:''' Please don't report people you think "might" be antagonists. Unless you have proof, please don't report them. You will most likely waste security's time and the time of the person you reported. | |||
=== Things you should do === | |||
*'''Have fun.''' | |||
* ''' | *'''Talk to other people''' on the server, and make friends with their characters in-game. | ||
*''' | * '''Make yourself known on the forums:''' The server is home to a group of players who make up the Paradise community, and we love to see new faces, so swing by and introduce yourself! | ||
*''' | *'''Try advanced jobs:''' Once you feel you have the basics of the game under your belt, don't be afraid to check the [[Guides#Job guides|job guides]] on the other positions available. It is more fun, and you might get to help the station! | ||
*''' | *'''Be an antagonist:''' After you've gotten the basics down, it might be time to try your hand as an antagonist. [[Game Modes|Here]] is the best place to learn the basics of the different game modes and how to play them properly. | ||
*'''Help out the game:''' If you're good with programming, drawing sprites, telling stories, designing maps, or updating wikis, we could use your help. Head over to the forums and chat with us. | |||
Most importantly, have fun! After all, That's what this is all about! | |||
Welcome aboard the NSS Cyberiad. Have an efficient and productive day! | |||
==Need More Guidance?== | |||
If you ever need more advice on gameplay or are unsure about any specific rules, we have the '''Mentor Help''' and '''Admin Help''' features readily available in-game. Generally, there's always someone online who can assist with your queries, so don't hesitate to ask. To access these options, press F1 and select Mentor or Admin Help, or navigate to the ''Admin'' tab and click ''Admin Help''. Choose your preference, type your message, and await a response. You'll hear a 'bwoink' sound when your message gets a reply, which will appear in the chatbox with a clickable link for any required follow-up. | |||
While you can use both options for any questions, some matters might be more suitably addressed to mentors or admins. | |||
''' | '''Mentor Help''' typically comes in handy when you need to understand something that wouldn't ordinarily be discussed in '''OOC''' chat without violating the IC in OOC rule. For example, if you've just spawned as an engineer and wish to learn about construction, Mentor Help is your go-to resource. Mentors can provide a specific answer or guide you to the relevant wiki page for more comprehensive learning. | ||
'''Admin Help''', on the other hand, is your first port of call if you notice someone breaching a rule or need admin confirmation to ensure your planned actions don't violate any rules.<br>Let's say you're an antagonist planning to wreak havoc by releasing the engine or detonating a bomb. We advise you to inform the admins '''before''' you proceed, allowing them to assess your plans. | |||
'''So, remember, our Admins and Mentors are ''always ready'' to assist when you're uncertain about anything. They're here to ensure your time on the server remains fun and enjoyable!''' | |||
Latest revision as of 08:44, 26 March 2024

Welcome to Nanotrasen and congratulations on your new career!
Space Station 13 (often abbreviated as SS13) is an engaging multiplayer roleplaying game.
As a participant, you'll assume the persona of a space station worker. Among the myriad of SS13 servers, Paradise Station stands out with its unique roles and diverse gameplay opportunities.
As a medium role-playing (MRP) server, Paradise Station encourages a balanced blend of in-character gameplay and narrative exploration.
As a newcomer, you might want to familiarize yourself with the Controls we use. Additionally, if roleplay is a new territory for you, we highly recommend browsing our roleplay guide. If any queries arise, feel free to ask them either on our forums or in our Discord channel.
The Server Rules
Please read the server rules.
The server rules help create an enjoyable atmosphere for all and punish users who interfere with the enjoyment of other players or adversely affect the community and server. Space Law largely dictates what you are and aren't allowed to do while playing.
We recommend that you read Space Law and Standard Operating Procedure, especially if you wish to play essential roles such as Security or Command.
Joining the Server

To get started with SS13, follow these steps:
- Download and install the BYOND client.
- Register for a BYOND account.
Afterwards, join Paradise via one of the following methods:
- Select the server from within the BYOND client.
- Click "Open..." located beneath the "Games" tab on the client's left panel, and manually input the Paradise server address:
byond.paradisestation.org:6666. - Press "Server" on the official website: https://paradisestation.org/
Tip: You can bookmark the server for easy access in future sessions.
If you've successfully connected to the server, congratulations!
Prior to embarking on your game journey, we suggest setting up your character next.

Character Setup


The Character Setup screen lets you personalize your character, encompassing name, species, and appearance.
This is also where you set your preferred roles for gameplay. More on this in the Occupation Preferences section.
Identity
Name: Choose a realistic name per the rules. Vary your name choice depending on your character's gender and species. As a Human, use a first and last name. Avoid comical or famous names. For random, lore-appropriate names, use the randomize option.
Gender: This alters your character's body type and scream voice. Options are male, female, or gender-neutral.
Age: This is only displayed on in-game security and medical records, and doesn't change your character's looks.
Species: The default is Human. Options like Tajaran, Vulpkanin, and Unathi exist.
Refer to the lore page for all playable species.
Secondary Language: Galactic Common is the primary language on SS13 and all crew members understand it.
Choose a secondary language like Tradeband, Clownish, or Gutter. Check Languages for language options and switching instructions.
Blood type: This determines the type of blood transfusion you would need.
Disabilities: Choose different disabilities here.
Nanotrasen Relation: Define your character's relationship with Nanotrasen. This is only for roleplay purposes.
Appearance Options: Alter your character's physical traits. Options vary based on species.
Flavor Text: This is your physical description and will show when players examine you in-game and should only contain information that other characters could see from a glance. Keep it brief.
Character Records
The Character Records screen lets you set your character's medical and security records, accessible in-game by Medical Doctors and Security Officers.
Use this as an RP tool to develop your character. Remember, these are official records, so keep the tone formal.
Your records do not belong in your flavor text.
Check the "Employment Records" to display your character's previous jobs.
Game Preferences
This section lets you tweak your games settings in order to get the most enjoyable experience. Some recommended settings to tweak:
- Window Flashing: Disables your game window flashing to white when flashed. Useful if you have epilepsy!
- Colourblind Mode: Lets you choose between deuteranopic, protanopic, and tritanopic colourblindness, adjusting the games colours to your needs.
- Parallax: Decreases or increases the level of detail and animation space has. Recommended to disable it completely on weaker machines.
- Ambient Occlusion: A shading method to make the game look fancier. Recommended to disable it completely on weaker machines.
Antagonists
This section lets you choose if you'd prefer to play as an antagonist in a round. Being an antagonist isn't guaranteed.
As a new player, you can't be an antagonist until you've played for a few days.
The non-antagonist roles include:
- pAI: You can rejoin the game as a Personal AI during observation or post-death. Won't happen without confirmation from you, so keep it enabled.
- Sentient Animal: If Xenobiology creates them, you can become a sentient animal when dead or observing.
- Positronic Brain: This lets you become a positronic brain when dead or observing, from which Roboticists can create a Cyborg or Artificial Intelligence.
Loadout
The Loadout screen lets you equip several items for your character. You get five loadout points to spend on various items like suits, coats, rocks, and much more! The possibilities are endless! Some items are restricted to occupation, however.
Saving your character
Use the "Save Setup" button to store your character, occupation preferences, and antagonist choices in the database.
Global Antag Candidacy
If you have any antagonist preference set to yes, the Setup Panel will have an option for ![]() . This option will allow you to be eligible for some antagonist roles you accepted, this includes round-start antagonists and auto traitors. Otherwise, the setting makes sure you aren't eligible for any antagonist roles while spawning in.
. This option will allow you to be eligible for some antagonist roles you accepted, this includes round-start antagonists and auto traitors. Otherwise, the setting makes sure you aren't eligible for any antagonist roles while spawning in.
Occupation Preferences

Your occupation is your most important choice on the server. It affects your station access, rank, authority, equipment, and purpose in life. The roles available to you are listed in the Occupation Preferences.
Job Assignment
Except for Assistant, all job preferences have four levels:
NEVER,
Low,
Medium, and
High.
These change how likely the server will assign you that job when it compares your preferences to other players. You may only mark one job High, but there are no limits otherwise.
Because of the diversity and range of jobs available, there are many ways to play the game. However, many jobs require a good knowledge of the game mechanics, the layout of the station, and how to use in-game tools and machinery. Because of this, the following jobs are recommended for new players:
- Assistant: The most basic of all occupations, the assistant has no authority and, generally speaking, no responsibilities. It's an excellent opportunity to learn the game mechanics, but your access is limited. Ask others if you can help; they'll usually be happy to show you around their department and help you learn the ropes. It also lets you practice roleplaying if you're still unsure about it. Unlike other roles, Assistant can only be set to
NoorYes. If Assistant is set toYes, all other roles are disabled.
- Cargo Technician: A basic yet practical job that is easy to pick up and will help you learn most of the game's controls. Working under the Quartermaster, you're tasked with ordering supplies and delivering them to the relevant department to ensure the station is well-equipped.
- Janitor: A simple but menial job that involves replacing lightbulbs, cleaning up messes, putting out wet floor signs, and then pointing them out to people who've slipped on the floor you just finished mopping. Your only responsibilities are to keep the station clean and well-lit, and it'll help you learn your way around the station and its various departments.
- Librarian: A very simple job that involves making sure the library is stocked, writing and running DnD campaigns in the back of your workplace.
- Bartender: A relatively simple job that gives you an excellent introduction to combining substances. The Bartender's job is primarily mixing and serving drinks to a thirsty crew. Drink recipes are available in Guide to Drinks. You'd be surprised at some of the stuff you can make, so try it out!
If you're interested in other jobs, browse the Job guides. Avoid any security, engineering, and command positions until you get the hang of the game. This is especially true of the Head of Security, Head of Personnel, Captain and Security Officer positions. (Jumping into a position you're not prepared to do is a guaranteed way of making people angry at you and possibly earning a job ban.)
Playing the Game
Great job! You've crafted a character and chosen a job. Before you jump into your new role, let's cover a few more aspects of the game.
Starting the round
A round begins with a brief period for players to chat and ready themselves. This is where your job preferences apply.
However, you may frequently join in the middle of a round. Clicking on Join Game! shows available jobs.
Once you spawn on the map, you'll start at the Arrivals Shuttle, announced by the Arrivals Announcement Computer or the AI. You can either proceed to your workplace or explore.
Click the for Map button in the top right corner of your game window for a station layout.
Also, click View the Crew Manifest to see who else is on the station.
The User Interface
The user interface might appear daunting initially, but understanding its elements will make navigation easier. The table below presents the elements in the example image.

| Icon | Explanation | Icon | Explanation |
|---|---|---|---|
Your Hands 
|
Your hands are used Individually. (See Your Hands & You) |
Mask Slot
|
Vital Slot to remember when air is sparse! This is for various mask types. |
Your Inventory
|
Left-Clicking this will open to show more icons let's go over them below |
Ear Slots
|
Mainly used for radio headsets, make sure you have yours equipped! |
Shoes Slot
|
This is where you wear any shoes (like Magboots) |
Head Slot
|
This is where you'll equip various helmets and hats |
Suit Storage
|
When you are wearing a "suit" you will be able to use this storage | ID Slot
|
When your ID is equipped here, you'll show off who you are to others because your character will pin your ID to your uniform |
Uniform Slot
|
Your main clothing slot, removing this will drop ID, PDA, and pocket contents! |
Belt Slot
|
Equipping a belt here can act as a smaller backpack like container for items, useful for Engineers |
Suit Slot
|
This slot is for exosuits, jackets, and other garments that go over your uniform. |
Back Slot
|
Your backpack will go here; you'll be able to store lots of things here |
Gloves Slot
|
An important slot for various needed gloves (Insulated Gloves, Medical Gloves, etc.) |
Pocket Slots
|
Two pockets for whatever you want easy access to |
Glasses Slot
|
The slot to equip your shades! | PDA Slot
|
Your PDA will go here, be sure to (see PDA for more info) |
| Icon | Explanation | Icon | Explanation | Icon | Explanation |
|---|---|---|---|---|---|
Intent
|
Intents define what some controls do (See Intent & Position) |
Status
|
There are various status effects in-game Mouse over them to see what they are |
Low "Air"
|
Depending on Racial traits, you'll see this warning when the air you breathe is low! |
Health
|
This indicator shows your current well-being | Pull |
You'll see this appear when pulling something, (Left-Click this to stop pulling) |
Low Toxins
|
Toxin levels are too low in this area! |
Hunger
|
You'll eventually get hungry while on shift, Make sure not to eat too much or too little! |
Resist |
Click this to resist being grabbed/cuffed, (if on fire, you'll stop, drop, and roll!) |
High Air
|
The Gas shown is too high in volume for you! (Toggle Mask & Internals!) |
Too Hot
|
The temperature is too hot for you! Scram! | Drop |
This will make you drop your currently held item | High Toxins
|
Toxins levels in this area are too high! |
Too Cold
|
The temperature is too cold for you! Scram! | Throwing On/Off |
Toggle throwing objects On/Off | Low Pressure
|
Outside Pressure is too low, you'll want a space suit, or you'll die! |
Action Buttons
Certain actions in the game can be quickly done using one of the buttons in the top right corner of your screen. When clicked and held, they may be moved around the screen or put into the Action Palette. Shift clicking a button will reset it to it's original position. Hovering over them will tell you what they will do once you press them.

Action Palette
![]() The action palette lets you store your action buttons and gives information about action buttons when hovering over it with your mouse. It will hide itself once you click on something other than an action inside of it, and changes color depending on if an action was added or removed from it. Alt-Clicking it will reset all action buttons to their original positions. Control-Clicking will give you a basic overview of the function of action buttons.
The action palette lets you store your action buttons and gives information about action buttons when hovering over it with your mouse. It will hide itself once you click on something other than an action inside of it, and changes color depending on if an action was added or removed from it. Alt-Clicking it will reset all action buttons to their original positions. Control-Clicking will give you a basic overview of the function of action buttons.
Controls
We suggest checking out the Controls page for essential information on controlling your character.
SS13's controls vary across servers. At Paradise Station, controls are keybindings that can be adjusted in the Character Setup before a round. Although the game can be complex, don't get discouraged!
Below are some basic mouse-related controls and an image of the default keybindings:
| Shortcut/Key Combo | Action |
|---|---|
| Pick up Items | Left-Click on target item (must be within reach) |
| Open Containers | Left-Click on the target Container or Backpack |
| Attack | Left-Click(with object in hand) Left-Click w/ Harm Intent |
| Using Consoles/Object | Left-Click the Console or Object |
| Perform CPR | Left-Click with w/ Help Intent on a "medically challenged" individual |
| Examine Object | Shift + Left-Click |
| Pull Object | Ctrl + Left-Click |
| Crawl into Vents | Alt + Left-Click See Item Interactions for more uncommon actions using Alt+LC |
| Point finger/Aim weapon | Press Middle Mouse Wheel + Left-Click |
| Access Someone's Inventory | Left-Click(Hold) on the target, drag the mouse to yourself, then release Left-Click |
| Buckle into Seat | Left-Click(Hold) on yourself, drag the mouse to a chair, then release Left-Click |
| Unbuckle (self/other) | Left-Click the chair you/someone is buckled into |
| Empty Backpack/Containers | While it's in your hand, Left-Click(hold) on the backpack, drag to a table or other surface, then release Left-Click |
| Climb over/ on top | Left-Click(hold) on yourself, drag the mouse to the obstacle, then release Left-Click |
In-game Communication
To interact verbally within the game, use the "say" and "me" command keys.
Open the say dialog with T to chat with others as your character.
The me command, activated with M, lets you perform specific actions for added depth.
Here's a brief overview:
| Key/Type | What you type in | What others see | Relative Notes |
|---|---|---|---|
T / Say
|
hello world
|
ExampleMan says, "Hello world" | You'll notice the chat system will automatically change your result based on certain factors (i.e., Punctuation, Drunkenness, Injuries, and Shock.) While other factors will only be seen by other players, like speaking different languages. Additionally, the game will capitalize the first letter in your input. |
T / Shout
|
hello world!
|
ExampleMan shouts, "Hello world!" | |
T / Ask
|
hello world?
|
ExampleMan asks, "Hello world?" | |
T / Whisper
|
:w hello world
|
ExampleMan whispers quietly, "Hello world" ExampleMan whispers quietly, "****o *****" ExampleMan whispers something. |
A) When adjacent, others see this B) When two tiles away, others see this C) three or more tiles away, others will see this |
T / Alt Language
|
:? hello world
|
ExampleMan articulates, "Hello world"" ExampleMan articulates, "Linkabota vech"" |
A) When others know your language B) When others don't know your language |
T / Specific Words in Language
|
well :? hello :9 world
|
ExampleMan says, "Well Idivyek world" | :9 is Galactic Common, so we're just swapping back to common after one word in another language |
T / Mixed Languages
|
:1 hello :? world
|
ExampleMan says, "Hello Bulobs" |
The outcomes could be: 1) Understand both languages / 2 or 3 ) Others could understand one word or the other 4) Both are in different languages. (This example is 2/3) |
T / Emote
|
*nod
|
ExampleMan nods his head. | Type *help in-game for available emotes.
|
M / Me
|
scratches his head and raises one brow.
|
ExampleMan scratches his head and raises one brow. | Notice I had to type the period for it to be there, and there wasn't auto-capitalization either |
hello world
|
ExampleMan broadcasts, "Hello world" | You can still use !/? to change up the method of saying it
| |
Alternatives
| |||
T / Me (Prefix)
|
! scratches his head and raises one brow.
|
ExampleMan scratches his head and raises one brow. | Notice when you use the prefix, you are using T instead of M
|
Runechat

Runechat means the text you see over characters when they talk and is good for in-person conversations, don't forget to still look at the chat box however! To turn it on/off, use the "Enable/Disable Runechat" option under your "Preferences" tab in-game.
Why don't I see it even though I have it on? There are some situations in which you won't see runechat text. Examples:
- If the speaker is using a radio channel and you are not in range of hearing the headset whisper.
- If they are whispering and you can't hear them clearly.
- If they are out of your normal vision range.
- If they were invisible to you (Out of sight or round a corner) when they said their message, you will not see it above their head even if they walk inside your vision range
What determines my text color for runechat?
- Typically, your hair color.
- For races without hair, blood color.
- For races without variations of hair OR blood color, its determined by eye color.
Headsets and Comms
Every crew member receives a headset on arrival, facilitating communication on specific frequencies. Wall-mounted intercoms are also accessible. See here for non-departmental channels.
To communicate on these devices, prefix your message with the right channel code. Each device can operate in "Hot-Mic" mode, transmitting any nearby chatter with prefixes.
| Headset | Intercom | Station Bounced Radio |
|---|---|---|
 Uses Prefixes Below Uses Prefixes Below
|
 To use a wall-mounted intercom, stand near it and use the To use a wall-mounted intercom, stand near it and use the :i prefix
|
 These prefixes can be used for any headset/radio in your These prefixes can be used for any headset/radio in your :right or :left hand
|
| Prefix | What you type in | What others see |
|---|---|---|
;
|
; hello world
|
[Common] ExampleMan says, "Hello world" |
:s
|
:s hello world
|
[Security] ExampleMan says, "Hello world" |
:c
|
:c hello world
|
[Command] ExampleMan says, "Hello world" |
:e
|
:e hello world
|
[Engineering] ExampleMan says, "Hello world" |
:u
|
:u hello world
|
[Supply] ExampleMan says, "Hello world" |
:m
|
:m hello world
|
[Medical] ExampleMan says, "Hello world" |
:n
|
:n hello world
|
[Science] ExampleMan says, "Hello world" |
:z
|
:z hello world
|
[Service] ExampleMan says, "Hello world" |
:x
|
:x hello world
|
[Procedure] ExampleMan says, "Hello world" |
Metacommunication
OOC (Out Of Character) and LOOC (Local Out Of Character) are methods to communicate with players directly, not as your character.
OOC is for pre/post-round chats and requires the O key. During the round, OOC is inactive.
LOOC is used during the game for local-area broadcasting and requires the L key.
| Examples |
|---|
| OOC: ExampleMan: Hello World |
| LOOC: ExampleMan: Hello World |
Extra Help
Server-based abbreviations are often utilized. For a complete list of acronyms, see the Glossary.
| Abbreviation | Meaning |
| AI | Artificial Intelligence |
|---|---|
| HOP | Head of Personnel |
| CE | Chief Engineer |
| CMO | Chief Medical Officer |
| NTRep/NTR | Nanotrasen Representative |
| HOS | Head of Security |
| RD | Research Director |
| Blueshield | Blueshield officer |
| Lethals | Lethal weapons from the Secure Armoury |
| Lings/Clings | Changelings |
Further guidance is available from the guides, from admins or mentors on our Discord channel.
What To Do Now
Things not to do
While this should already be pretty obvious, do not do the following:
- Randomly kill people: While this is stated in the rules as not allowed, anyone who wishes to do this probably hasn't and won't read this guide. New players might think that the game objective is to kill everyone, but I cannot stress enough that it is not.
- Get a job change: This is fine for experienced players, but if you have just joined the server, you should not go and get a job change to a role you have not unlocked and don't know how to play.
- Report false antagonists: Please don't report people you think "might" be antagonists. Unless you have proof, please don't report them. You will most likely waste security's time and the time of the person you reported.
Things you should do
- Have fun.
- Talk to other people on the server, and make friends with their characters in-game.
- Make yourself known on the forums: The server is home to a group of players who make up the Paradise community, and we love to see new faces, so swing by and introduce yourself!
- Try advanced jobs: Once you feel you have the basics of the game under your belt, don't be afraid to check the job guides on the other positions available. It is more fun, and you might get to help the station!
- Be an antagonist: After you've gotten the basics down, it might be time to try your hand as an antagonist. Here is the best place to learn the basics of the different game modes and how to play them properly.
- Help out the game: If you're good with programming, drawing sprites, telling stories, designing maps, or updating wikis, we could use your help. Head over to the forums and chat with us.
Most importantly, have fun! After all, That's what this is all about!
Welcome aboard the NSS Cyberiad. Have an efficient and productive day!
Need More Guidance?
If you ever need more advice on gameplay or are unsure about any specific rules, we have the Mentor Help and Admin Help features readily available in-game. Generally, there's always someone online who can assist with your queries, so don't hesitate to ask. To access these options, press F1 and select Mentor or Admin Help, or navigate to the Admin tab and click Admin Help. Choose your preference, type your message, and await a response. You'll hear a 'bwoink' sound when your message gets a reply, which will appear in the chatbox with a clickable link for any required follow-up.
While you can use both options for any questions, some matters might be more suitably addressed to mentors or admins.
Mentor Help typically comes in handy when you need to understand something that wouldn't ordinarily be discussed in OOC chat without violating the IC in OOC rule. For example, if you've just spawned as an engineer and wish to learn about construction, Mentor Help is your go-to resource. Mentors can provide a specific answer or guide you to the relevant wiki page for more comprehensive learning.
Admin Help, on the other hand, is your first port of call if you notice someone breaching a rule or need admin confirmation to ensure your planned actions don't violate any rules.
Let's say you're an antagonist planning to wreak havoc by releasing the engine or detonating a bomb. We advise you to inform the admins before you proceed, allowing them to assess your plans.
So, remember, our Admins and Mentors are always ready to assist when you're uncertain about anything. They're here to ensure your time on the server remains fun and enjoyable!